
What to do when you adore the picture/line drawing of a pattern, only to sew up a muslin and find you look utterly ridiculous?
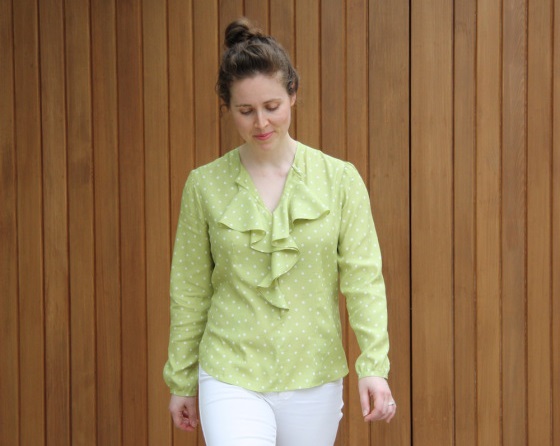
The pattern is Marfy 3449, which I’ve adored since laying my eyes on it. According to the Marfy catalogue it’s “A flowing, collarless shirt with a ruffle down the centre at the front, satin trim at the side, and sleeves gathered at the wrists and slightly at the shoulders.”

My ridiculous muslin was sewn up in a specially bought hot pink polyester because it was virtually identical in weight and drape to the fabric I envisaged this being made up in. Had I been invited to a dress up party where I would have like to have gone as Joan Collins, a pirate or someone from Days of our Lives, this would have been utterly fabulous.
Alas, that was not my intention. It did however, fit me perfectly through the shoulders and the bust. What this muslin doesn’t show is the gathered cuff – I recall feeling more OTT that this WIP instagram snap would imply!
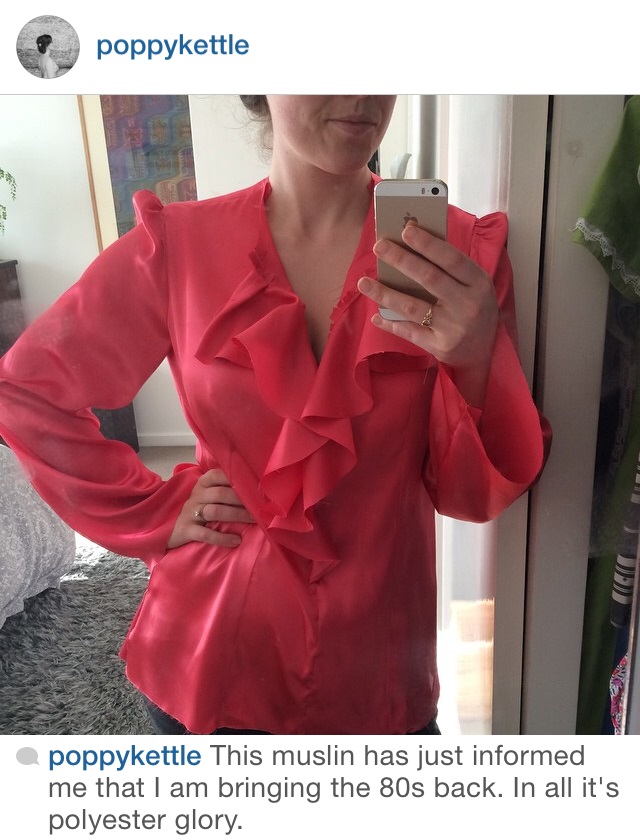
I figured if I toned down the sleeve cap height (I’ll admit – this effect was enhanced by the body of my chosen fabric, and the fact that I’d pushed all the ease up to the top of the sleeve cap), slimmed down and removed the bell cuff on the sleeve (which once elasticated looks exactly on me as it does in the sketch) and raised the level of the front split by 5cm (warning – this one is very low cut – right down to below the root of my bust) then I could probably handle it.
Once I adjusted the fit of the bodice by my normal Marfy adjustments (taking it in below the bust to account for me being two different torso sizes) I compared it to one of my all time favourite and regularly worn make – the Blue Blotch Blouse. Many times fitting issues with woven clothing only become apparent after a bit of wear, and it was clear to me that whilst that blouse is a very comfortable garment, it did need some more width across the shoulders (I’m broad). This Marfy pattern had that, which was great.
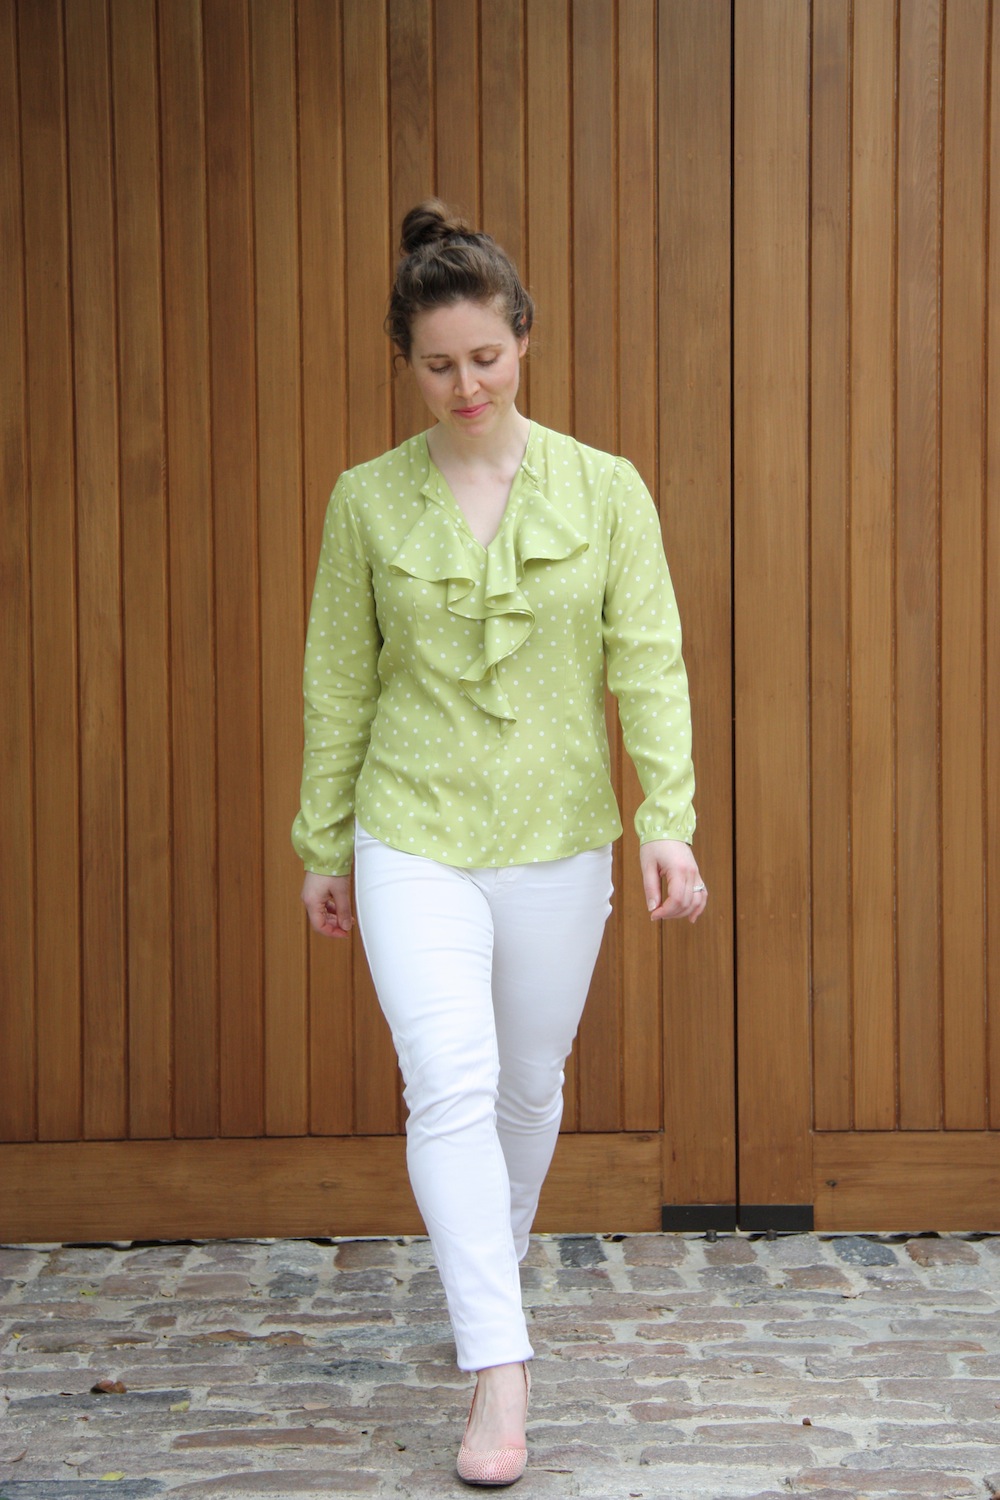
I hesitated on my ridiculous adjusted muslin for nearly two weeks on whether or not I would proceed with the real thing, and I’m SO glad I did. I really love the end result! The flounce makes me smile every time I look down or catch it moving as I walk.

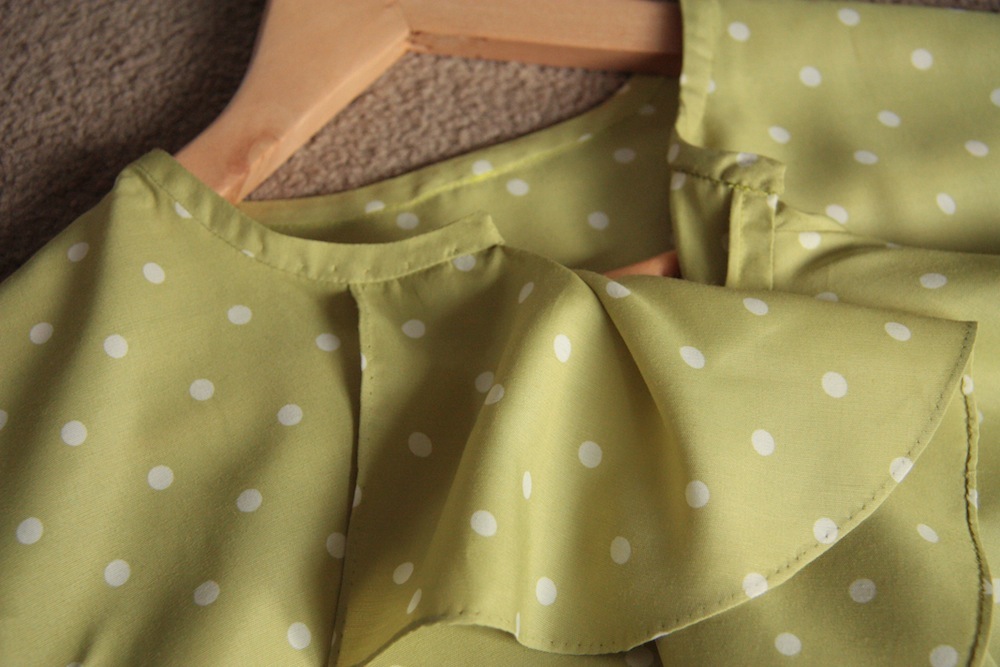
The fabric is one I’ve been wanting to sew with for over a year. It’s a pretty substantial silk twill fabric, chartreuse with off-white polka dots – cool to the touch and with a subtle matt texture. I scored this at one of the fabulous End-Of-Financial-Year-Sale’s at Stitches to Style a few years back.
The hem of this shirt (which you can’t see from the sketch) is straight, split at the sides and the front is slightly shorter than the back. I altered this to be curved and with more of a pronounced ‘hi-lo’ hem.
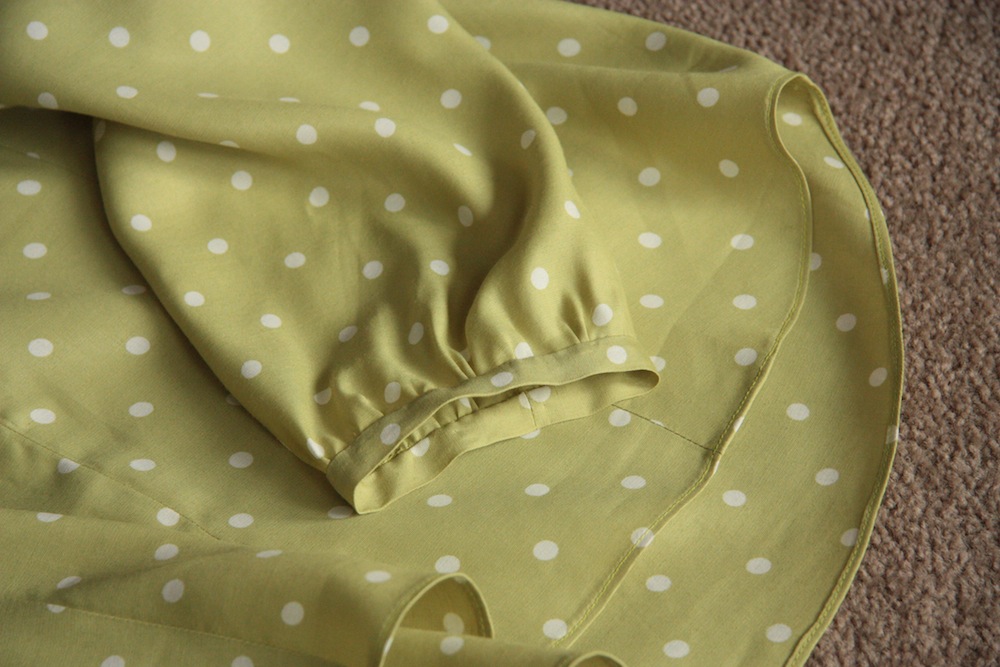
The ruffle – a challenge to finish because of the weight and thickness of my fabric – I chose to sew a hand-rolled hem on. I used this youtube video to get me started – it’s a really simple and (if you like hand sewing) enjoyable thing to do. I haven’t quite yet mastered my rolled hem foot on my machine on straight edges – so no way was I going to risk it on a shaped edge!
How well the ruffle sits depends solely on how you clip the seam allowance (Anne from Clothing Engineer has a wonderful post on how clipping can affect your flounce/ruffle here). I clipped every 7mm or so along the length of each ruffle – and it really does sit wonderfully.


The sleeves I copied from another Marfy blouse pattern instead of adjusting the sleeve cap, because they were also a lot wider than what I felt comfortable in. The original sleeves recommend finishing the cuff with elastic (to enhance the bell shaped cuff – a feature I really like in principal but not so much on me in reality), I drafted a simply slim cuff that I can pull over my hand easily.
Otherwise this blouse is finished with French seams except for the front seam – a challenge because I knew it would be visible. I’ve bound each side to enclose the heavily clipped seam allowance. A bit heavy, but effective.

For the neckline I initially thought bias binding, but drafted a thin, curved collar so it would sit flat. I suspect that I am missing a pattern piece for the neckline, as the back bodice pattern piece has a notch around the neckline indicating that something should be matched to it – and I only had pattern pieces for the front, back, sleeve and ruffle.

Also – the ‘satin trim’ down the side is not a pattern piece, but rather a DIY addition. I left it out.
Another work horse blouse, complete – I’ve already worn this to work a few times and I love it both tucked into skirts and untucked over pants. The silk does crush easily, so it’s not a travel-suitable blouse – but it’s so substantial that it feels like it could withstand a LOT of wear, much more so than the delicate silk/cotton voile I made the Blue Blotch Blouse in. Much to my devastation, I think that blouse will only last another year… massive sad face!

Oh, what a perfectly draping flounce! I love this blouse. It’s so well done and so pretty!
Thanks Nayla – I love it too!
Polka dots and that gorgeous grass green – oh, such a pretty blouse! So glad you made it work!
I was ever so doubtful for quite a while, so I’m over the moon to be so happy with the final result. Thanks – glad you like it!
Beautiful Melanie. I love hand stitching and I am going to try this rolled hem method on a similar Burda pattern. I have put it off because I am not that great at using my rolled hem foot.
It’s a really wonderful technique, Marjorie. And you can get it so small! The stitches on mine show through mostly because the fabric is quite substantial and I wanted to force it into a teeny hem. But I’ve tried it on other fabric types and if you’re very particular, it’s virtually undetectable until you turn it over. Glad you love it too!
Oh Marfy! Fabulous blouse – I am glad you have made it – and adjusted to your own wishes. You look great in it!
Yeah, I really do love Marfy ;) Thank you – glad you like it!
Oh the details. I love your spotty top – perfect fabric and perfect ruffles and not at all pirate like. I hope you kept your muslin though – you never know when you will need a pirate dress up. I always find your handstitching so inspiring – I don’t have your patience or skill, but I do aspire – and it’s great to see your pics.
No pirates in sight! Thank goodness! I can totally see you in a blouse like this, that’s more boxy than fitted. The flounce pattern piece clearly is the star here. Thanks Debbie!
Gorgeous! Love your fabric choice, and the ruffles hang beautifully.
Thank you Tia Dia! I’m still gobsmacked at how gorgeous your daughter looks in that black shantung confection of a party dress!
The finished blouse looks so much more refined than the billowy-sleeved muslin! The slimmed down sleeve was definitely the way to go. This turned out so beautiful! I really wanna steal your fabric… ;-)
And thank goodness for that. Slim sleeves all the way! I love the fabric to bits, but what I like most is that I got it at 70% off! Whoohoo!
Wonderful outcome. Making the muslin really paid off.
Thanks Vicki! It certainly did. Although that muslin nearly stopped me from making the real thing… It was really touch and go at one point! haha :)
Beautiful blouse! The fabric is so fun!
Thanks Jean! I do love it rather a lot :D
Lovely blouse. Your perseverance paid off big time! Thanks for all the tips on your finishes.
Thanks Cissie! :) x
I LOVE this! It looks gorgeous on you! The color, the fit, the ruffle… perfect.
Thanks Sallie! I love it to bits :)
Good save! Amazing what a difference the sleeve shape makes. And I wish I had your skill at rolled hems.
Yep, those sleeves just tipped the balance into too-much-going-on territory. Thanks Catherine! :)
It looks so beautiful! What a difference fabric makes. I personally despise polyester, the dullness of the color, the fact you freeze in it when it’s cold but suffocate in it when it’s hot, and it’s creeping up all over the place, yuck! Your blouse came out amazing you did a wonderful job! You know it may also look great in silk chiffon with a matching silk camy.. I might try it although I don’t think I sew as well as you do, great job!
Yeah poly is revolting stuff on its own, but it certainly has its uses! I would be lying if the thought of sewing it up again in a different silk type hadn’t crossed my mind… LOVE the idea of a semi-sheer blouse with a matching cami! Genius! It’s actually a very simple blouse to sew – 5 pattern pieces and no closures. Apart from getting a smart finish on the ruffle which could definitely be challenging, I’d highly recommend it! Thanks Ines :)
I’m excited to make blouses next spring – yours is inspiring! The flounce is very elegant. How did you bind the front seam?
I attached the ruffle/flounce to each of the two front sides, clipped those seam allowances then sewed my binding down on top, ironing it off to the seam allowance side. Then I sewed the two front pieces together (after carefully aligning and basting in place), before finishing off the binding by folding it around and sewing in place. Like I said, it is a wee bit bulky, but it negates the need for a facing and completely encapsulates the clipped seam allowance. Thanks Morgan!
Gorgeous and as always your attention to detail and use of beautiful techniques warms the cockles of my sewing heart. I have been wanting to do a hand rolled hem for ages and this may just push me over the edge. I am sure you will get years of wear over this one.
Thanks Janelle! I sometimes get really frustrated at the pace at which I churn out a wearable garment, but I’m just so happy with the finished thing I can’t complain. Slow sewing is definitely the type of sewing for me!
I dream of ruffles such as these. One day they will be mine! Thanks for the tip. You look lovely! :D
They certainly are the best of ruffles. There’s a secret dart hidden in them, which really helps! Marfy draft the best patterns, I swear. Thanks Jo! x
Mel, this is the anti-Joan blouse now! Love this ruffle hard- that hand rolling is both intriguing and slightly terrifying. But what a finish (and voluminous ruffle- though that sounds kinda suss…)
It turned out better than I thought it might – it was touch and go for a long time there!! But nope, one terribly wearable blouse has just been added to the wardrobe vault. Thanks Amanda! x
Wonderful blouse. So good that your pirate muslin didn’t put you off but showed you what to change. Your hand sewing is inspiring, as always.
Thanks Elle, sometimes taking a pattern alteration gamble really pays off!
You look so lovely in this! I’m going to try that hand rolled hem on a silk tank I’ve got on my project list.
Oh absolutely. It’s a winner of a finish. I’ll be looking for opportunities to incorporate it in future, now! Thank you! x
What a massive improvement over the muslin. Cute!
Thank goodness for muslins. Thanks Shams!
How beautiful! and how clever of you to see through that awful muslin to the potential hiding within! I had a pirate blouse in the early 90s – made it myself with a Burda magazine pattern – looking back it was hideous although I loved it at the time – not a good look.Fortunately yours is nothing like that!!
Great job! What a cure blouse! I never would have guessed from the muslin or pattern picture that it would be something I would like. The power of the polka dot!
Polka dot perfection.