
 |
| Jeffery’s handy-work, from the amazing Made by Hand |
Buttonholes have always instilled a bit of fear in me. Probably the whole thing around having spent a lot of effort in finishing a garment, only to slice holes in it. I’ve been racing against the clock to finish this jacket in time for the August 31 deadline, but I really want to try hand worked buttonholes, like the ones pictured above. Buttonhole porn if there ever were such a thing, I’m sure.
Seeing as I’m now no longer having lessons (with my seriously talented teacher) and can’t just roll up on a Saturday afternoon with all my questions any more, I went about some hand worked buttonhole research.
If you aren’t acquainted with Made by Hand – the Great Satorial Debate, a fabulous and incredibly instructive blog by Jeffery, then I highly recommend you pay a visit. He has a bit of a thing for hand worked button holes and I can totally see why. The more time I spend reading (and re-reading) his blog, the stronger my own buttonhole obsession gets. Oh yeah, and his blog is also a fabulous wealth of other couture tailoring information. Drool.
There’s multiple types of hand worked buttonholes, with tailors around the world apparently jealously guarding the secrets to their particular techniques – I’ve got permission to pull a few images from Jeffery’s website for comparison to show.
Firstly you have the key-hole style buttonhole – which I suppose could be classed as being ‘utilitarian’ (if couture clothing could be described as such) because it’s practical and functional design is key in ensuring lasting wear from the garment, especially if the button being used has a shank. I love how you can see how precise each individual stitch is!
 |
| Keyhole buttonhole, from Made by Hand |
Then there’s a more delicate version, left for jacket lapels where it’s unlikely it will ever be used, but looks stunning none-the-less:
 |
| The ‘Milanese’ buttonhole, from Made by Hand |
Because I adore Jeffery’s work, I’m going entirely off his recommendations for supplies, and I’ve been waiting on various orders from around the globe to arrive that are transporting necessary hand worked buttonhole making goodies. I’m talking:
Gimp. Specifically, Agreman Gimp (made by Gutermann). A very strong thread used to reinforce buttonholes. It’s tricky stuff to get hold of, and there are two online sources that I can find:
– The Lining Company (UK)
– Kenton Trimmings (UK)
The latter won’t post to Australia though, so I went with the former.
– WAWAK Sewing (US) *update – new supplier!
Buttonhole Twist. The word is that Seta Bozzolo (literally ‘silk cocoon’ in Italian) silk thread from Italian Thread maker Cucirini Tre Stelle is the best to use. Some online suppliers if you’re interested in trying your hand:
– La Rosa Blue (Italy)
– Carmen Warehouse (USA)
– Tristan Italian Threads (Canada)
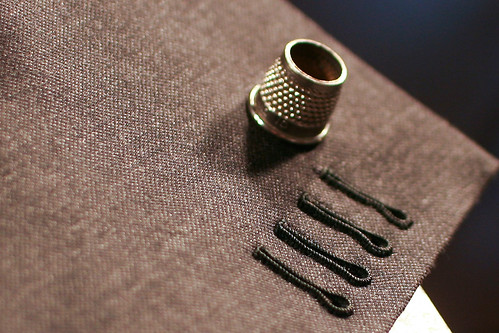
I bought mine from Tristan (it arrived really quickly too!) and spent quite a long time just admiring the gorgeous sheen of the silk before threading up. When I went into Buttonmania to order some fabric covered buttons I noticed they had Gutermann silk buttonhole twist in stock – I bought some in the closest colour to match as well ($2.50 for 10m):
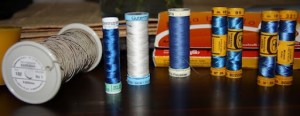
The silk comes in 10m lengths, which is apparently due to how the silk fibres are handled in the production process. The gimp is a giant 100m spool and it comes in a vast array of colours – I ended up choosing a neutral light brown. For visual reference I threw a standard 100m thread spool in there as well.
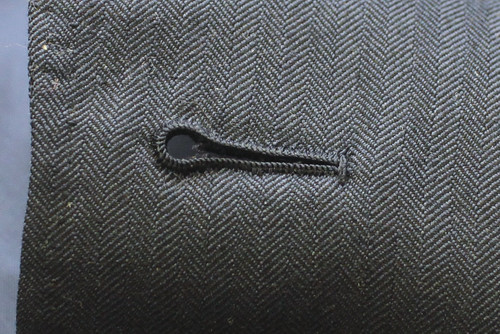
I’ve been practising these all weekend, starting with numero uno:
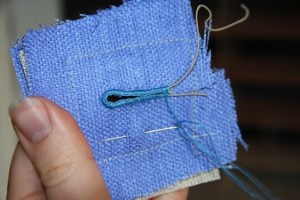
It’s certainly not something I’d feel comfortable parading in front of Claire Shaeffer, but it’s a starting point. I started on the bottom right and worked my way around clockwise – it’s pretty evident to me the second half is a lot nicer!! Half the trouble is knowing how far to ‘bite in’ with your stitches; unfortunately I’ve also managed to stretch the fabric out, presumably when pulling my stitches tight – which you can’t really see in the photo.
The Seta Bozolo silk thread is a dream to work with (once you’ve run it through some beeswax and ironed it in between some grease-proof paper – the first time I’ve tried this and it makes handling and sewing with silk thread a hassle-free experience). The Gutermann stuff is nice too but a bit thicker.
Maybe one day soon I can have mine looking like Jeffery’s (in the picture at the top of this post). Just. Ahmazing.
If you’re keen to try your own hand worked button holes – here are the resources I used:
Made by Hand: here, here, here, here and also here
Frabjous Couture
The Cutter and Tailor (the best instructions I’ve come across yet)
A Tailor Made It
Paco Peralta
Vogue 8333 Instructions
Couture Sewing Techniques (book) by Claire Shaeffer

What a fabulous, informative post! Thanks for sharing all your research and I look forward to sering how your buttonholes progress.
Fabulous post!! Thanks for sharing all of your research – you are very generous. I like your first attempt – can't wait to see the jacket.
so glad you posted this! i'm making a tailored winter coat soon and have decided to do handworked buttonholes. you just did all the research for me! i look forward to seeing how yours turn out.
Oh lovely! Definitely do practise before you try the real thing though… it takes quite a bit of getting used to! The end result is really strong and robust too – I was a bit surprised! Glad I can help out, and I'm looking forward to seeing your jacket!
Thanks Lara :) More to come soon!
Thanks Evelyne – I was quite pleased with the first attempt, but I think I must be missing something with the technique though as it's rather different to the ones I'm trying to emulate. Ah well!
Wow, you're more ambitious than me when it comes to techniques! I'm eagerly awaiting seeing the final thing, since this practice one already looks great.
Wow, those buttonholes are beautiful! Yours really look good! Good luck with the rest of yours!
Oooooh… fancy! I am so excited to see your jacket now! And thanks for all the helpful hints. I don't think I am quite there yet, but I totally have a project I want to make (in the distant future) that totally deserves hand worked buttonholes. Yours look really good so far – can't wait to see more!
Thanks for the great info and for introducing me to such a wonderful blog. Can't wait to see the finished jacket!
I think your handworked buttonhole is looking fabulous and besides, practice makes perfect! I've had to do quite a few at work for some of our costumes to be "Historically" correct and it's been great seeing my improvement!
This is a great post – thank you for the relevant links! I am still debating over buttonholes for a green coat I am making.
What beautiful buttonholes, Poppykettle!
These do look very impressive.
Yikes – the work! But I'm sure they will look lovely
That looks gorgeous, especially for your first attempt!! Thanks for the links too :)
Thanks for sharing your findings on buttonholes! Such a tiny little thing but demanding lots of precise work :) Looking forward to seeing the jacket finished!
Stunning! Good on you for pushing on with these close to deadline too :)
Oh man, those sure are beautiful buttonholes! I'm afraid I'd never be able to do something like that.
Thanks Rachel – I can't wait to see what you make first from Gertie's book!
Thanks Ginger! :)
Glad I could be of some assistance :) It's all finished now… I just have to get some pictures before the end of the week!
Jeffery's work is pretty darn incredible. I think I have a blog crush ;)
Good to know even things like this get better with practise. And nice to hear someone else making them too! I'd love to see some pictures :)
It's a tough choice, isn't it! Thanks Esz :)
Thanks Shams! :)
HiThank you for your kind words.You said you started at bottom right and went clockwise. The way I look at it, if you started bottom right you would have to have gone counter-clockwise, which is backward. that might explain why your purl looks off. Try starting bottom left and working clockwise and let us know how you make out.
Thank Y’all…