


I loath hemming. Hate it. And I’ll tell this to anyone who’s willing to listen.
So when it dawned on me that in going ahead with my birthday dress (a copy-cat of this Eva Franco lovely) I’d just committed to sewing a full circle skirt, in a super slippery and lightweight fabric – well people, to use a well-loved euphemism – I practically choked on my weet-bix.
Practise runs with scrap fabric left me with a wavy edge that pressing just couldn’t fix, time and time again. That curved skirt with its hem on some form of bias 99.9% of the time needed stabilising, pronto!!
A quick internet search and I found this tip by a fellow Burdastyler. I don’t know if they ‘invented’ it per se, but hey, this is the internet – not a dissertation. I bought a strip of Belt Backing (not the fusible kind) from Clegs that is made of some kind of polymer, is quite stiff and if you look closely below – has a woven mesh/matrix configuration.
Fellow Melburnians – you can pick some of this up at Clegs, and it’s $2.85 for a meter. Frustratingly, I couldn’t get this in a longer length, so I was forced to sew in sections. I will be keeping a keen eye out for something similar that I can buy by the meter in future though!
The best thing is – its pretty easy to use and it makes hemming 6 meters of curved fabric a really quick thing to do. I’m using a scrap of fabric cut on the curve so you can see just how well this works.
1. Firstly I needed to chop off the edge where all the fibres are fused together so we can get to the good stuff:

2. Then I grabbed my quick-unpick and pulled off the bottom few fibres from the Belt Backing. How many you pull off (ie, the length of the exposed fronds) will determine the depth of your hem, from the stitch line to the fabric fold line you’ll see on the right side of the fabric.

Once you’ve dislodged the ends of a few of those fibres, I found I could just pull them out. I ended up taking off about 5 of them, giving me just under 0.5cm to play with.
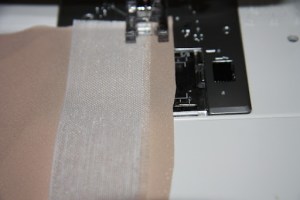
3. Line your Belt Backing up with the fabric’s edge, right side up. I’ve allowed the standard 1.5cm seam allowance here, and I want the first fibre parallel to the edge to be about 1cm away. Sew along as close to the mesh as you can – ensuring your machine’s needle doesn’t stray across into the unpicked area of the belt interfacing. It won’t be fun if you let that happen.
The little teeth you exposed by unpicking a few of the fibres are quite strong (they’re plastic) and even though I was using a micro needle (the kind for tightly woven fabrics) it never got stuck.
3. Carefully, making sure you don’t dislodge the teeth from your fabric, trim the fabric up really close to the teeth. The benefit of having a curved edge here comes into play – I don’t really need to worry about it fraying!

4. Sewing back the way you just came, turn the belt backing over so all your fabric is on the left side (and the wrong side is facing up). The belt backing is providing support for your fabric so it doesn’t get sucked down into the fiery depths of feed-dog hell, and holding your hem fold in place, all at the same time. Sew down the middle of your exposed belt backing teeth.

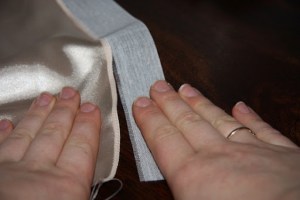
5. This part is important – pulling willy nilly could potentially stretch out your bias and make it ruin all the work you’ve just done. I found that out the hard way. So gently, holding the fabric and belt backing with your hands parallel to one another, pull the belt interfacing out of your hem.
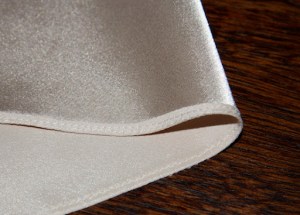
6. It may still look a slightly rippled in some places, but once you’ve pressed the hem flat, this disappears.
And now you have a perfectly smooth, unstretched, impossibly small hem. Woot.

This looks amazing. I read about this technique in a magazine recently and wondered who would go to that effort…you, obviously! And all that work has paid off. The hems are beautiful. I can't wait to see the finished dress.
oh WOW!!!! I love the fabric! I'm so happy that you got it pleated! I never think to do anything luxurious with my fabrics, not only do I feel I'm still not good enough to sew expensive fabrics (though this might just be insecurities on my part) but I'm even more afraid of WEARING expensive fabrics. what if I make a beautiful silk shirt and get soy sauce all over it? (I'm very partial to asian food) anyway, I love this method! I actually saw this a burdastyle a while ago as well and was very impressed. I only couldn't figure out what she was using and where to get it. I now know it's belt backing (but I still don't know where to get it). I tried using a narrow hem foot today as I was sewing with this polyester dupioni – like fabric and almost threw my machine out the window in frustration. I really don't understand how dare they call it a narrow foot hemmer, it sometimes does what it's supposed to do but all the other times if just fold part of the fabric over and makes a mess,when I made my Cinderella dress it also had a circle skirt and I was dreading narrow hemming so much that I used a scallop stitch in the end and just cut the ends off. it turned out beautifully and I avoided narrow hemming.Omg I've never written a comment this long!I can't wait to see what you're dress will look like! you always make such professional and well thought garments!
Now I get it! I had read this somewhere before but I needed more visuals to make sense of it. I have a gorgeous georgette to make up and was going to use the over locker, but this will be much more professional looking. Love the style, what pattern are you using?
Clever! Your hems are beautiful. I hate narrow hemming so I'm bookmarking this one.
Oh so very very clever! thanks for this great tip.
Very tricky! I've seen this before and wondered how it would work in real life.
Oh, this is a revelation! I have totally disregarded patterns because the hem was beyond my skills- I think a dor has just been opened for me. Thank you so much!
Narrow hems don't seem scary anymore! Thanks for sharing this tip!
I have seen this tutorial before – it seems like it could be a handy one to have in one's arsenal! I also hate narrow hemming – and don't even get me started on those stupid rolled hem presser feet! Yours turned out beautifully. I can't wait to see the dress – it looks beautiful! And did you get all that fabric pleated?!? So cool…
I'm in awe. Amazing!
Brilliant! Now I just need to find some of that belt stuff…
Yup, I've been called a nutter before… :) Anything for a good end result I say!
Hi Jess – you prob saw the same technique on Burdastyle as I did! I had a massive lightbulb moment when I saw this. See if you can't find something similar in the notions section of your favourite sewing shop – it really does work a treat, and it's quick too!!
Oops… Jess = Kess! Silly me :)
This will work perfectly for you :) I'm plannig to do the same thing to a georgette in an upcoming project! I'm using the bodice of McCalls 5975 and a circle skirt :)
Thanks Catherine :)
No Problemo :)
Like a charm! ;)
Spotlight has it by the metre. It's usually near the boning in the same Birch yellow box.
Oh fabulous!!!! Thanks for letting me know! :)
OMG – you are amazing. Would never have thought of doing this – I love your tenacity when it comes to couture. Thank you so much for enlightening us all with your post. You are a kind sharing person, for which, I am grateful. Can't wait to see your dress, it will be perfect, I'm sure.
Holy moley that looks so delicate, I can't even comprehend what is going on! But great technique, i'll keep this one tabbed as a favourite for future references. Great hem!!! Love the dress :P
WOW!!
Wow this looks fantastic. Thank you – considered yourself bookmarked!
Wow
Very nifty! Pinning now.
WHERE CAN I GET THE BACKING..IVE BEEN LOOKING EVERYWHERE!!!!!!
I can’t help you I’m sorry Patty – even my source has stopped stocking it! I did have a friend utilise really stiff horsehair canvas instead – that might work for you?