

The day of muslins! After putting mine together at home following Susan’s instructions, I was more than a little flabbergasted at just how much of a difference sewing with the seam lines as your guide (instead of the edges of the seam allowance) makes. The best ever princess seams and the best ever set in sleeves I’ve sewn yet – and it was in calico, for goodness sakes!!!
We start out with Susan showing us the French Jacket she made for her Threads magazine article (Oct/Nov 2005, issue #121), discussing the construction methods and the garment’s distinguishing features – the construction of this garment really is a subset of techniques in its own right.

For example, the sleeve is a 3 piece sleeve with a seam down the front side – allowing you to get that rounded look with the armscye seam going straight up, much like in this photo. The only departure we will be making from the garment’s produced by Chanel is that our sleeve buttonholes will be decorative, rather than functional. This is mainly because hand worked buttonholes take 6 months of solid work to master apparently – and I can believe it.

We talk sizing – apparently measuring your bust size then selecting your pattern size based on this is wrong – the right way is to measure across between your armpit creases (the little bit of skin we all have that allows us to move our arms about) – the ‘high’ bust. “If you measure 14″, then you’re a size 14. If you measure 13.5″, you’re a size 12” says Susan. I make a mental note to try this on my next muslin… it would probably mean I’d be required to do a FBA though. le sigh.
Of course all of us have selected our muslin jacket size based on our bust measurements, with varying results. A few lighthearted grumbles from my fellow jacketeers on how lousy the fit from pattern companies is causes Susan to jump to their defence – patterns are a starting point, something that is only slightly better than nothing to give us inspiration, the style and design lines, she says. How could 8 standard sizes possibly cover all the body shapes in the world combined and fit? We have unrealistic expectations that patterns should fit us straight out of the packet, and we shouldn’t direct our frustration with fit in this manner. And I’ve got to say, it’s a sentiment I share.
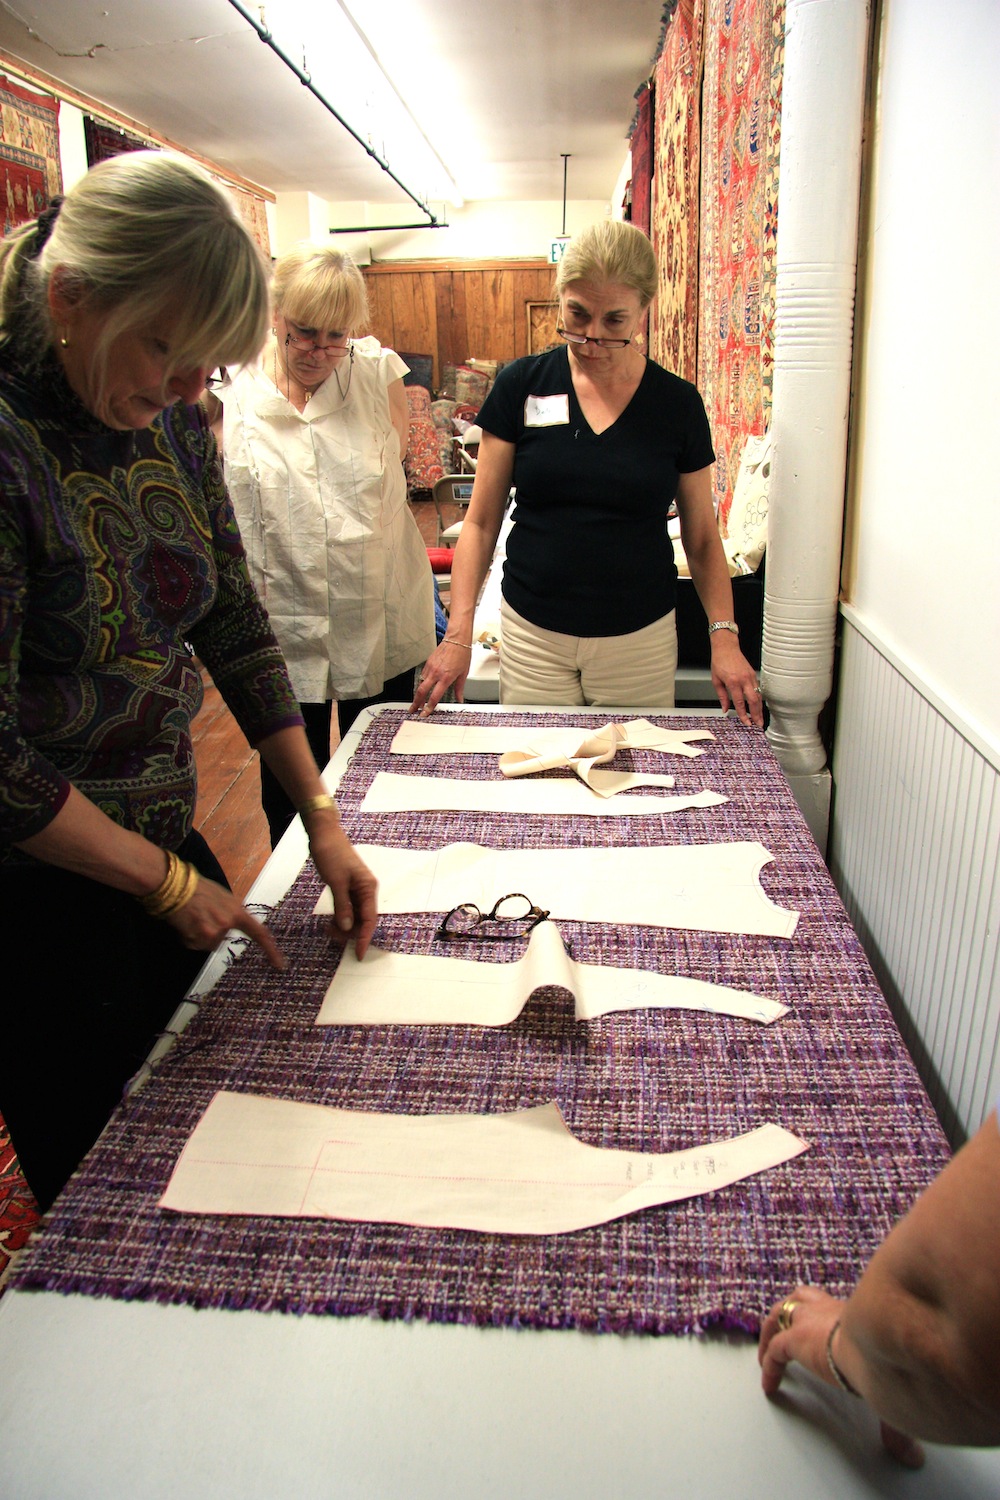
This in turn highlights the importance of the muslin – at which point we get stuck into having Susan fit each of us into our mock-ups. This is what I’ve come to see – I think we can all agree that fitting is the nemesis of any home sewing enthusiast… it’s something you need to practise a lot of and learn through watching in order to get the knack of. Susan’s expert knowledge really shines through here and nobody escapes making changes – some people have minor adjustments, one lady had her entire jacket rebuilt by Susan from the ground up (which took several hours), but it was a fascinating process to watch. In fact, I can entirely appreciate why some people do get so mad at the fit of patterns as a result. At this point the sleeves aren’t part of the picture – it’s all about the bodice.
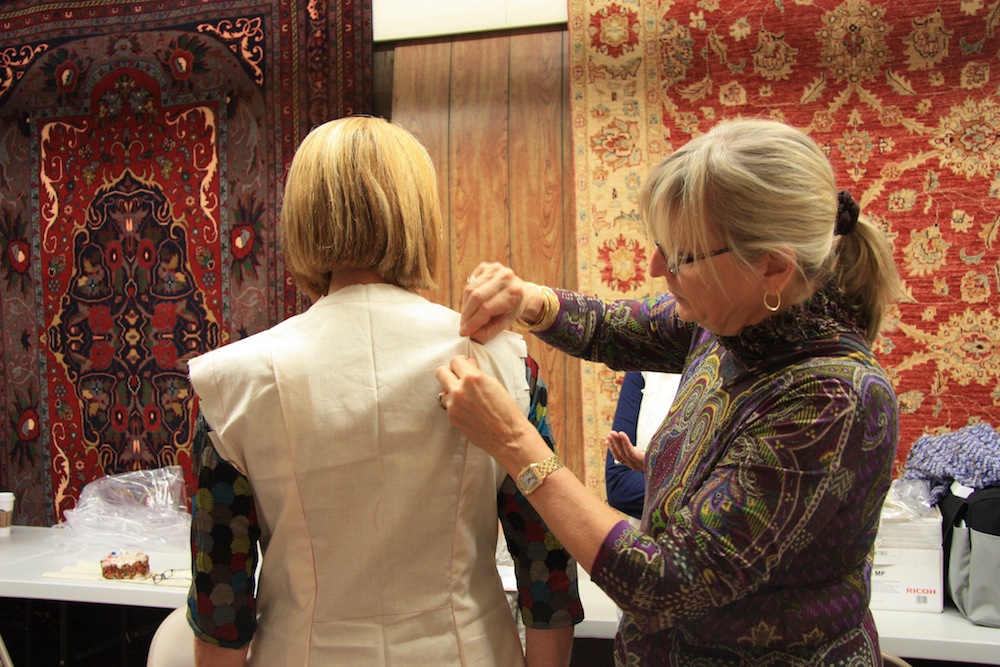
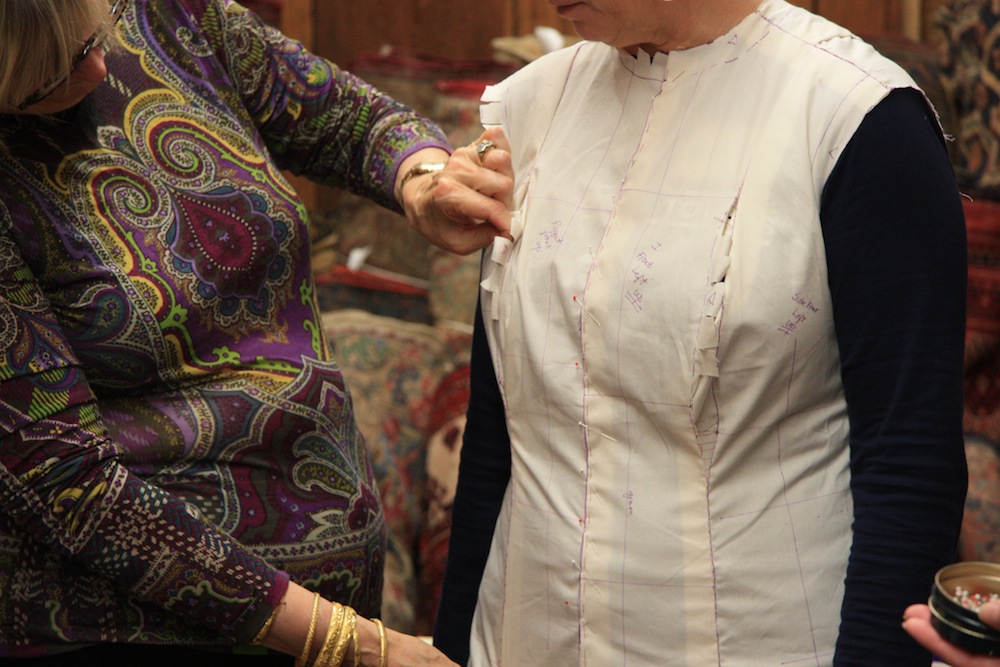

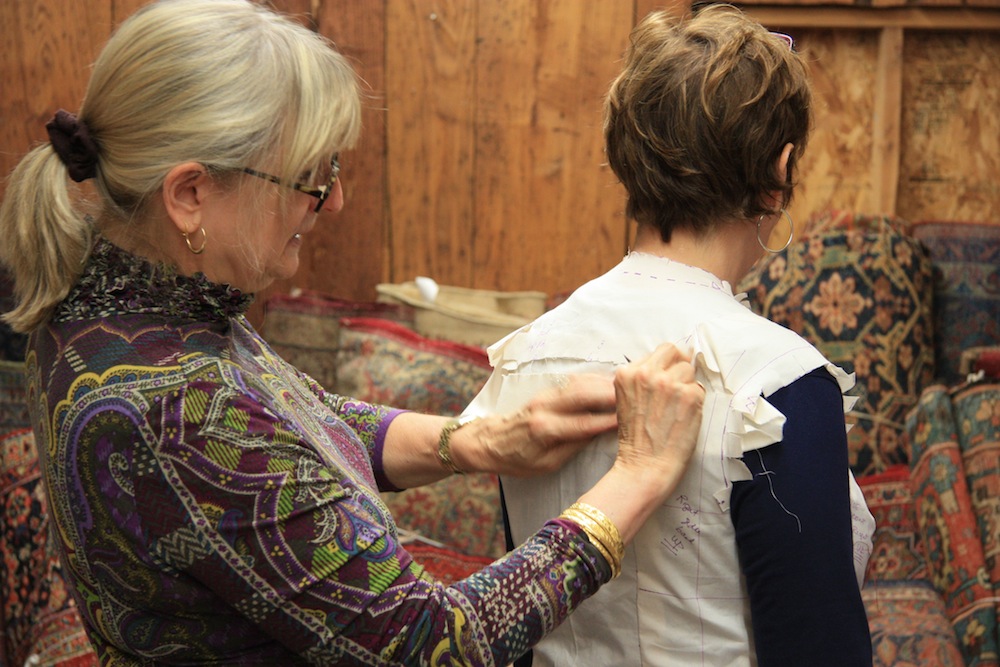
The symmetry of your body’s left and right sides plays such a huge role in how a garment sits and fits, which is the beauty of being able to sew for yourself (especially as one gets a little older and the ravages of time make such things more obvious), and the collective objective attitude to the fitting session (and the down to earth attitude of all in attendance) allows hilarity to ensue over various body shapes! As the fitted muslin is then cut back to the seam line and used as a pattern, you effectively have a pattern piece for each piece of the jacket – allowing you to have ALL pattern pieces be fitted, regardless of differences from one side of your body to the other.
Me? I end up feeling a little jibbed after watching everyone have seams repositioned, sloped shoulders accounted for, slices cut to allow for rounded backs and grain lines shifted as my muslin took about 5 minutes for Susan to do. Turns out I’m fabulously symmetrical and fill out a Vogue size 14 quite well. Very reassuringly – she made the same adjustments as I usually make at home, so at least I was always heading in the right direction!
We take apart out muslin’s, make the necessary adjustments and hand sew everything flat, cut off the seam allowances and get to positioning on the fabric ready to cut out. Depending on the fabric choice, this can be quite a challenge – some fabrics have quite distinct repeats (either vertical, or horizontal or painfully…. both), others have obscured repeats, some fabrics have nap.
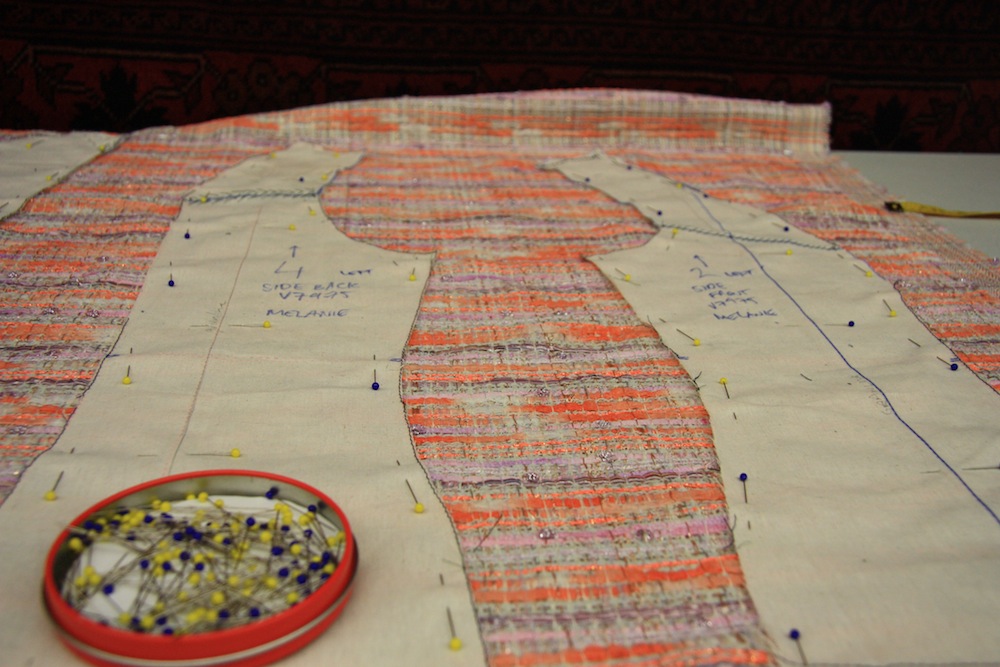
The seam allowances are MASSIVE – 2 inches. Boucle’s are loosely woven (mine especially) so this gives you the ability to handle the fabric without it falling apart on you to the degree that you loose half of your piece. It’s the insurance policy, so to speak, and used for the next fitting session once the bodice is basted together. Clearly there’s quite a difference between a tightly woven calico and the loosely woven boucles – these seemingly small differences can have a big impact on the way such a thing fits.
The boucle fabric is generally between 50-52″ wide – so you can get 5 pattern pieces across (although this gets quite tight if your fabric is 50″ and you require a larger size) – the centre back in the middle with the side back and side fronts either side. Obviously, aligning all the pieces so you can pattern match when sewing everything together is critical, as is making sure your grain lines are in the right place.
The two front pattern pieces then go on the next row up, again carefully making sure the pattern repeat sits in the same place as the previous pieces. I bought 2 1/4 yards of my boucle as I’m (at this stage) intending on having full length sleeves, and 3 yards of the lining as charmeuse is generally shorter in width. If the fabric has a particularly long pattern repeat, you would need more.
I position my fabric then (deep breath) cut it out, at which point I add in my batiste underlining (which has been spritzed and steamed to within an inch of its life to both pre-shrink and soften it). Then it’s basting time.
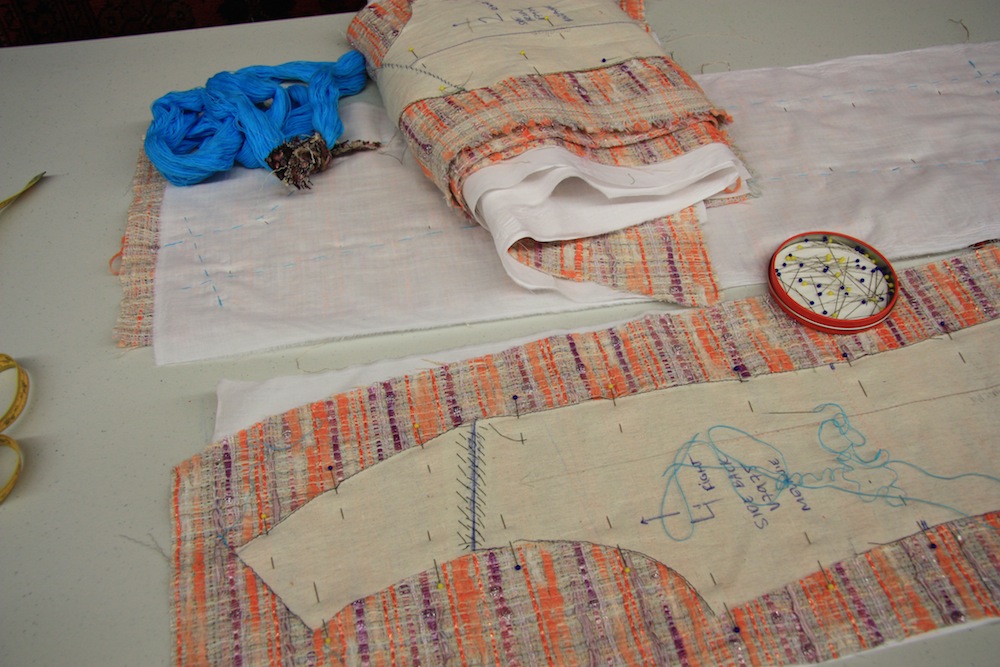
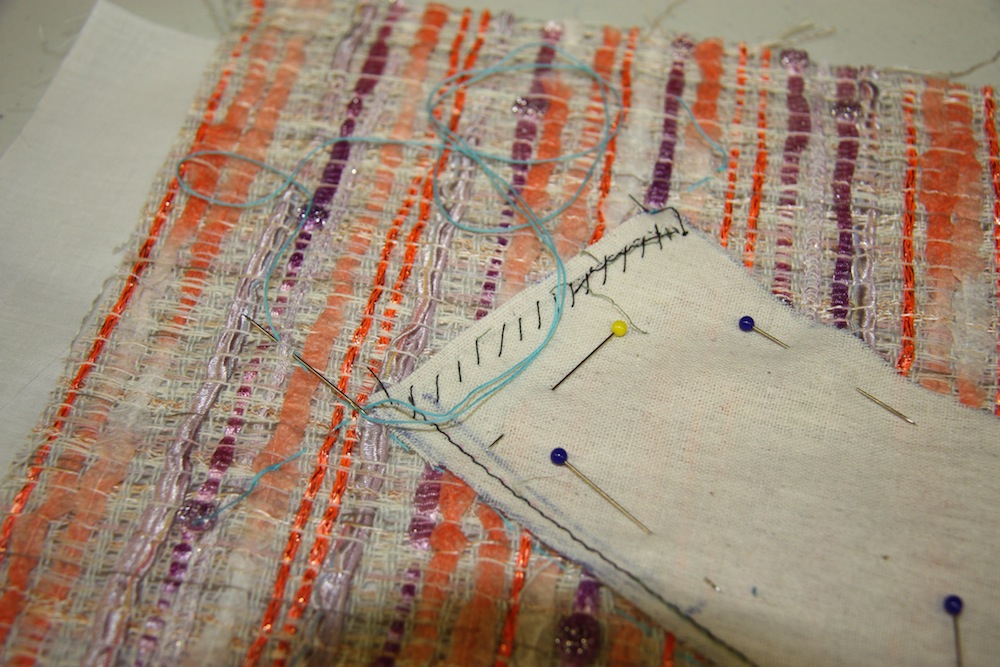
Japanese cotton is the best – it’s ‘grippy’ but smooth at the same time, whereas silk in this particular circumstance would be too slippery. This transfers the location of the seam to your fabric. Obviously you can’t draw it on with chalk… unless you’ve been practical and gone with a tightly woven boucle with even sized threads, of course.
Due to my underlining I don’t do one of the steps – everyone else reinforces the ‘peninsula’ of each pattern piece above the armscye and the princess seam curve with silk organza for stabilisation and support:

I manage to baste two of my pieces before the day officially ends, at 6:30pm. Our homework for the night is to complete all of the basting. So I’d better stop writing this and get to it…. See you all soon for Day 3!

Wow! Melanie, this is so informative – loving the read. What an opportunity and I love the colours you’ve chosen. Can’t wait for the next episode. I’m actually in NYC 2/10 for 9 days – looking forward to my trip, but alas no sewing classes. Will have to be the next one. Cheers – Evelyne
Oooh, I hope you’ve scheduled in a little time for some sewing related shopping whilst there?? It’s incredible!! I would highly recommend B&J fabrics and NY Elegant fabrics… and of course M&J trim. So much amazing. Next episode coming soon ;)
Oh how fun to follow along!
Fun is one of many, many adjectives I can think of ;)
Fabulous. Very interesting. Did you pretreat the boucle at all?
Nope :) It’s definitely a dry clean only garment, so no pre-treating required!
Loving every minute of your journey. Love the orange and can’t wait to see it in person! I’ll be arriving on Sunday afternoon and am so excited about this upcoming week! Can’t wait to meet you, Melanie!
Hi Cissie!! Susan has been talking about how fabulous you are… and yesterday and AMAZING bolt of fabric for you arrived from Mendel & Goldberg. You are going to absolutely love it, I know. Can’t wait to meet you!! See you on sunday afternoon :)
Thank you so much for writing such a detailed post. I dream of doing this class one day. And I can’t wait to see what your completed jacket will look like. You boucle is stunning!
Belinda
Thanks Belinda – it’s been an incredible journey! So glad you’re enjoying my documentation of it :)
How exciting! I keep wanting to do this class, but then I remember how much a French jacket wouldn’t go with the overwhelming majority of my wardrobe. But thrilled to watch your progress!!
Ha – I know exactly what you mean… I thought the same thing initially. Now I’m wondering how I can adjust my wardrobe so I can wear this thing ALL the time. Glad your enjoying reading along :)
I am loving these blogs Melanie. Thank-you so much for sharing with us. Your writing of all that is happening is excellent and you are so generous to be doing this. Your time there is precious and you will be exhausted by the time you get to bed. I hope you can have a sleep in, in the morning. Take care and learn heaps.
Not at all… I need a few moments of non-sewing to cool down from a day of intense sewing!! I will :) x
so glad you’re able to share all of this on the blog! i, no doubt, would be way too exhausted to be coherent… happy sewing :)
It’s actually a lot of fun documenting it. Although I’ll admit writing is not one of my strengths!!! Happy sewing to you, too :)
Thanks for documenting this amazing process! Wow, so awesome! :)
Thanks Jo :)
I hope you got your basting done for day 3. You’ve put so much into this post. It’s a great reference piece.
Still on track, thanks to some late nights of sewing ;) Still unlikely to finish before the end of the class, though!
How amazing it must have been watching her fit everyone! This is just thrilling to read.
Also, I didn’t realise it was held in an ACTUAL carpet gallery.
The woman’s skill is a incredible thing, for sure. And yes! It’s her husbands carpet gallery :)
Ahhh – I am loving these posts…and I’m vicariously living through them as I would just LOVE to do this course!!! The fabric you have chosen is amazing – looking forward to watching your progress :)
And you should! If not in person, then through the dvd’s she’s going to be releasing on this before the end of this year :) It will be an incredible set of video’s to own, for sure!
Such a fascinating read!! Thank you so much for sharing!! I bet it was just incredible to watch Susan fit everyone (and very jealous of your symmetrical size 14, btw!!)
So glad to hear you’re enjoying the documentation :) It was definitely an amazing experience. I think the symmetry has more to do with lack of years under the belt more than anything!
This seems such a great course to be able to take. I’m currently doing Susan’s Craftsy course and that is already so informative. Who knows, one day…
Oh it absolutely is!! But I’ll admit that I’ve watched her Craftsy course three times now, and learnt something new each time around. It’s an amazing resource!
Thanks again! When I see your post popping up I drop whatever it is I am doing to read about your breathtaking Baltimore adventures. Can’t wait for the LFJ sewalong to start!
I’m so glad to hear you’re enjoying reading this as much as I have enjoyed reading accounts of others who have done this before me!! The sewalong will be fabulous :)
Thanks for taking the time to post all this!
It’s an inspiration. I can see after reading the other comments that I’m not the only one thoroughly inspired by your adventures.
Thank you Jodie – I’m so glad I can do this for you all :) It’s been amazing.
Just fascinating. I am so impressed you are getting time to take pictures, blog and still learn!
haha – documenting it for me is a nice little relaxing period at the end of the day – I need just a few moments that aren’t spent physically sewing ;)