
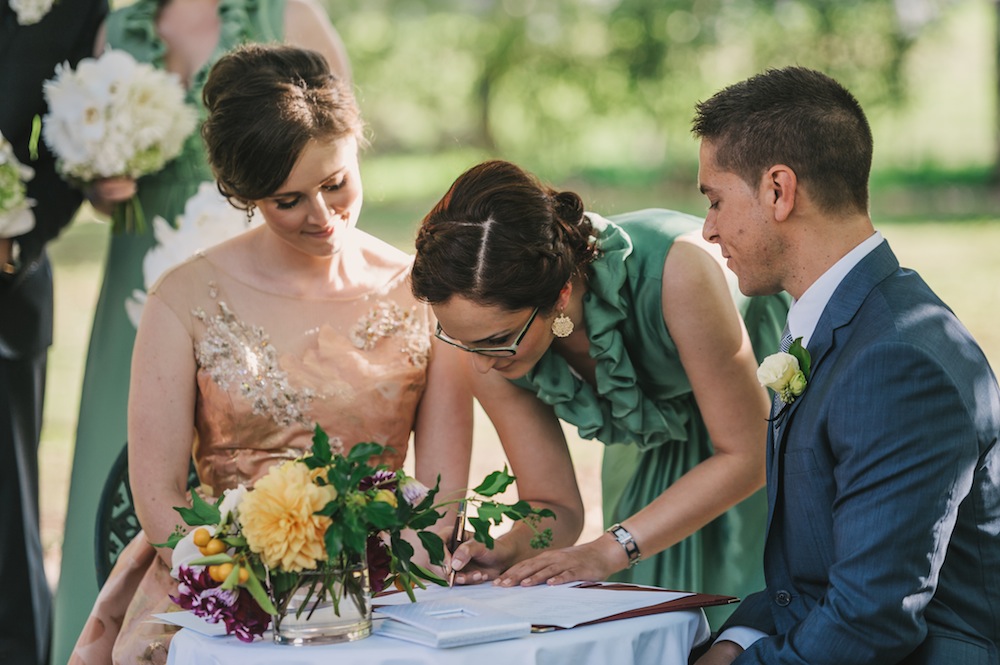
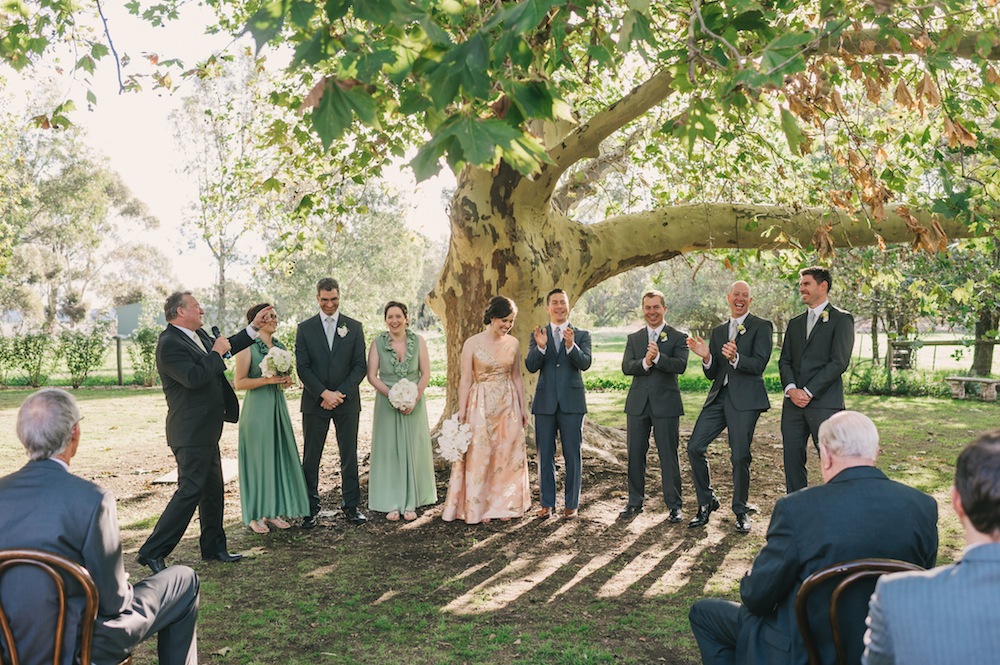
I’m not quite sure that sewing dresses for your bridesmaids counts as selfless sewing (as really, it’s technically for me), but I’m so totally claiming it. If I was humbled that both women were willing to wear something I made, then their trust in me throughout the muslin phase bowled me over even more. It’s hard enough for a non-sewing enthusiast to understand just how much sewing means to me, let alone be forced into wearing one of my creations. I remember doing one of the fitting sessions in front of a group of friends – one of the on-lookers genuinely thought I was going to make them wear a dress made of muslin. …..”Oh, I didn’t realise you were going for such a rustic theme”…. Ha! My third bridesmaid, technically a bridesman – escaped the whole process. Although the poor man often got confused as my betrothed when accompanying me on official bridesmaid duties such as visiting florists and trying on dresses. It was funny! I did briefly consider attempting to make a tie for him, but lumped that idea pretty quick when time got tight! So I’d like to introduce you all to Nikoo, Andrea and Lev-Ari: 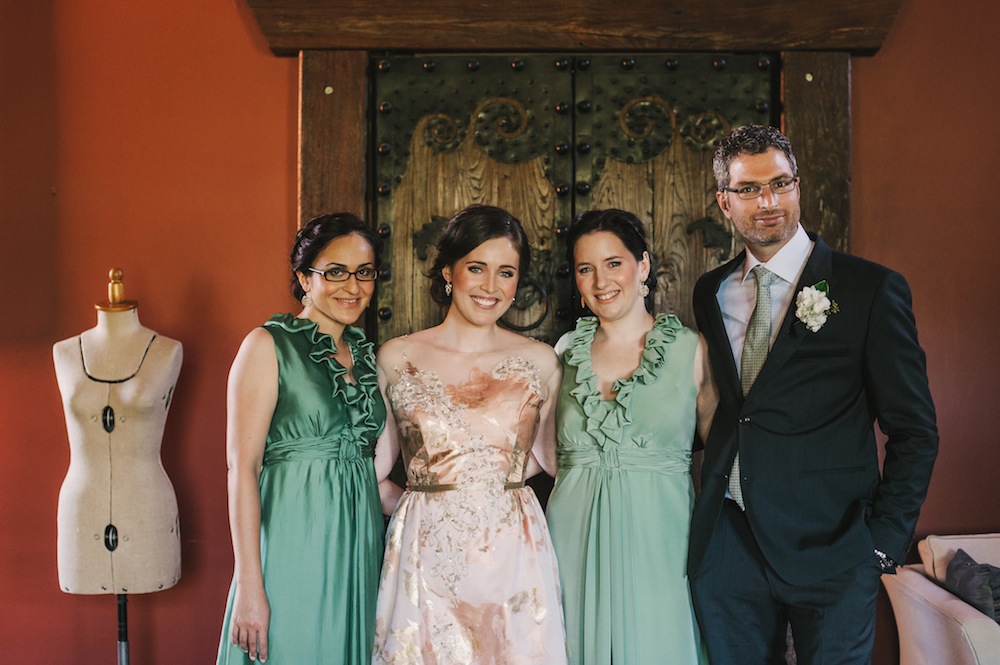


I had picked out Vogue 1030 as pattern I rather liked, and both girls were kind enough to deem it acceptable… once I’d explained that I would be able to alter the design to provide some additional coverage – this pattern in it’s original form has one helluva plunging neckline. This pattern certainly had its moments. I think the most difficult part was that it calls for silk chiffon or silk double georgette that is 60″ wide. Those fabrics in that width? Difficult to find generally, and nigh on impossible to find in a colour of your choosing! The skirt has both fabric and lining pattern pieces – the lining (silk crepe de chine or georgette are recommended) is effectively an exaggerated A-line skirt, whilst the overskirt (chiffon or double georgette recommended) has a train and angular side seam, which is the reason the super wide fabric is required. Upon realising this I decided it would be practical both from a wearing and fabric width point of view to keep the hem at floor length – removing the need for super-wide width and giving me far more flexibility in fabric choice. Once we’d all agreed on on two potential colour palettes I started the fabric recon, and was disappointed at every turn. As you can see from the photos, both Andy and Nikoo have distinctly different skin tones – and I felt they’d look their best in different hues of the same colour – and I simply could not find two double georgettes in the right shades! I pinned all my hopes on my fabric shopping expedition in New York, and even there I struggled to get a match. I did eventually spot silks in the colours I was after in Mood – what a crazy place. I know a lot of people rave about Mood, but it just didn’t do it for me – I’m so much more a B&J girl! I deliberated on the silks for a day as one was a crepe de chin, the other tagged as a charmuese (we’ll get to that in a moment) – really rather different from georgette. Oh, and the darker silk was on hold – someone was planning to buy the whole bolt. But the colours were so perfect for both the girls and my personal taste, and when I went back in just before closing and the bolt was still there, it was a done deal! Whilst my yardage was being cut, the girl told me both were Ralph Lauren silks – it made sense both were from the same place given how well the hues matched. I recall a fleeting concerned thought at how the lightweight ‘charmuese’ would work, but in the excitement of finding the right colours that thought got pushed from view. Jetlag probably had something to do with that too – it’s like a wierd mix of feeling both drunk and hungover at the same time – I think I may have lost my balance whilst standing upright when perusing fabric because of this, but noone saw so it never happened, right? 


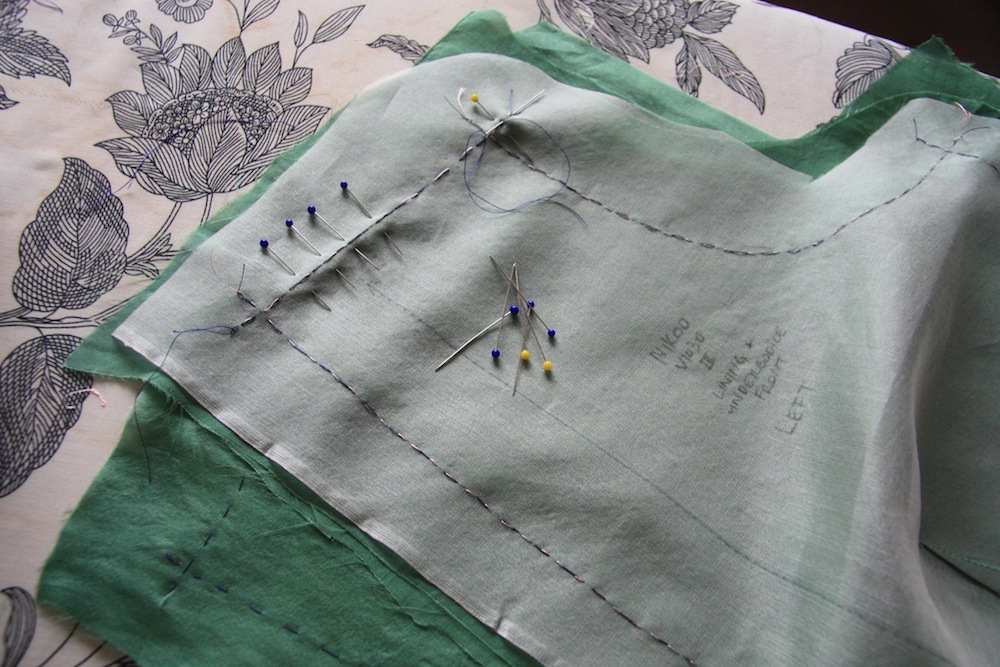
 I made a muslin for both girls and was really, really challenged at having to fit them both. Even though they both had virtually identical B-W-H measurements, their proportions are vastly different. The skirt was always going to be easy as it’s so free-flowing – but the pattern bodice has a lining, and underbodice piece and an overbodice piece which incorporates the gathering around the edge of the neckline – and for the life of me I just couldn’t figure out how to adjust the pattern to get a good bodice fit without impacting the gathered portion. I had limited time to spend fitting both girls as they don’t live close by, so I ended up scratching the overbodice pattern piece (and thus, the gathering around the neckline) and not taking the risk that it might not work. I was to extend the ruffle around the neck down to give coverage, and also raise up the trapezium shaped pattern piece joining the bodice fronts to make it more of a modesty panel – onto which the ruffles would be tacked to hold them in place. It turned out that I probably only needed to extend the ruffles as they gave plenty of modesty, but hey. I kept the gathers on the centre trapezium shaped piece the same to keep with the look.
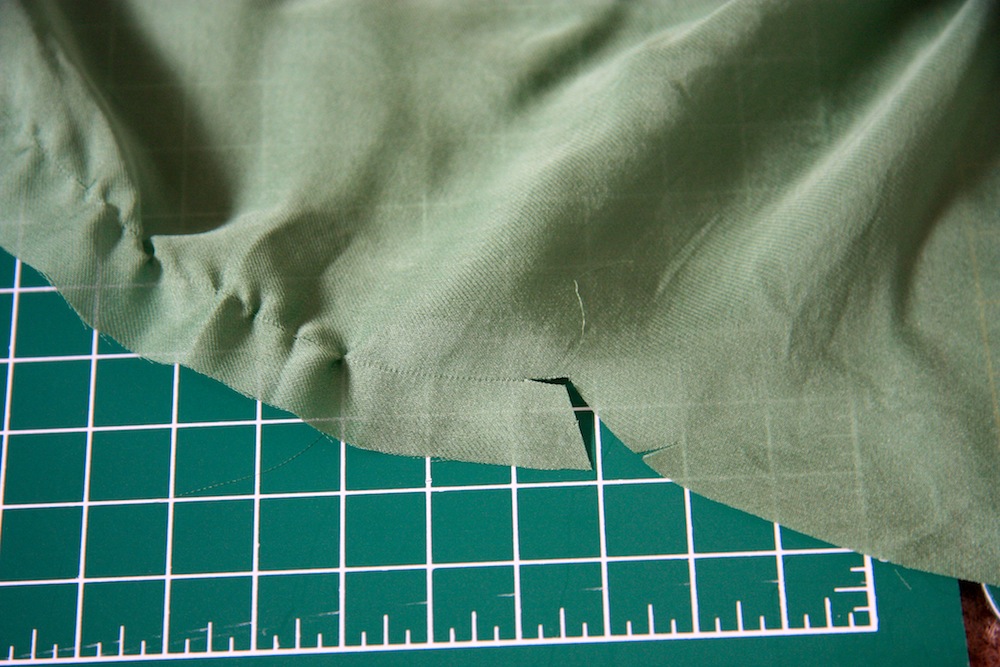
THE BODICE: I started on the darker green ‘charmuese’ dress first. And that’s when I realised – this was no charmuese. It was the lightest, most loosely woven silk habutai I’d ever come across. It was Hell Spawn Habutai. Throw a fluffy feather and a piece of this in the air and the feather would land first with time to kill. It was so lightweight and fluttery and insanely sheer that even when 2 layers were laid out on my cutting mat with a silk organza underlining pattern piece on top – I COULD STILL CLEARLY SEE THE GRID LINES ON MY CUTTING MAT. I shit you not. My second realisation – trying to align the grainline of this fabric was like trying to get a nappy on a wriggly toddler that just will not stand for having their nappy changed. I ended up taping down the selvedge, then finding the cross grain by using the thread-pull technique, before taping that down the cross-grain on the cutting mat too. Then pinning on my organza pattern pieces and thread-tracing blah etc blah blah. It was a nightmare.
 At the end of cutting out the bodice pieces (none of which had bubbles indicating the grain had tricked me – woooo!!!!) I rewarded myself with a rather stiff G&T. Then came back the next day
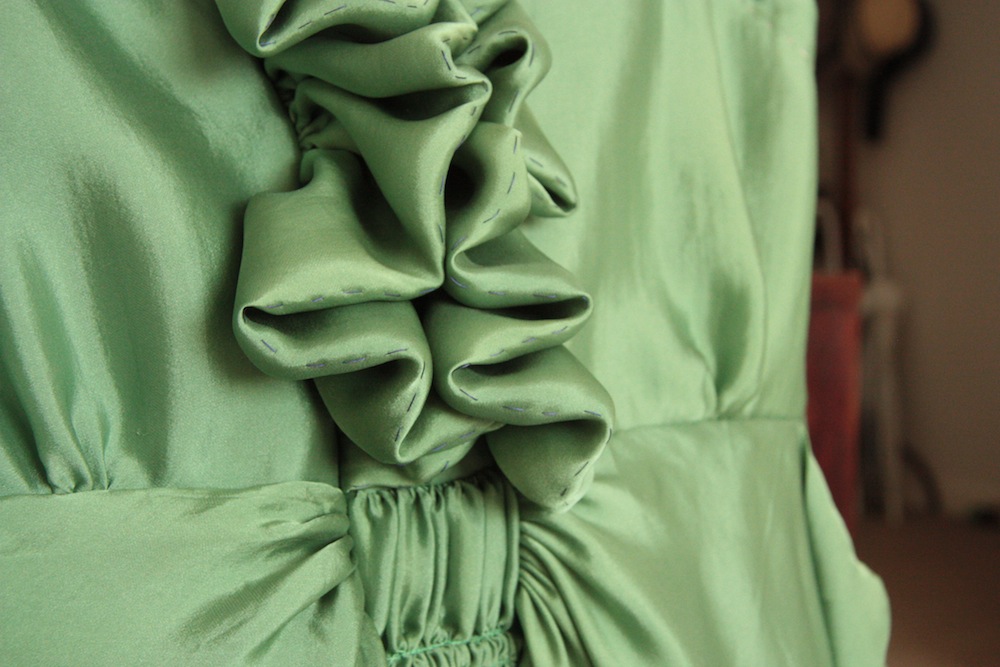
 for more punishment to cut out the skirt pieces. I think I spent nearly 3 full days just cutting out this one dress. I used every single trick in the proverbial sewing book to keep this fabric in line – basting was my best friend. After spending a full Saturday cutting out and basting together the ruffle alone (I had a hunch that the ruffle would sit more beautifully if I underlined it with itself) I was greeted with the sight of possibly the most beauteous of ruffles that has ever existed. It draped, flopped and rolled in such a way that washed away all my despair at ever getting this dress to look like I wanted it too. I mean, just look at it in the photo here:  If I had one regret from these two dresses, it’s that I had already cut and gathered the ruffle in Andrea’s dress with just a single layer of fabric. And I just didn’t have the time to do it again… I then realised it would have been amazing if I could also underline the skirt in self fabric, but I didn’t have enough and I’d already sewn the skirt together by this stage so it was never going to be. Ah well! THE SKIRT: With the skirt – I sewed french seams using tissue paper to hold the hellspawn habutai fabric sturdy under my presser foot, because I just couldn’t find a way to sew a seam without it looking utterly terrible. Altering thread tension minimised only slightly the chewed up look a sewn seam gave the fabric. My machine is a base computerised model (Janome DC2101) and doesn’t have the option to adjust presser foot tension – I’m not sure if this would affect it but I’d love to know!
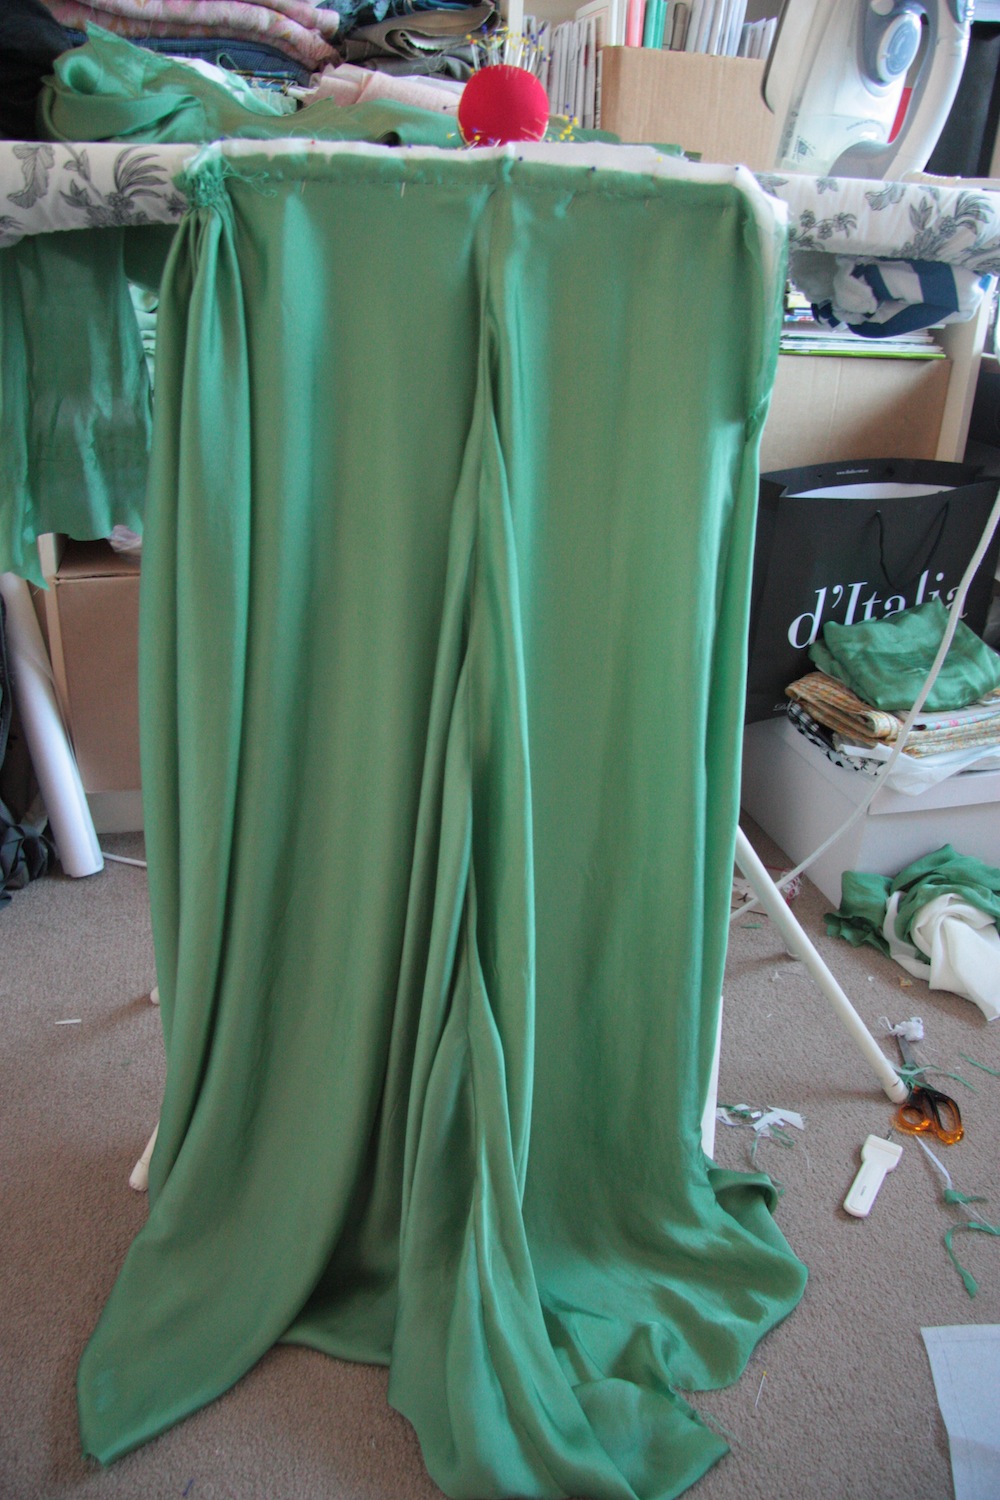
  One those seams were sewn, I hung the skirt up to let everything settle. I realised at this point that my adjustments to the over skirt weren’t really all that well thought out – sure, I’d removed the train by simply cutting it off, but I hadn’t factored in that the side seam of the skirt might be angled in such a way so as to support the weight of the train – meaning my french seamed skirt looked incredibly, horribly and devastatingly ugly:
DISASTER! At least, I’m assuming it’s my fault. I did flatter myself for a moment with the thought that maybe I could see the hint of the same effect/drag lines in the picture on the pattern envelope, but figured people would have mentioned it in their pattern reviews if that was the case. I let it sit like this whilst I pondered it for a few days. Really annoyed at myself for taking the shortcut of muslining the underskirt only, I figured it would have to remain as is because unpicking would ruin the skirt, and whilst I bought an extra meter of fabric as contingency, that wasn’t going to be nearly enough. Maybe somehow when Nikoo put it on, it would all be ok. ERRRR – No. It looked even worse on and she totally freaked out. We all have our least favourite body part and hips are hers – and this f’ugly seam drew your attention right there and would not let you go. And the image stuck with you even once you’d turned your back on it. I had no choice but to alter it. I tested my proposed changes first in some scrap poly silk, then gently and super-carefully unpicked, realigned on my pattern piece and sliced the offending angle off. You can sort of see exactly how shifty-shifty the grain is from the off-cut on the right: 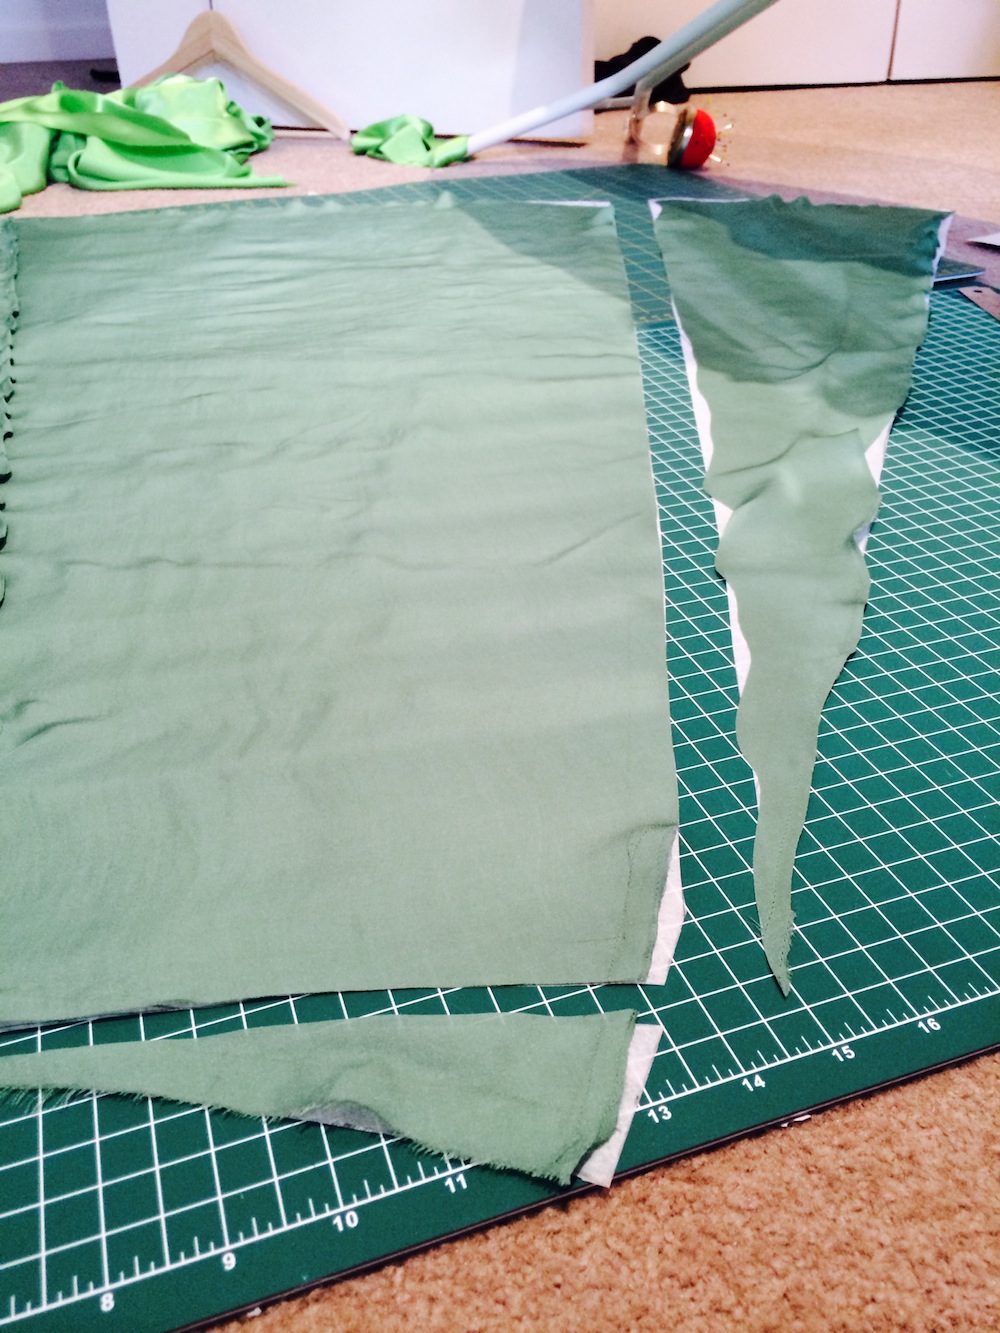 Then I carefully re-sewed the french seams. I can’t even begin to describe my frustration here – the only positive I can take from it was that I could at least save myself more pain by adjusting the lighter green dress skirt panels pattern before cutting that one out. As much hurt, angst and frustration that this habutai fabric caused me – I absolutely love it. It has stunning sheen, drapes in such a lustful manner and is the most perfect shade of apple green – and suits Nikoo to an absolute tee. You can see in this photo the offending seam ended up being quite easy on the eye!
 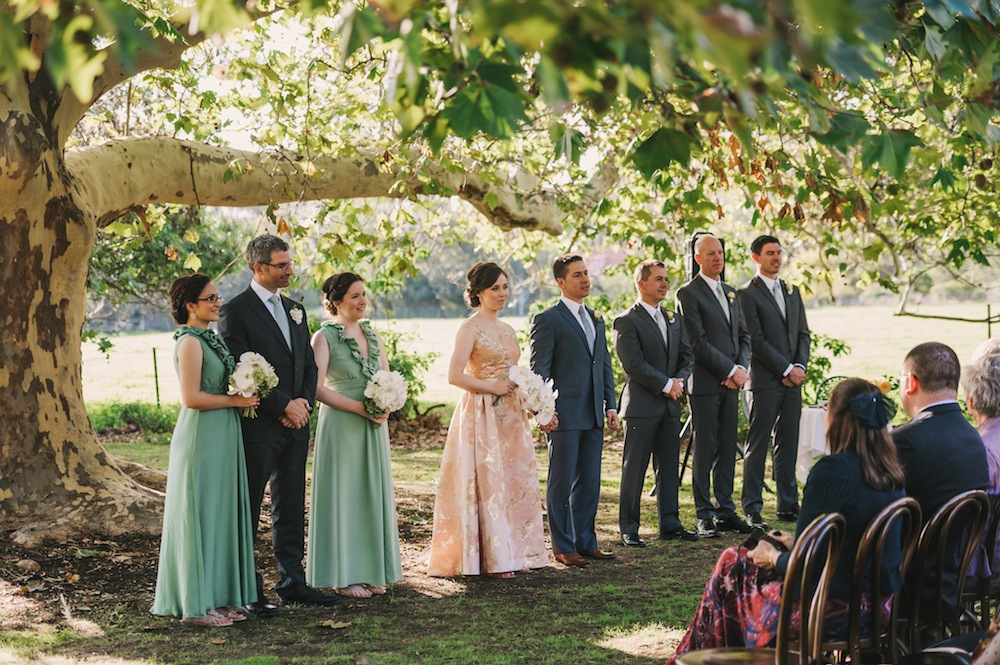 The side seams, still being slightly on the bias – did drop somewhat. Obviously, the looser woven Hellspawn Habutai dropped much farther than the delightfully well-behaved crepe de chin.
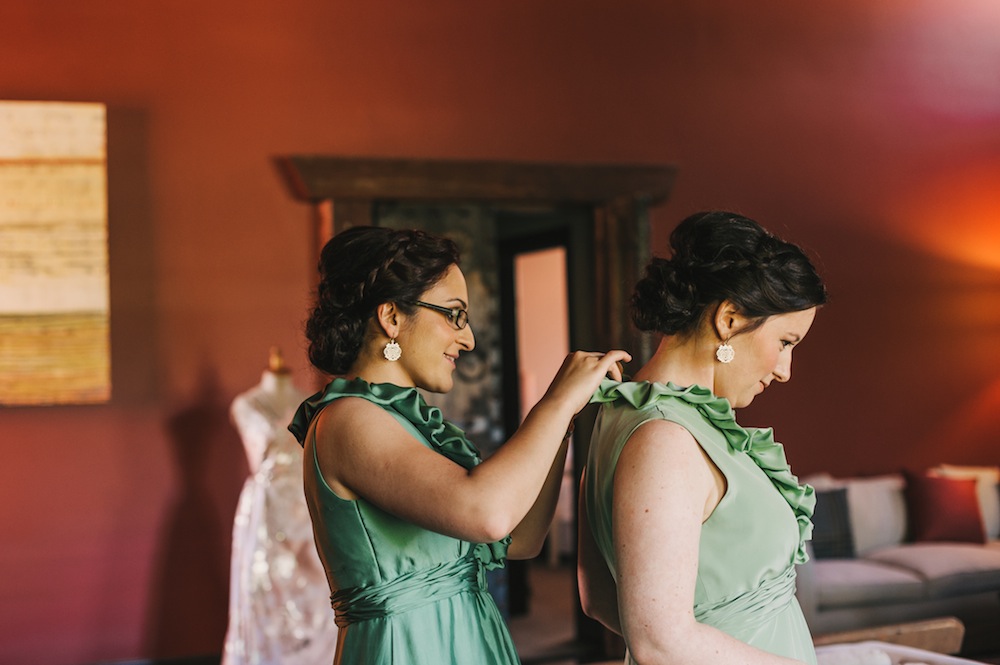
 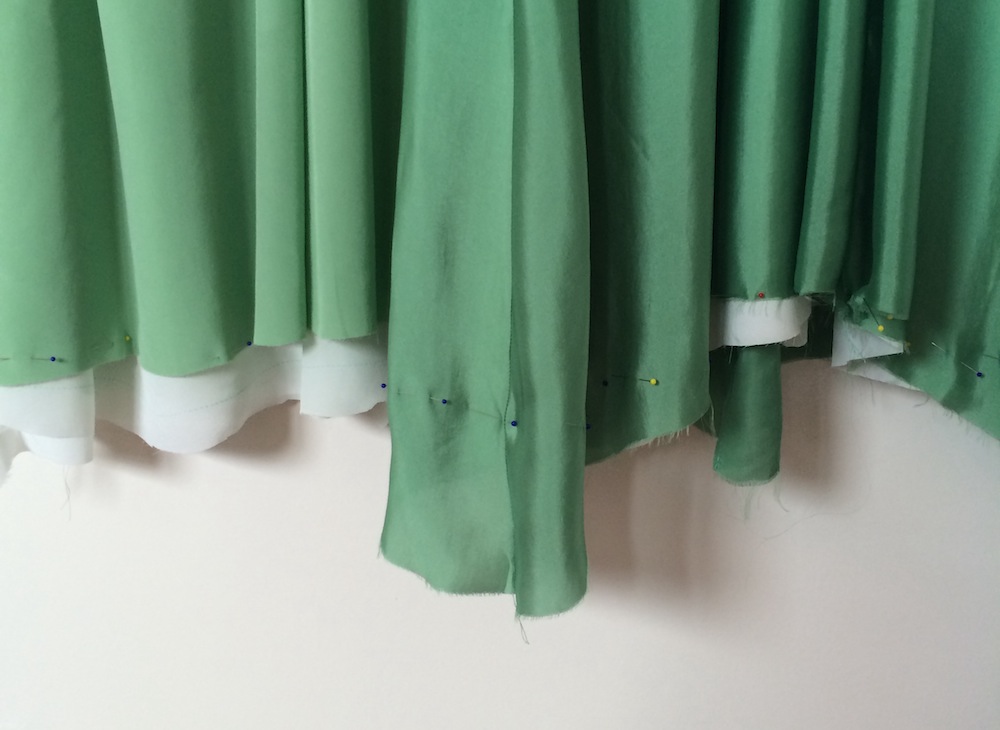 Hemming was a case of using my piece of altered plastic belt backing to sew a miniture hem without the seams being chewed up by my machine. It involved a lot of patience on the wearer’s behalf, standing still whilst I pinned in place the ideal hem location! Another interesting thing from a non-sewists point of view… both girls were quite visibly shocked at how ‘different’ each dress looked on a hanger. Well yeah… that’s because they both have very different body shapes, and each dress has been altered to suit that. Andrea was longer in the body and is the classic rectangle shape, whilst Nikoo is really very petite through the torso (you can see this in the shape of the armscye on both dresses below) and pear shaped, evidenced by what appears to be the curved hem when sitting flat. And yet, they are the same height and have exactly the same B-W-H sizes. When they’re being worn, you probably wouldn’t notice any of those things. This is why we sew right?
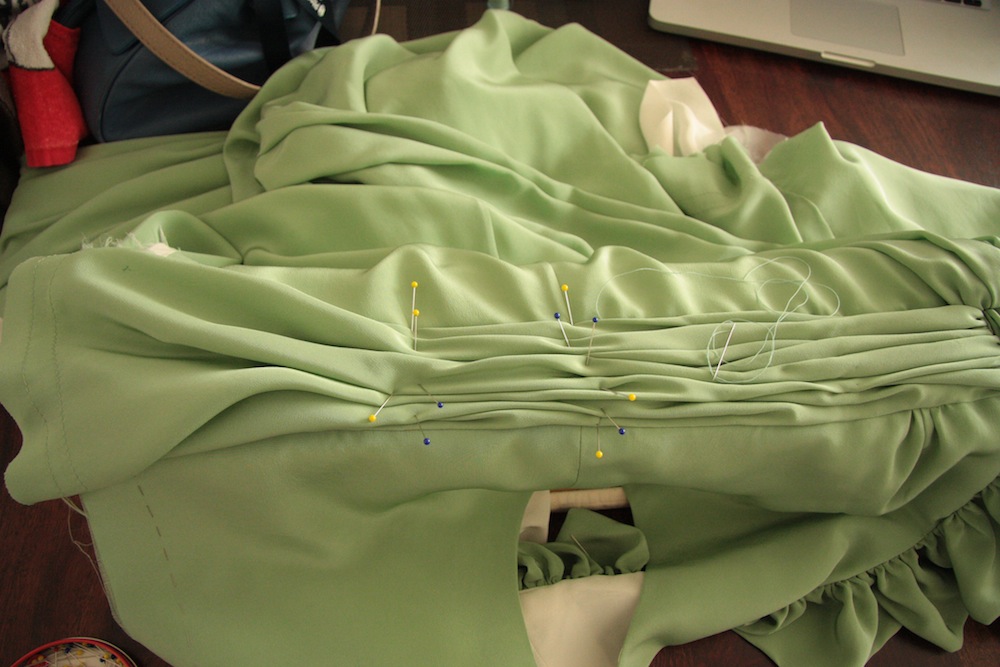
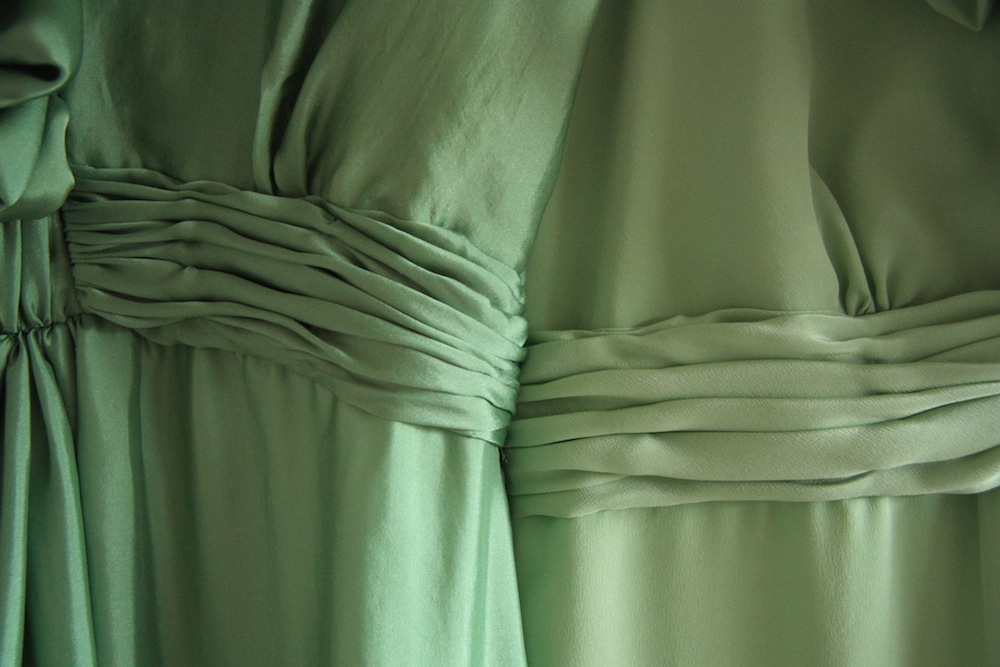
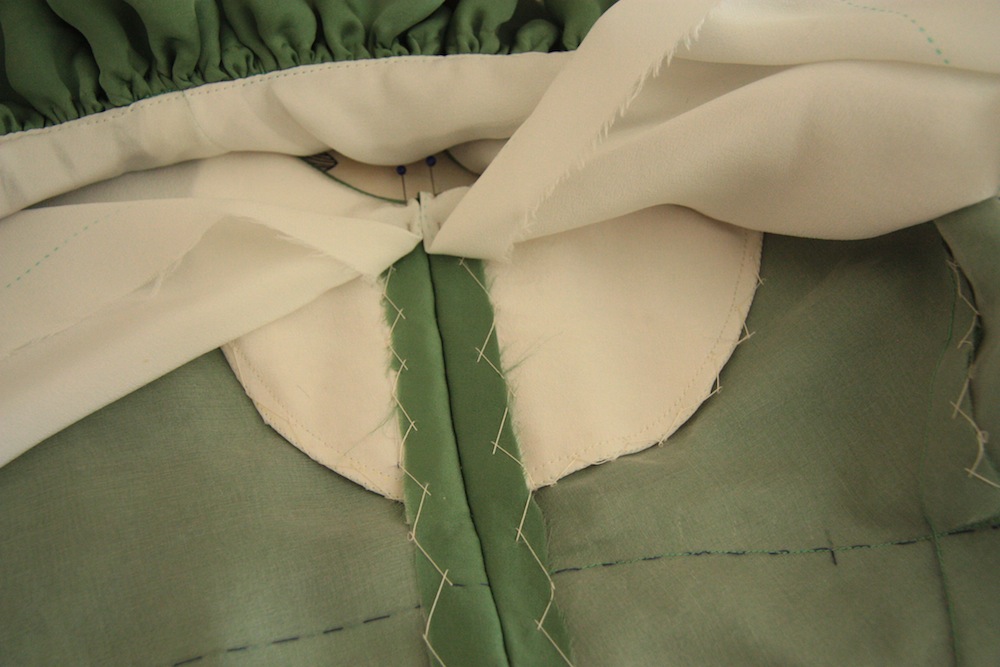
 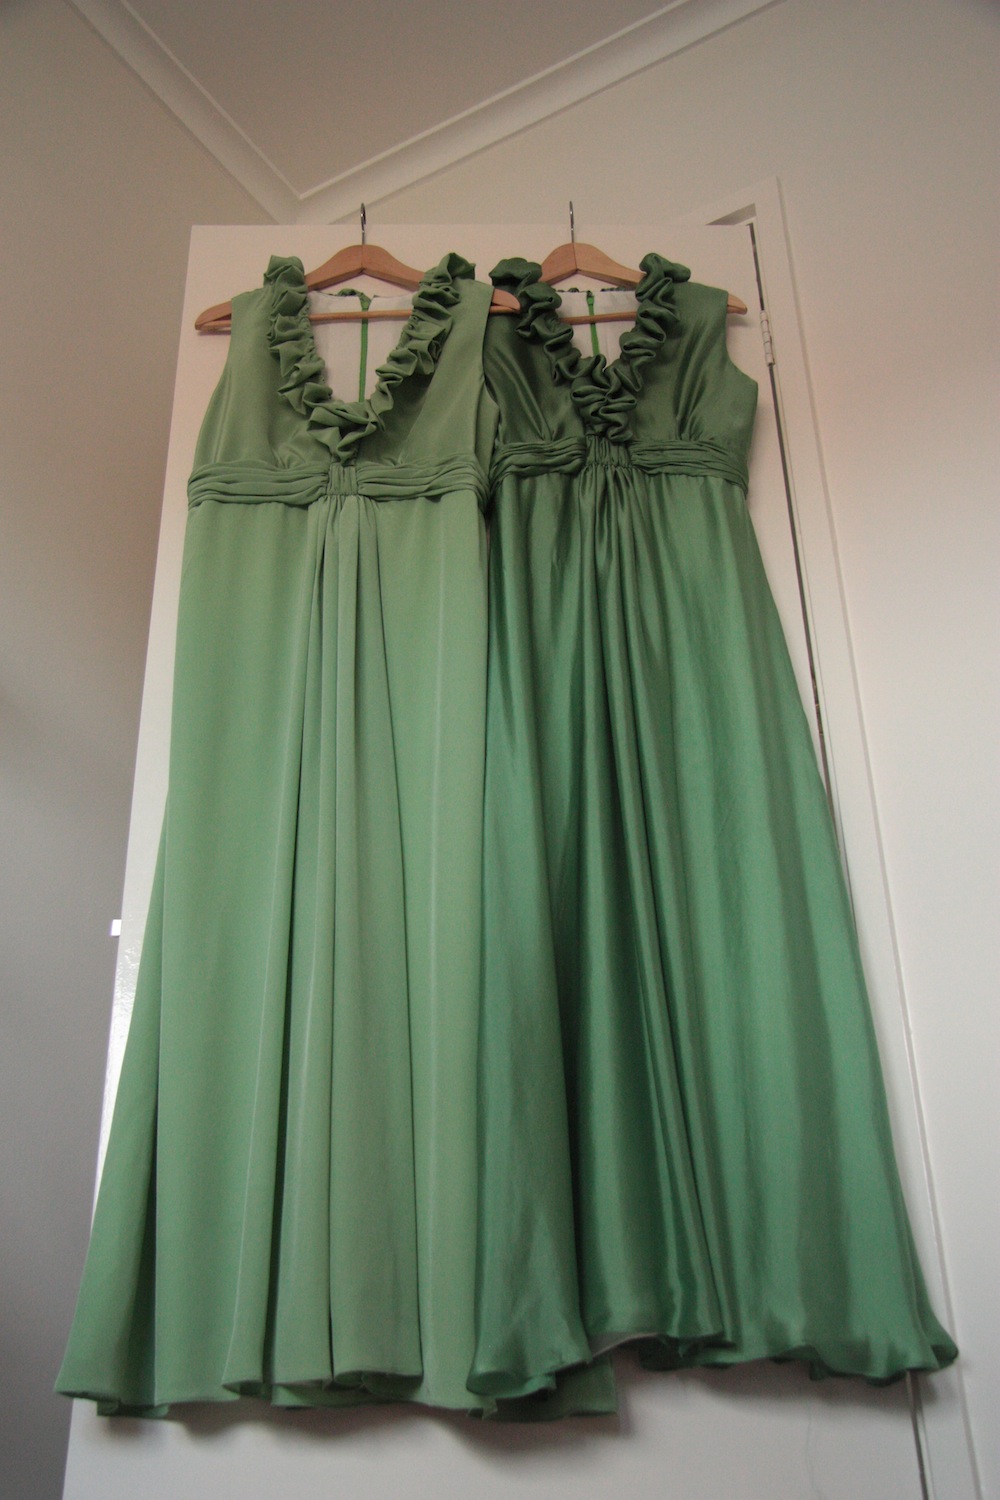 WAIST GATHERING The panels at the waist are not structural – they are aesthetic additions onto the bodice and sit above the seam line between the bodice and the skirt. The panels are cut on the bias then machine gathered at each end and attached to the dress between the center back seam and the seam alongside the trapezium shaped piece at the centre front. At least, that’s what the pattern instructions would have you do. I noticed on a few of the pattern reviews of this pattern that the gathering looked a little saggy – which was not something I wanted to replicate. This kind of gathering always looks better under tension! I pinned my gathered panels in place then used some matching silk thread to ‘lock’ them in place, which was a something I noticed on a Colette Dinnigan dress I own that also has gathering like this at the waist.
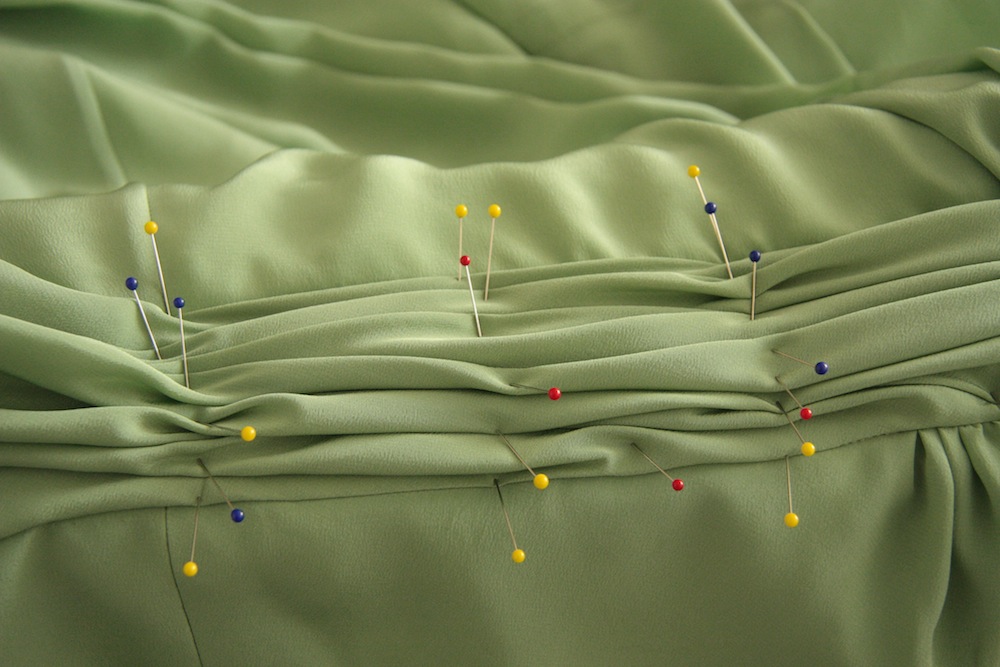
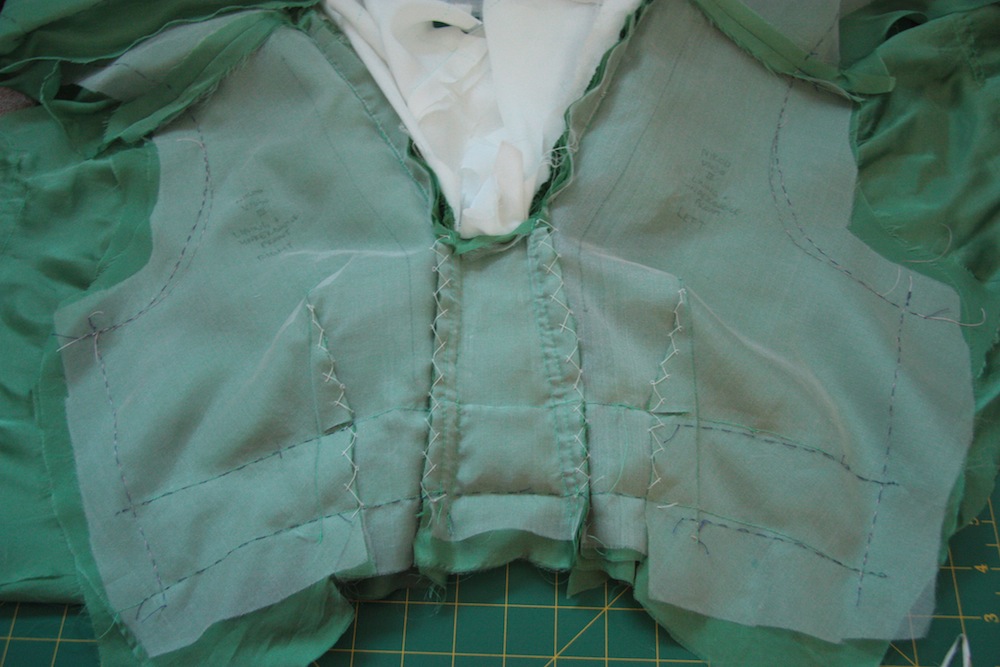
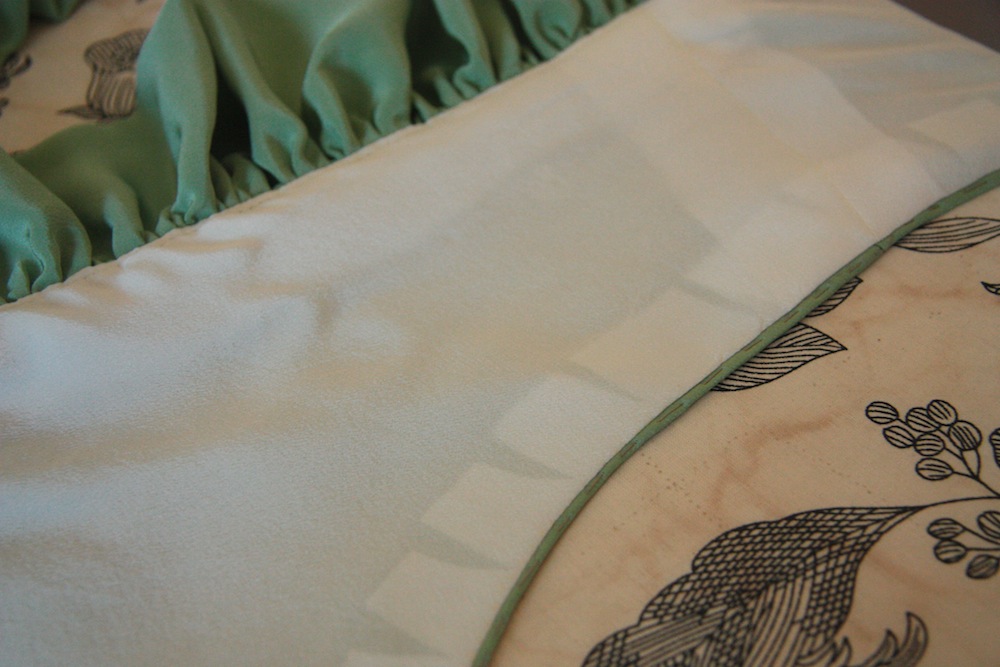
 Having sewn this up with two different fabrics, I think it would be very difficult to get your bias cut panels cut to exactly the right length so that when worn, the gathering would sit in the right place AND look attractive. It all depends on how your fabric behaves under tension – how tightly woven it is. It was a challenge of the fun kind to get it so the stitches held the gathers attractively whilst not showing! The light in the photo above does rather give the location of my stitches away, but it didn’t appear to be visible whilst being worn. THE LINING & TURN OF CLOTH: I used a white crepe de chine silk to line both the bodice and the skirt. The pattern wanted the arm holes to be finished with some self-fabric binding – that was never going to happen! Because of the white lining, I wanted to account for turn of cloth at the armholes, and I didn’t want stitches showing on the outside (so I used this technique) – but I forgot about this when I was tracing my seamlines. To account for it, I pinned the seam line of the lining 2mm out from the outer fabric seam line and sewed along this, resulting in armholes that don’t show the lining :)
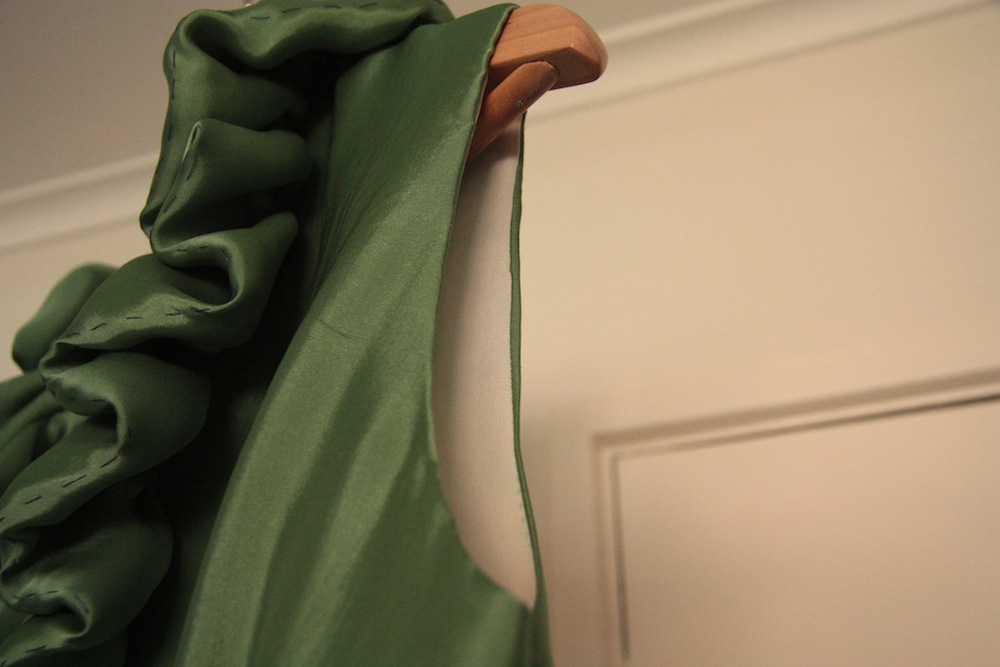
 The silk organza underlining helped a lot here as after pressing it in place – gave me a nice crisp fold that held the turn of cloth beautifully. I finished off the lining to enclose all of the seams by fell stitching it to the skirt’s seamline. CLOSURES I used invisible zips on both dresses (down the centre back seam), finishing with a hook and eye at the top, which is hidden nicely by the ruffles at the neckline.
 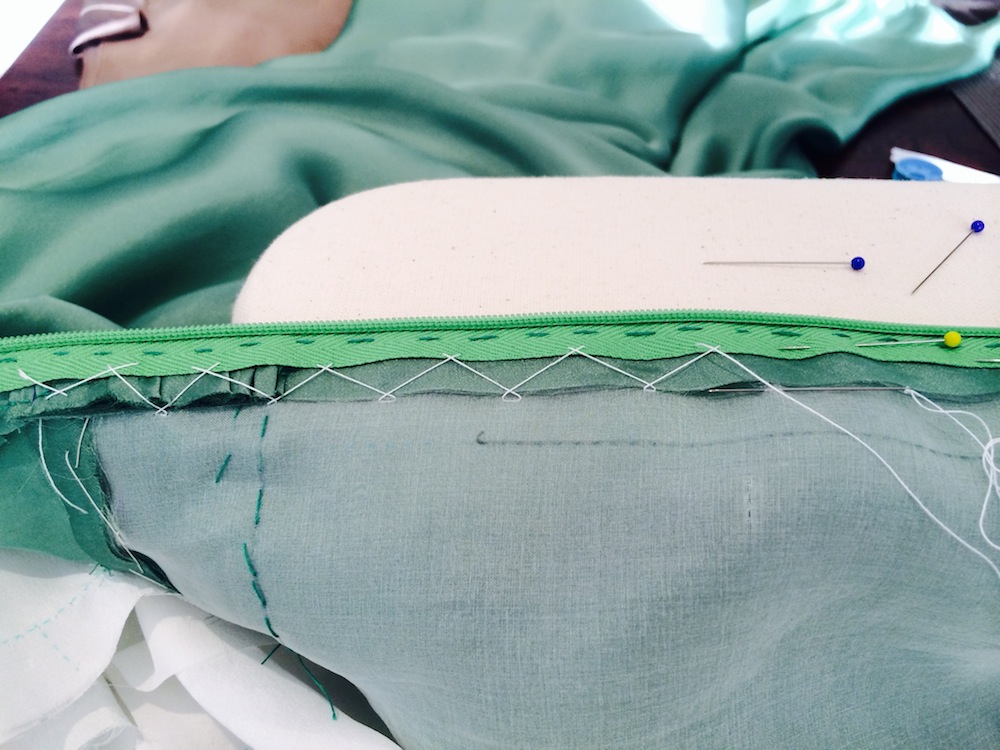 Because I used french seams at the skirt though – there is always that difficult point where french seam meets zip. I get around this by making a perpendicular cut into the seam, which allows the seam to lay flat. DRESS SHIELDS: Perhaps a little on the unusual side – but I think we’ve all worn a silk top at some point and had perspiration make our fabric wet under the arms. And that damp silk really stands out because it appears dark! I saw ready-made dress shields for sale when I was in New York, but it’s not something I’ve yet to come across here in Melbourne. There was an old thread on Artisan Square from 2006 about dress shields – but also mostly about using bought versions. Both versions of the book Couture Sewing Techniques (Claire Shaeffer) discusses them briefly, shows a picture and discusses how they were traditionally sewn.
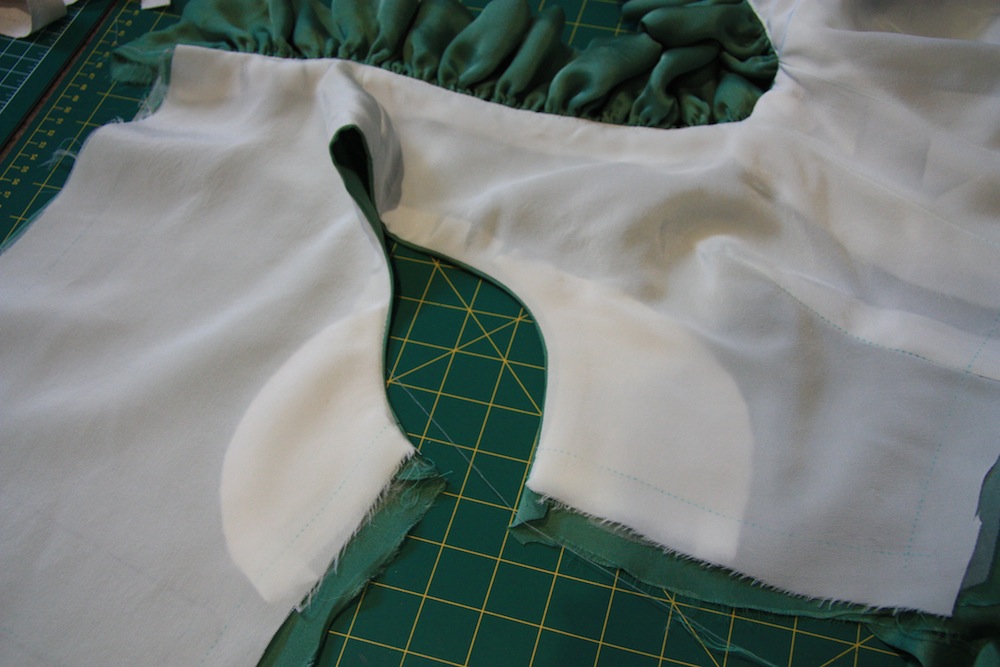
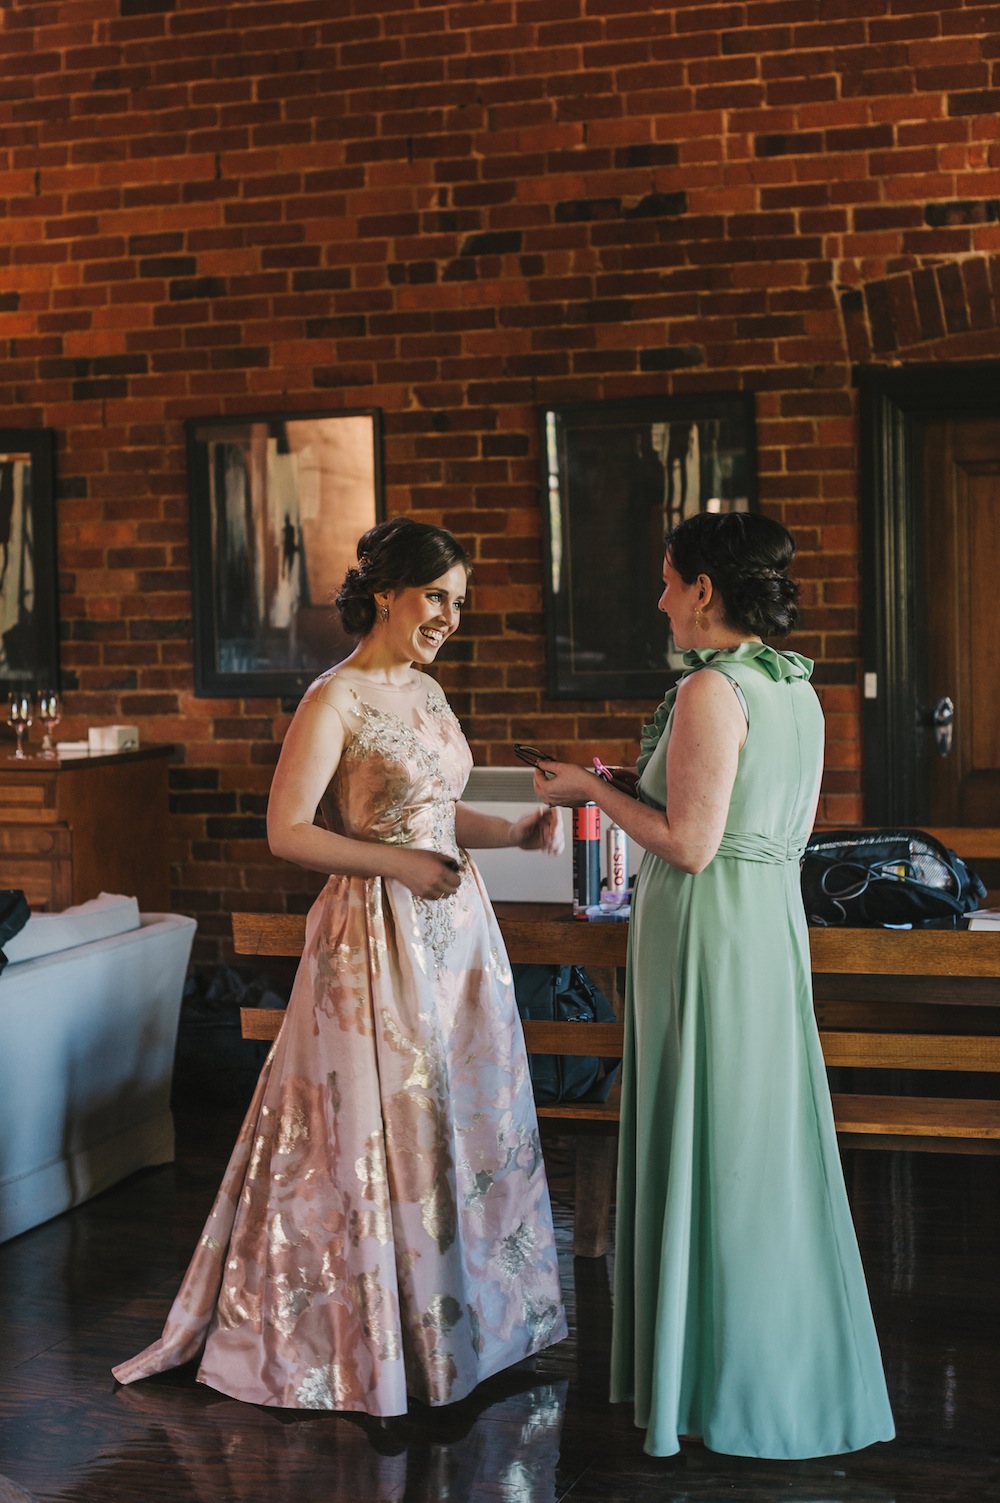
 For Nikoo’s dress (Andy is one of those people that doesn’t seem to sweat!) I incorporated built in dress shields, which I made from a layer of cotton calico covered in the white crepe de chin lining, tacked in place with catch stitch before sewing up the side seams. You can’t see them when she’s wearing the dress – and I checked in with her at the end of the night as to how well they worked – not a single sweat mark! Although… we were both rather inebriated at that point… THE END RESULT: Super floaty and elegant – nothing looks or feels more luxurious than a flowing floor length silk skirt! They all looked pretty good I thought :)


What agrear job! All by yourself! Amazing! Your wedding was even more special. Lovely dressess!
Thank you! :)
I love reading these posts even though half of it goes over my head, haha! Both the dresses turned out stunning! :) do you find it freaks you out when you clip into a seam like you did for the invisible zip? I’m always paranoid my whole garment will fall apart from there! Heh :)
haha – it used to! Not any more, probably because I’ve done it enough times now ;) Thanks Jo!
They’re stunning Mel! Worth every second you spent on them.
Also you’re a braver woman than I, making dresses for other people while making a wedding dress. I’m not sure how you slept during those months!
haha, thanks Jodie! I’m still a little blown away at exactly how much I managed to achieve in my timeframe! It was hell for leather for some months there :)
So, I really have to pipe back in and say I am totally blown away by your wedding sewing. If I had a hat to take off, I would.
Thank you Renee! Your lovely words mean the world to me :)
Damn you Melanie, for putting all us selfish sewers to shame!!! What an incredible accomplishment- I hope your friends have a new found respect for your craft. Seriously, it’s taken me 6 months to make 2 Wiksten tank toiles for my sister in law, and yet you crank out a couture dresses AND a robe for each or your gals. Much respect!
I was a woman possessed, Jenny. That’s the only explanation!! It’s not something I’ll be doing again any time soon… haha. Thanks Jenny :)
Absolutely stunning dresses! I’m just about to embark in sewing dresses for our 4 female wedding attendants and I am SO GLAD that I decided to sew them each knit dresses, even more so after reading all about your sewing process. Your wedding sewing is truly an inspiration as I’m diving into my own!
Smart lady!! Knit all the way! I love that idea. Goodluck as you embark on that, Erin – all the best!
These two bridesmaid dresses are absolutely beautiful Melanie. I am sure Nikoo and Andrea will never have anything as beautiful and so perfectly fitted again unless you make them another dress each. I just love your wedding photos and I also love how you included your dear friend Ari in your bridal party.You have so much to be proud of in making your dress, bridesmaid dresses and silk robes for your very special day. Hard work and dedication always pays off. Thank-you for sharing all of this with us in blog land.
Thank you so much, Marjorie! It absolutely does, and always will. Hard work is definitely worth all the hard work ;)
Those dresses are beautiful, and the whole thing looks like it’s out of a dream. I got married under a tree, and 26 years later, we’re still at it!
Thank you, Julie! I hope to be at your point in 26 years time ;) To infinity, and beyond!
I’m sorry that fabric caused you so much grief, but it really does look beautiful. I love the two colors together. Oh, and I had a bridesman, too – except he sewed both my wedding dress and his own outfit!
You know what Morgan? I love that fabric even more because it was so hard to work with, but so rewarding in the end. It was an issue of respect, and I had to work for it. I started out thinking it would be a disaster, but it ended up looking an absolute treat, and I’m not even the slightest bit embarrassed to admit it!
Blown away at your bridesman’s efforts. Incredible stuff! I’m so intrigued now :)
What love you put into those dresses!
Oh absolutely! ;)
if only we all had the privilege of being “forced” to wear one of your amazing couture dresses… luckiest bridesmaids ever! i’m amazed and totally in awe of how you managed to handle the fabric through all the challenges. and they look stunning in their dresses! i love how you we able to use different fabrics; it gives nice dimension to the wedding party. and oh those ruffles… fabulous. you should be insanely proud of your efforts!
We get it… but those who sew can probably come close, but never really understand, I think. I love the different fabrics too. Adds another dimension of uniqueness, which felt right to me because both are so very different :) Thanks, Lisa!
Stunning dresses. What an honour to have you make their dresses. They look amazing and those colours are flattering and fabulous!
Thank you so much, Debbie! :)
Dress shields!! DRESS SHIELDS!! Totally worth the caps. What a revelation! Absolutely going into the next fancy frock I make.
Hellspawn habutai is totally worth the tears isn’t it? I have lined a number of frocks with it and I LOVE it to wear. Sewing it, mmmmm, not so much love. But then I forget and use it again. And vow never to use it thereafter. Until the next time.
Thank you for the frock posts, they are beautiful and I love all the delicious sewing nerd detail.
Yep they worked a treat! Definitely something I’ll consider when making a silk dress for next time! You’re absolutely right though – habutai is absolutely worth it. Such beautiful sheen and drape!! It totally won over my respect in the end :) Thank you!
What a task to undertake: your dress PLUS the bridesmaids! Beautiful job. Your post went through the challenges of working with the slippery fabrics and fitting issues. Thanks for taking the time to share all your work with us.
Thank you so much, Mary! :)
Well done! These dresses, your dress…it’s all so beautiful and even more so since you made them. Would you mind if we shared some photos on our social media? Email us at facebook@voguepatterns.com. Thanks!
They are really beautiful dresses . Lovely colour too. I know what you mean about dropping hemlines ,, I let my DIL wedding dress hang for 3 weeks with pegs weighting down the hem before I hemmed it . Apparently Vionnet had special little weights made to do the job but then pegs as we know them with a spring wouldn’t have been around !!
Pegs! What a wonderful idea. I’ll save that one for another day, cheers! Thank you so much, Mem :)
Oh, how lovely. Both ladies look stunning, and your care in colour choice and fitting really shows.
I contemplated this pattern for my own wedding dress. Floaty silk is the best! I know alllll about sewing down gathers in soft silk. It *has* to be done, and the results are worth it. Love your work :-)
Thanks Kat! Yes, you were actually the person responsible for bringing this particular pattern to my attention! I first saw it on one of your wedding dress blog posts :) You’re absolutely on the money on the sewing down of the silk, definitely worth the extra time taken. Thanks, Kat – love your work!
Green is my favourite colour and these dresses are stunning. I hope your friends find lots more opportunities to wear them.
Thanks so much, Anna! :)
You really are an inspiration, I love watching your techniques and reading about your sewing adventures. I have been searching for my wedding dress pattern for years, when the time comes, I think it will make the day even more special! Congratulations on your wedding, your beautiful gown and the bridesmaids dresses, it just goes to show that hard work and dedication do pay off in the end! well done!
I hope you’ll one day come across a pattern which fills all your criteria! Thank you so much, Alex :)
Wow, I really can’t believe how much you managed to sew in a relatively short period of time. Your bridesmaids were lucky to get these dresses, I don’t think they would have been able to get this custom fit with store bought ones, especially if they wore the same design.
I couldn’t have imagined not making them both dresses… haha. Thanks Emmely!
You are some kinda saint. Tis all I can say!
It’s easy to appear that way when only the good stuff appears online, but thank you! xx
WOW WOW WOW – you love your girls dont you :-) Beautiful work & I love your tip on making dress shields.
Thanks Ange! Dress shields are absolutely something I’ll be trying again – I highly recommend them!
At my bridesmaid’s first fitting her husband discreetly took her aside and asked concernedly “do you like the fabric?” (a white cotton and not well fitted at that stage). Poor guy, his effort was wasted, as she immediately told me about it gigglegiggle.
Well done with the dresses – overcoming the fabric and the nightmare of that side seam. You took on an awful lot with this wedding project!
Yep, some people just don’t get it!! haha. Not their fault though, they haven’t been educated ;) Thanks Kathleen!
Absolutely gorgeous – love the shades of green. you. are. a machine!
haha, Thanks Emma!
You are truly an inspiration. I can’t believe you made the time to make all these dresses and gowns. You must not have done anything else for six months. You really love your craft and your bridesmaids! I really appreciate all the time you have put into telling the story about them all too.
Oh, thank you so much! How could you not love sewing? ;)
I am blown away by all of these dresses. What a lovely day made even more special by your skill and work!
Thank you so much, Jessica! :)
wow. after reading the amount of work put in… i already thought the selfless sewing should be claimed, now i think you need a trophy.
ooh, I do rather like trophies. Scratch that – I just love winning! haha, Thanks, Marcy!
WOW.
;) x
Wait, you made bridesmaids dresses too?? Of the evening gown variety no less?? You officially veered into a totally insane realm there. They turned out so lovely, though, and both of your friends look so beautiful and comfortable. I will never understand how you did it, but very well done!
Yeah, and I know it. I’m so lucky my better half was willing to put up with me being almost entirely consumed by sewing, and also that my job bizarrely happened to be quiet enough that I could leave on time. Thank you so much, Kelly! :)
Wow, so much work. The details are amazing – such beautiful hand-stitching.
Thank you! :)
I think this was the most beautiful wedding! I wish I had been there! You must be so proud of how everything looked! Well done!
Very much so :) Thank you so much, Amanda!
I felt every moment of your distress – and, gratefully, your ending triumph while reading this post. What I want to know is how much time did you allot to yourself to make these two dresses? If you were under serious time pressure, then I really don’t know how you did it – and did it so well! The dresses are absolutely beautiful! Just more proof that we dressmakers are a hardy breed!
PS – if you ever get to San Franciso, you must go to Britex Fabrics on Geary Street…
Gosh, I honestly don’t know! I did spend about triple the time on the habutai dress as opposed to the crepe de chin dress however. A combination of it being an easier fabric and having just sewn the first one. The three months leading up I was sewing all friday night and weekend, an squeezing in 2-4 hours each weeknight. I was seriously so lucky my better half was willing to put up with me for that long! Starting back into sewing since the wedding has made me more than a little shocked at exactly how productive, focused and morbidly single minded I was at achieving those hefty goals I set for myself. I don’t regret it one bit, though!
Oh, I’ll get to San Fran one day… ;)
Thank you so much, Karen!
Gorgeous gorgeous gorgeous!
thank you thank you thank you! ;)
WOW! Those ladies are so lucky. One, they get to be friends with you. Two, so much love was put into making them beautiful custom dresses. WOW (again!) :)
Aw, your lovely words mean so much to me! Thank you!! :)
Wow, what a challenge!! Beautiful dresses and in silk too!
Thank you, Vicki!! :)
Your work is absolutely awe inspiring. Everything you have done is impeccable. Thank you for sharing the journey…the high points as well as the low points. Your ability to overcome disaster is amazing. You must be so proud…and deservedly so.
I’m not even the slightest bit ashamed to admit I’m ridiculously proud! Thank you so much, Jean Margaret :)
I think I was holding my breath while reading this whole entry. Fantastic work. Bravo!
Thank you so much, June :)
Wow (I seem to start all my comments to you with that!) – you have the most amazing patience. I am pretty sure I would have had a mini tanty numerous times and quite possibly nearly have given up (I say nearly because unfortunately I’m not much of a quitter even when I should).
Both dresses are amazing, and how lovely that you were able to get both in colours that look very similar but suit them both. So thoughtful.
The construction is nothing short of amazing (I read every word with fascination). Thank you for taking the time to share
Oh, there were tanties all right. I was in too deep though… with no plan B! Thank you so much, Liz – I appreciate your kind words! x
Unbelievable. What beautiful dresses, and what a story about making them. I love that you tried to get complementary colors that worked for each bridesmaid. And, I’m glad you won out over the unruly fabric. I’ll have to remember this story the next time I’m battling with fabric!
haha, thanks Amy! I had no option though… I was in too deep with no plan B! Habutai is incredibly troublesome to work with, but absolutely repays your efforts three-fold, I love the end results!
I’m totally in awe of your beautiful work! And your lovely day. Congratulations on both!
Thank you so much, Coco! :)
Holy moly! I am so incredibly impressed that, not only did you make that absolutely stunning dress, but you busted out two other gowns amidst the rest of the wedding preparation. Bravo!
Thank you so much, Nicole! :)
So impressive! I can’t believe you made these gorgeous dresses in addition to your absolutely perfect wedding gown — not to mention the silk robes — all while taking care of wedding preparations! Wow! Just perfect!
Apart from my obsession with sewing… I’m a pretty laid back kinda girl so the wedding was equally laid back and non-frivolous! That certainly helped. But mostly the credit goes to my now husband who put up with me throughout the whole deal! He’s just the best. Thank you, Jean! :)
Hi Melanie,
First of all, I have to say I was so excited to see a new post from you the other day! Your blog has been one of the most inspirational for me. I am currently sewing the bridesmaids dresses for my wedding and am dealing with a colored fashion fabric, white crepe de chine lining situation and was wondering which technique you allude to regarding the armholes. Is there supposed to be a link there or am I just not advanced enough a sewist yet to understand? Sorry to bug you. Thanks for providing such entertaining and informative posts. It’s so generous to those of us still learning!
Thank you so much, Kailani!
And yes – it’s commonly known as the ‘Burrito’ method, I believe, you can see it here:
https://poppykettle.com/2012/01/30/101-finishing-the-facinglining-on-a-sleeveless-bodice/
Happy sewing!
Thank YOU so much, Melanie!
I don’t know how I missed that post of yours before, but it is very helpful indeed.
I hope you get some happy sewing time yourself!
Hello, I had my eye on the pattern V1030 and the fabrics I wanted to make with it. After saving up, the pattern was taken off the website entirely. I emailed vogue patterns but they have not replied. Do you know whwre2 u can get this pattern for size 14? Are you willing to sell yours?