

Or even mediocre and unfinished in this case, to be honest.
This project was a slow start to 2023 (yes, you read that correctly) – I’d been wanting to revisit tailoring for SO long now it was a simple choice to pull out the most classic blazer pattern in my stash and start with what I plan to be a complete and finished wearable muslin – as a practice garment before I cut into some highly treasured fabric lengths.
Marfy 3635 (on the left) is the pattern I’m working with – originally from the 2015/16 catalogue and issued with a peaked lapel, this pattern was reissued as Marfy 6038 (on the right) in the Evergreen catalogue, but with a shawl collar. Both patterns are still available on the Marfy website, and putting the two images side by side makes a wonderfully adult version of ‘Spot the Difference”:


Leisa Stanton has made this blazer before in beaded lace (see here), and so has Becki in a super bright, dopamine-dressing hot pink wool (see here).
The last tailoring project I embarked on was Vogue 8333, which I LOVED making and wearing, and which is now sadly out of circulation due to UV damage on the raw silk fibres :( The aim is to replicate the experience, but with a Prince of Wales inspired check wool (very budget friendly – some $20/m and a wool/poly blend), as a way to work up to using a tartan Ermenegildo Zegna piece of wool from my stash.
I had been reading obsessively on the topic (the re-released Vintage Couture Tailoring book by Thomas Von Nordheim, and Tailoring: The classic guide to sewing the perfect jacket, and I thought instead of sharing a step by step journey of making the thing – which you can read instructions for about in any of the books I’ve mentioned above, I thought I’d instead share the moments that made the project, and where I learnt some new things. So here we go.
THE MUSLIN
I’m working with the size 46 pattern, as that’s what I had in my stash. Despite my body changing heaps since when I bought this (read: I’m bigger) – this is definitely still the right pattern for me – we made zero changes to the shoulders or the back – all the changes were in relation to getting the pattern to fit across my front and bust. Which, unsurprisingly, is exactly where all my additional carry on is being stored. I had my muslin fitted by Tatyana (because I just don’t have three days to fit the thing myself when I can pay to have it done in an hour by someone else!) which was a great decision – nice one, past-Melanie.
The pattern has one of those tricky L-shaped darts – for shaping and also for the front pocket, so we got the extra width by adding in a triangle at the side seam, and a triangle at the front, done in such a way as to have very limited impact on the front lapels. We also took away some space from the front lower armscye.
Photos below show my original muslin (as yet unadjusted) on the left, centre shows the adjusted muslin from the front, right shows it from the side so you can better see the adjustments that have been added in. The photo below shows these adjustments translated onto the paper pattern. In short – these adjustments meant no change to the collar! Not shown – I pushed back the shoulder seam by 1cm to have it sitting just a bit further back, so it’s less noticeable due to being right on the peak curve point of my shoulder.


ON CANVAS STRUCTURE
The Thomas Von Nordheim book recommended pre-shrinking the canvas being used as the under structure. I put a length in some hot hot water, swished it round good and proper, wrung it out without mercy and let it drip dry. The hair canvas rumpled like a hessian bag, and was almost impossible to remove all the wrinkles from with even my steam iron. My intensive wringing did knock off the grain in some areas and it was a wee bit bubbled. Whilst the chest canvas had nary a wrinkle, didn’t need ironing, and not only kept its shape, but didn’t fray. Amazing!
I was concerned about the state of the horse hair canvas due to how it responded to the above treatment, but in the end this made no impact. It still did a great job of providing stability and structure without it feeling forced. It was also lovely to pad stitch with.


Both photos are of the canvas post pressing, both of which are from Kenton Trimmings (in the UK). The grey one is the chest canvas (IL3) and the tan one is one of the horse hair canvas (IL10). The folded over photo gives you an idea of the amount of body in each canvas! The chest canvas is like the corflute of the fabric world – so light! So spring-y! So much unexpected strength and stability! And still so bouyant after being put through the literal wringer!
ON OTHER UNDERLININGS
I did underline the back pattern pieces with silk organza – my Spotlight wool blend was quite collapsible and shifty, so I felt that the transition from really structured front to unstructured back was a bit too severe. This worked quite nicely, and also provided a means to catch-stitch down the seams, which would have otherwise shown through had I not have the underlining.
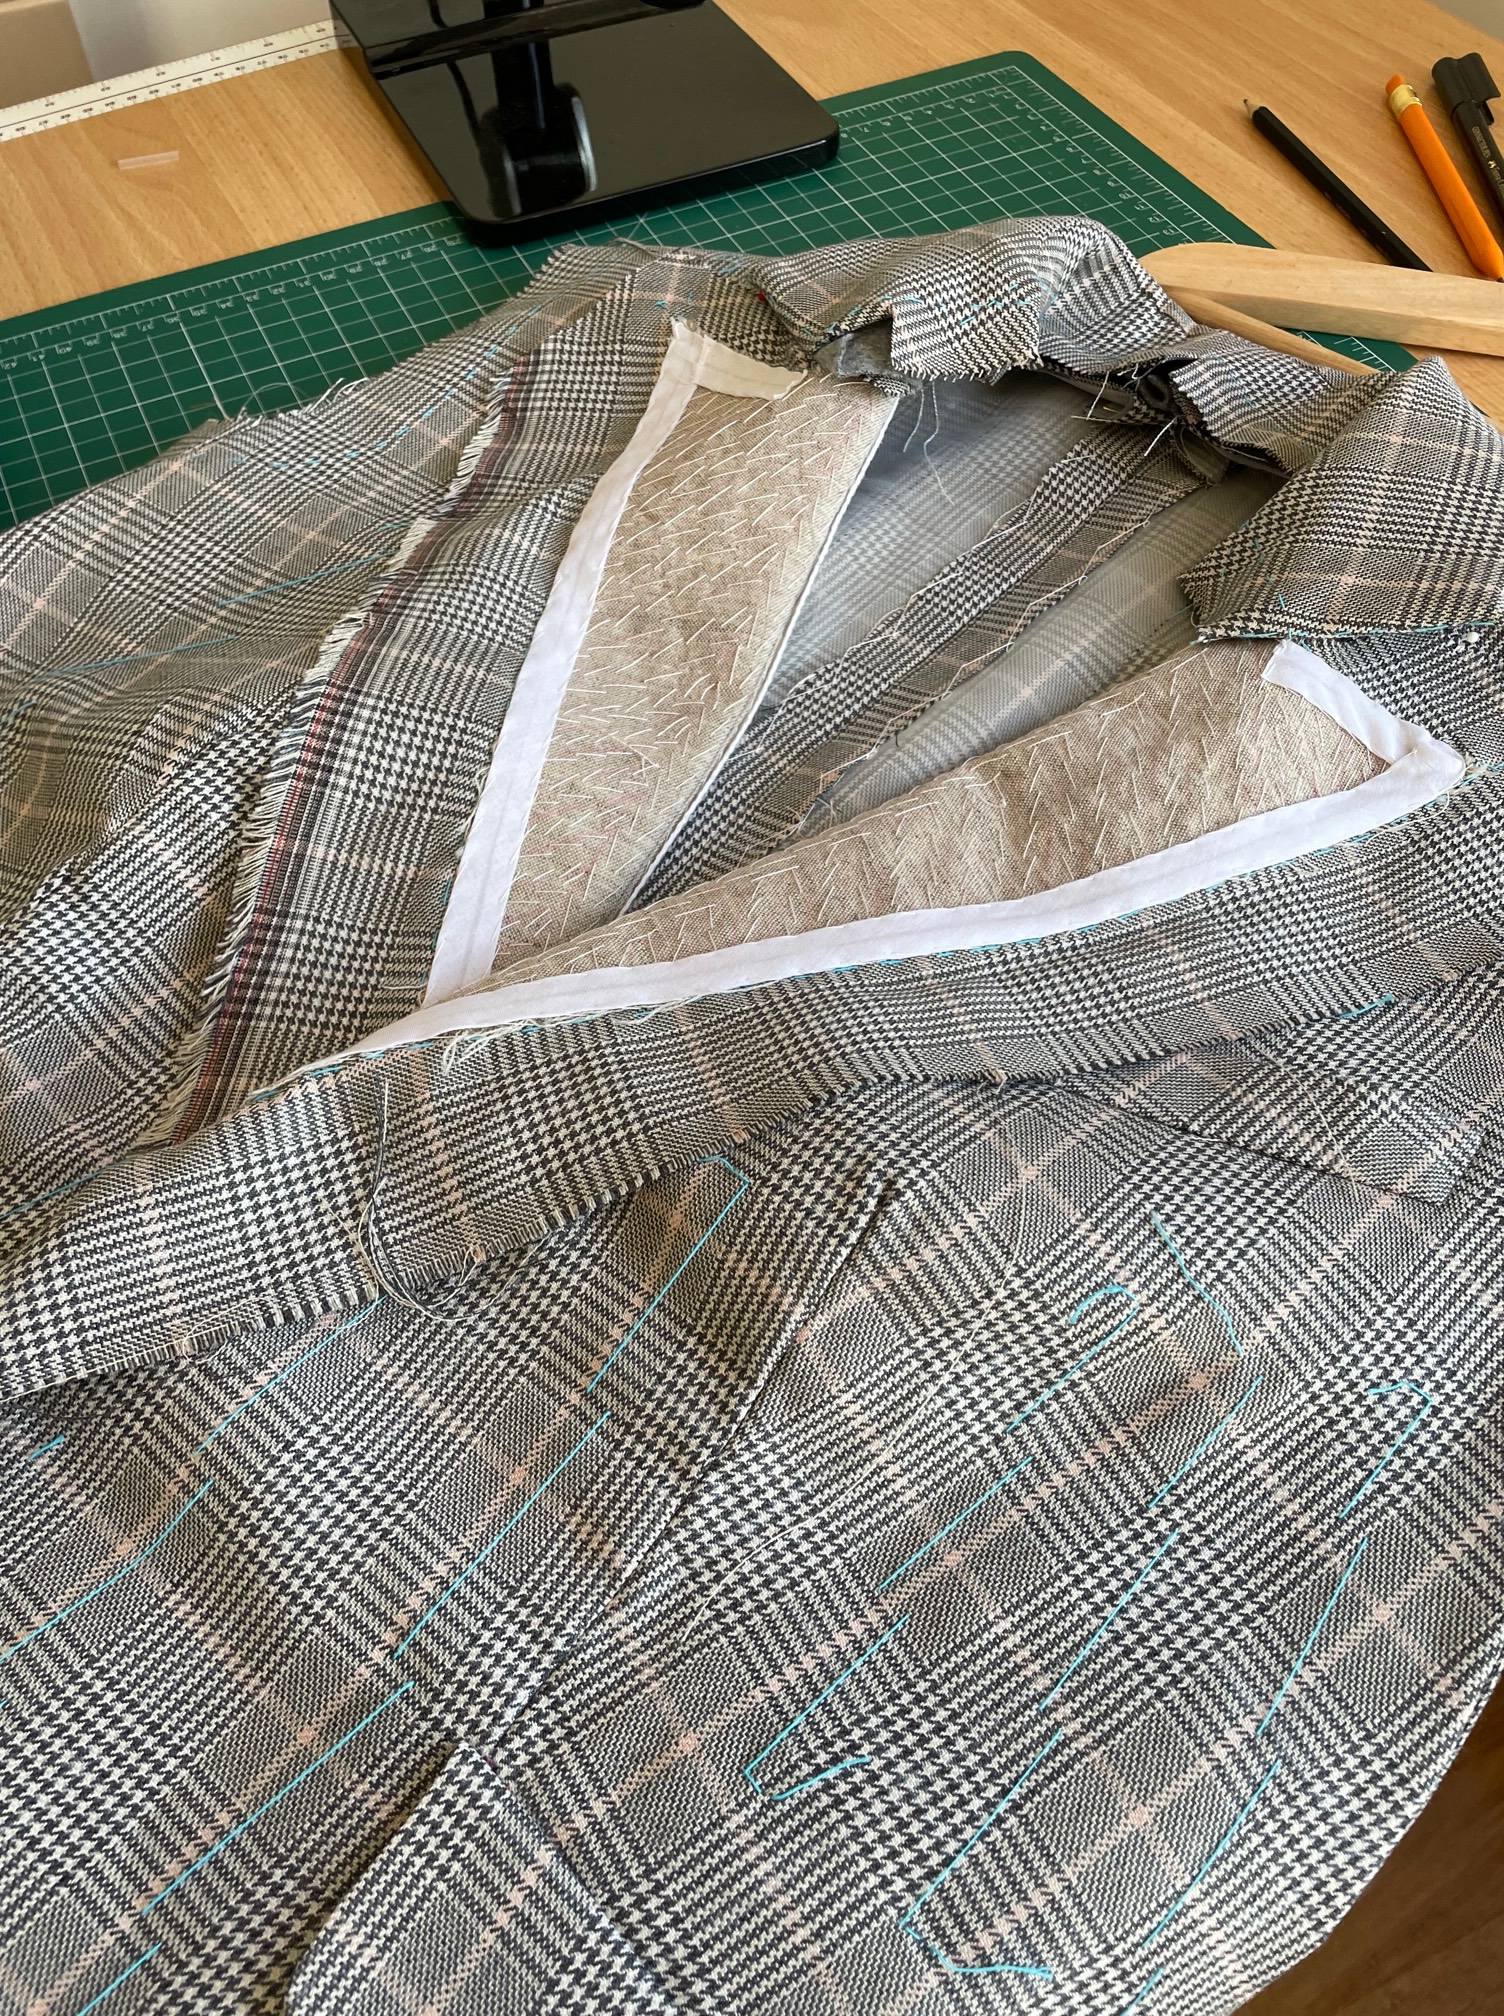
ON THE FABRIC and PATTERN MATCHING
My fabric. It was cheap, it frayed, it was insipidly floppy instead of delightfully drapey, it was lightweight due to being quite loosely woven, it bubbled off grain at the slightest provocation – it was really annoying to work with!

Am I fabric-snob enough to wonder if I would have had these issues had I used a better quality fabric? Of course. But, as with most fabric challenges, one learns a lot more from working with a challenging fabric than from a well-behaving one. The one this this taught me was the important of stabilising with fusible interfacing. I do wish I had fuse-interfaced the L-shaped dart (hard to go back and do once once has put in all the canvas), because the upper portion (on the bias more than the grain) when joined to the lower piece (on the grain) resulted in a lot of bubbling . You can see this in the photo on the left .
This experience had me worried for the collar – even with fusible reinforcing where you have to clip in a turn point, the fabric pulled and stretched. I tried to compensate for this by handling it as little as possible, it turned out better than I expected.
Even after a solid pressing and catch-stitching everything down – there is still some visible bubbling here, but I figure when I’m wearing and moving about, it’s unlikely anyone is really going to see it. Consider this element the inspiration behind the heading of this post!
It’s a good thing I decided to skip doing real double welt pockets because that would have been an unpleasant and unmitigated disaster. I am really quite please with my efforts to match the faux pocket flaps however.
If there is one thing I’m pleased to have learnt from this project – it’s this: how far and wide the ripple effect from pattern matching goes. It started with the centre back seam – how would I align up the Prince-of-Wales-inspired check down that curved seam? I chose to go in between two of the vertical box repeats.
What I should have chosen was in the middle of one of the box repeats, because this would have allowed my collar to ‘match at the back’ whilst showing the same pattern repeat at each front collar tip. Instead, I had to chose between the two – I went with balanced collar at the front and having it misaligned at the back (below right photo). So when I finally cut into my Zegna wool, I will probably start considering the approach to pattern matching AT the collar, keeping in mind the interdependancy with the centre back seam.


The Thomas Von Nordheim book has some beautiful examples of where the lapel facing has been steamed into submission so that the check pattern curves along the lapel edge, which I love the effect of. But alas – one can’t really achieve this with a high poly content fabric.
ON THE PATTERN and FIT
Once I’d sewn my L-shaped dart, I noticed that in comparison to every single example of a jacket being made using traditional tailoring techniques – my jacket had a lot of shaping (you know, because normal human beings are not coat hangers). The jackets in all the books I have are quite simply – for very flat chested humans. It got me wondering about the order of construction – the books have you sewing in the darts, then doing your lapel pad stitching. But when you’ve got sizeable boobs – the dart effectively distorts the lapel as it needs to curve around you – a lapel that sits flat on the table will gape on the body with a sizeable bust. I did it the other way around, then steamed my lapels by hanging the front piece off the edge of an ironing board, so that my curved darts wouldn’t be set in a flat and crumpled way. I put on the fold tape to add that additional curved tension just before I steamed the lapels and left them to set. If you have thoughts on this – I’m super keen to hear them.
The result was a pleasing lapel fold, whilst the bodice of my jacket still held the form it had been adjusted to shape around. The fact that it looks somewhat like a piece of breastplate armour tickles my funny bone – this was hard to really capture in a photo, but you get an idea of this in the photo below left.
The ease provided for in the pattern pieces for the lapel facing was quite substantial – definitely more suited towards a wool that you can steam into submission. So I did quite substantially reduce this for my fabric – largely as a guesstimation – which worked out ok.

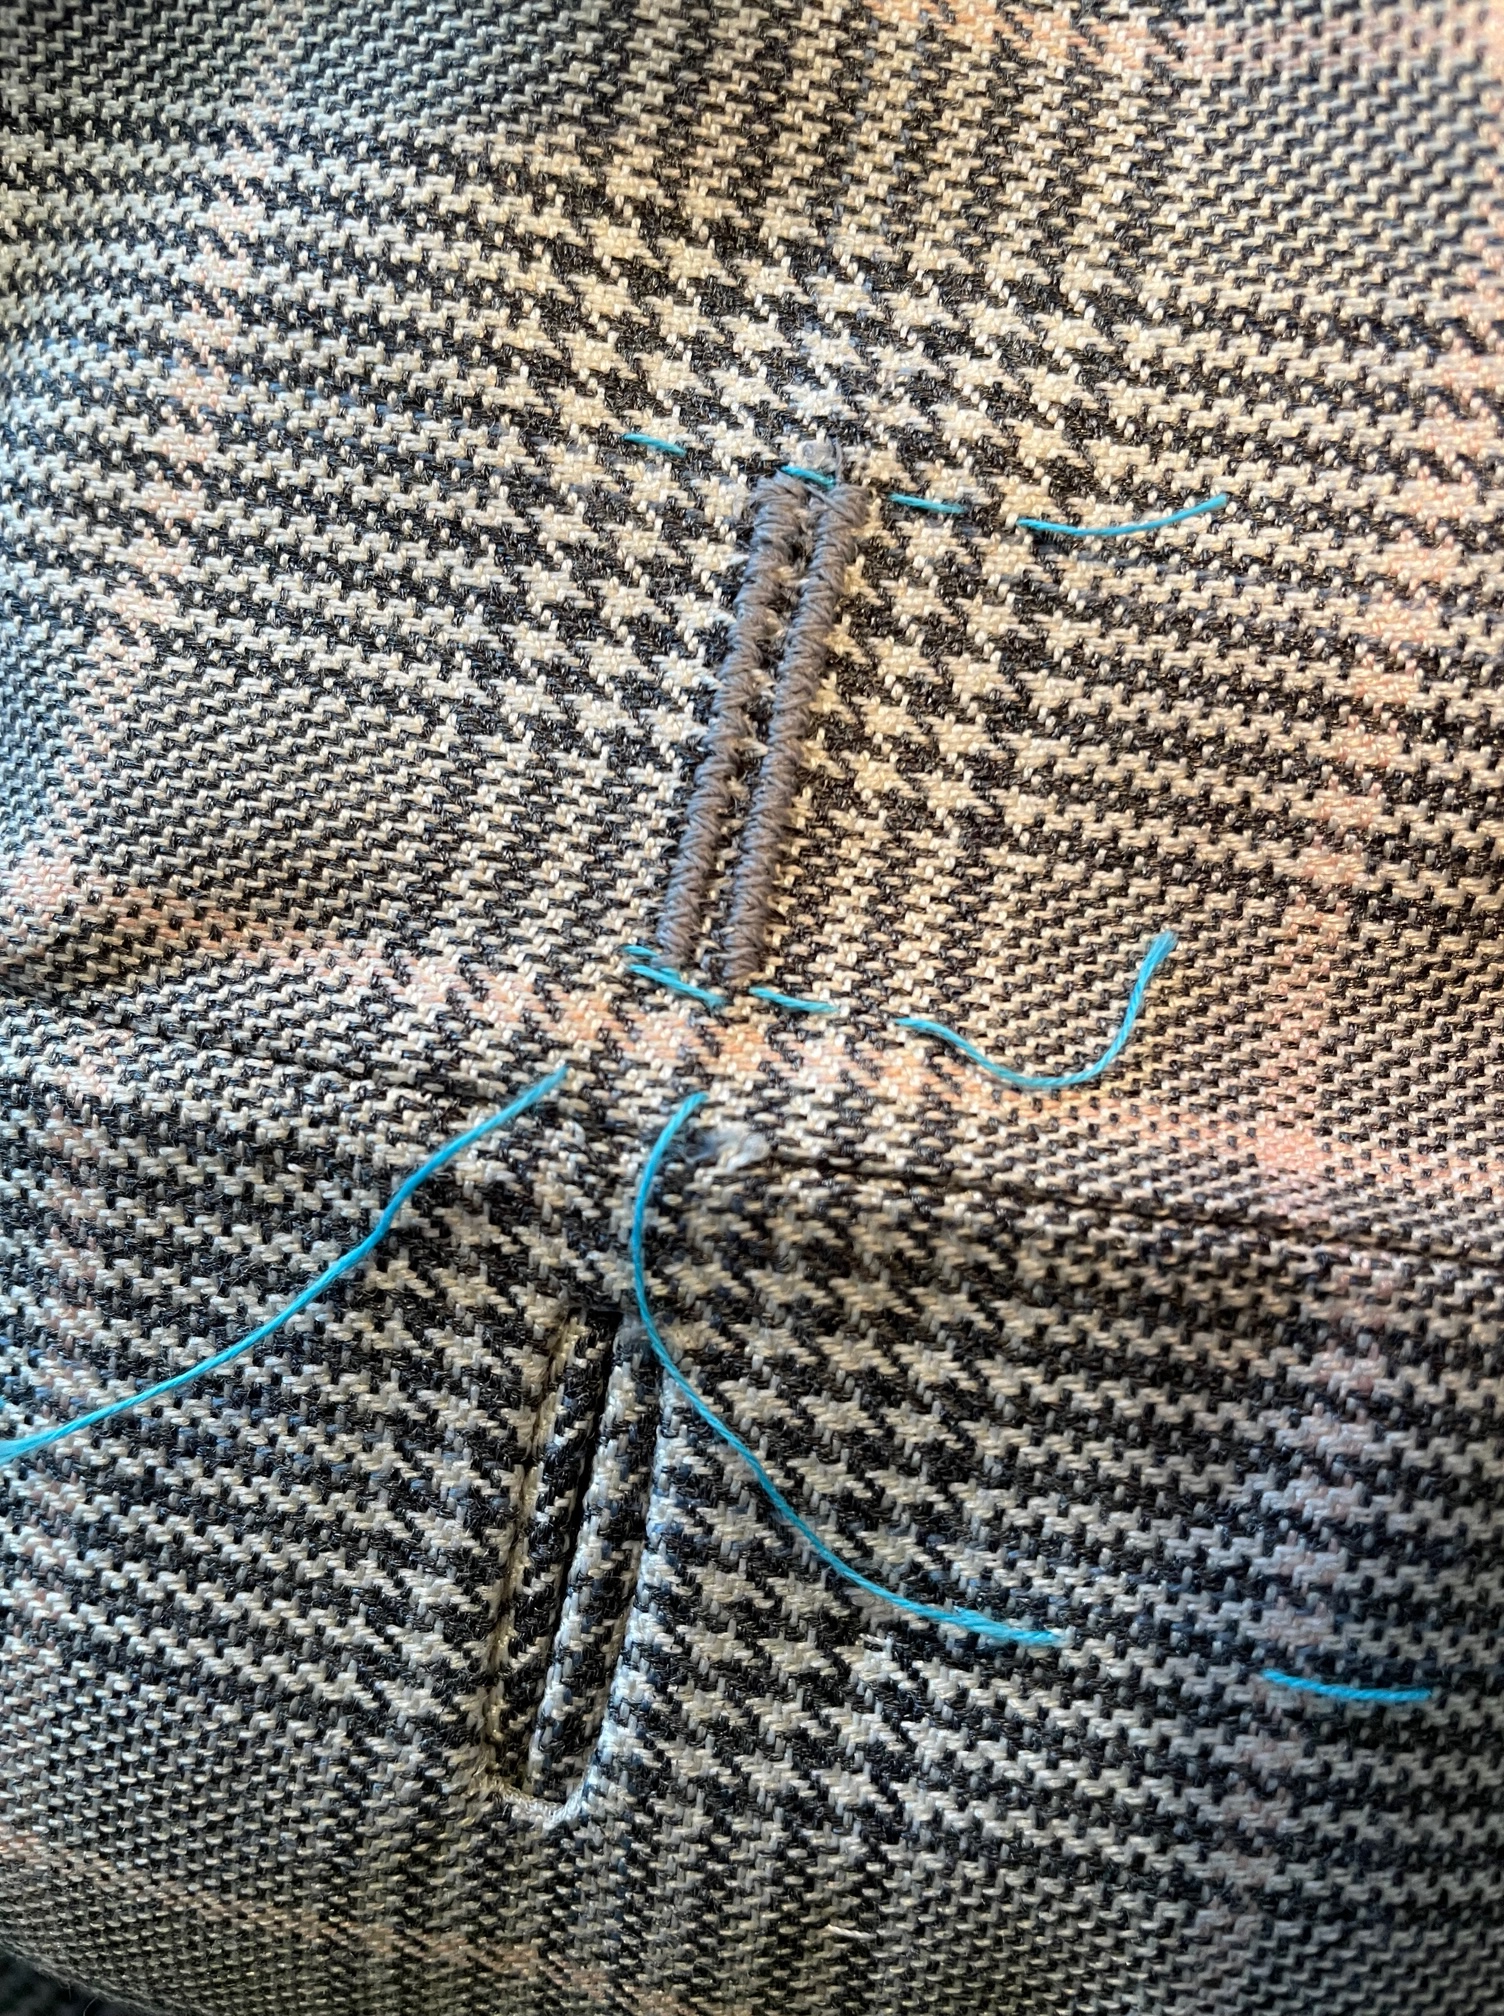
I was surprised at how easily the facing went in – with all the structure and taping acting almost like a stencil guide to really easily turn the facings around. I had sewn in a bound buttonhole for the single button closure I was going for – and chose to put in a simple stitched button hole for the backside of this (through the facing piece). Otherwise everything was catch stitched down and into place.
That facing button hole was a problem. All the tests work fine of course, but I tried three times (and unpicked three times) on the facing itself and kept having the machine ‘skip’ on the positioning – see photo below left. After going back to my scraps to troubleshoot, I suspect the skipping was due to my machine struggling with the change in thickness of fabric between the jacket front and the lapel. It’s relevant because the footprint of my machine’s buttonhole foot partially extended over this difference. I ended up manually doing the button hole using a zigzag stitch, going back and forth over it a few times to get the desired thread density. I am actually more pleased with the finish on this than my machine’s 1 step buttonhole!
I’m actually in the market for a new sewing machine at the moment, and testing for buttonhole ability in adverse circumstances (like this thickness differential) is right up there for in-store testing!

ON THE COLLAR
This pattern had something new to me – separate collar and collar stand pieces. I chose to use felt for the under-collar, which I LOVE. Having had a number of previous jacket fails due to under-reinforcement of the collar – I did have a moment of uncertainty on whether the felt would need additional support or not – so going in the opposite direction (ie extra reinforcement) seemed logical. So I did add hair canvas to the undercollar, and some iron on interfacing for the upper collar (the main fabric was a bit shifty and liable to bubble unless pulled taught). On suggestion of Julia, I will be trying the collar canvas from Kenton Trimmings. I also chose to make life easy for myself and try the fold under option, which worked wonderfully. Whilst not shown below, I did also catch stitch down the seam allowances after taking the second photo below.
Given the under collar pattern piece is cut on the bias, but the collar felt melton wool I used was non-directional, I could have done without these two seams. Next time!


SLEEVES
Once the collar was in – I was pretty razzed because this has been my Achilles heel for jackets to date – they have never been quite right. Whereas I’ve historically had a far better time with sleeves… you can guess what happened, right?
I pinned the organza to my jacket bodice to mark the match points I thought I wanted – then applied this to my fabric, basted everything together, constructed the sleeve, then attached it. It was beautiful! Except, the sleeve was on backwards. I think I must have pinned the organza sleeve underlining piece on backwards from the get-go. So I took it off – and basted it to the right side of the jacket, but in order to force the sleeve matching on the right side, I haven’t hung the sleeve correctly.
It got worse – I cut the second sleeve out and must have got it back to front – I had two right sleeves! Honestly this is like the third time I’ve done this – I really need to learn that lesson!


Sleeve looks WROOOONNNNNGGG. It’s basically a choice between pattern matching and appropriate sleeve head positioning.
But I’ve run out of fabric (I mean I could piece it, but bleugh) , so I’m cutting this project loose, and will re-try with a far more forgiving 100% wool fabric once I’ve got the sleeves right on a new muslin. I think one of the biggest challenges here is that I worked on this over a period of nearly two years – forgetting where I was, what I was up to, what I’d done previously. That said, despite how the camera makes it appear, I’m well thrilled with the collar and body of the jacket.
Reckon that plaid Zegna fabric is gunna be marinating in the stash for another decade or two!

it’s great to hear what you’ve been up to! That collar construction looks seriously professional. Tell us all about the wool version when you do it.
Hopefully one day I will be able to :) Thanks Catherine!
What a journey! How disappointing for you though. It sounds like you learned a whole lot.
I sure did. And given that was the original motivation for the project, I’m still pretty happy despite not having quite as wearable finished thing as I’d hoped! x
It’s so interesting to read about this epic project. Would you consider removing the one installed sleeve to make a sleeveness blazer? That would be very cool and give some life to this epic project, even though it didn’t end up where you hoped.
You’d be surprised how much the ‘turn it into a vest’ comment has been said… and yes I’ve considered it! I may still do it… Maybe. One day. There is still a fair bit to reconcile in the bodice if I did. It could look cute with a blouse that has a voluminous statement sleeve I think!