

I’ve been sewing for just over two years now, and I’m noticing the result of spending all my money on fabric rather than RTW clothing is that a few specific items are beginning to look a little… threadbare.
I wear button-up shirts to work during the week – they add a little professionalism to my uniform of jeans, steel-caps and hi-vis.
But when I started working in an office environment, it seemed ludicrously expensive to pull together an appropriate wardrobe – a really good quality shirt starts at $170+, and I’m too fussy to have just bought standard high street fare (which falls apart after 6 months of wear anyway). So to bridge the gap between my french champagne taste and my cask wine budget, I turned to second hand. I tried top-end shirts on in shops and then scoured eBay like a hungry hawk, and over-time ended up with a fairly substantial collection of silk and cotton shirts for a fraction of the cost – many of which I’m still regularly wearing today 4 years down the track.
At one point I did splurge though – I had a shirt made to measure when I noticed in their shopfront they were having a rather rare half-price deal. It was a really cool experience – I got measured up in store (there was 14+ measurements taken), then I went back for a fitting a few weeks later once it had been made before finally getting to take it home a month later. I was a little unhappy with it at first, because it seemed so much bigger, but after wearing it once or twice, I was in love. It made me realise exactly what I’d been putting up with by wearing standard sized fare – not only was it extremely comfortable, but I had a full range of movement without having to worry about that front button popping open, or having the button placket strain to give the person next to me an eye-full of whatever bra I was wearing that day.
That shirt has been in retirement for some time now, and I’m thinking I’ll probably cut it up and use it as a pattern base at some point. But for the meantime, I’ve been using it to adjust the McCalls OOP pattern I’m using to sew up my first collared shirt – 5929.
Copying my made-to-measure shirt to get the darts in the right place worked a treat, the fit through the front is great, if a little tighter fitting that I would like – which is easily fixed. I’m planning to make this out of a lightweight silk/cotton voile blend – a bit different to the starched calico I’m using to test the fit. Most of the strain is around my hips and at the tops of the side seams next to my bust:
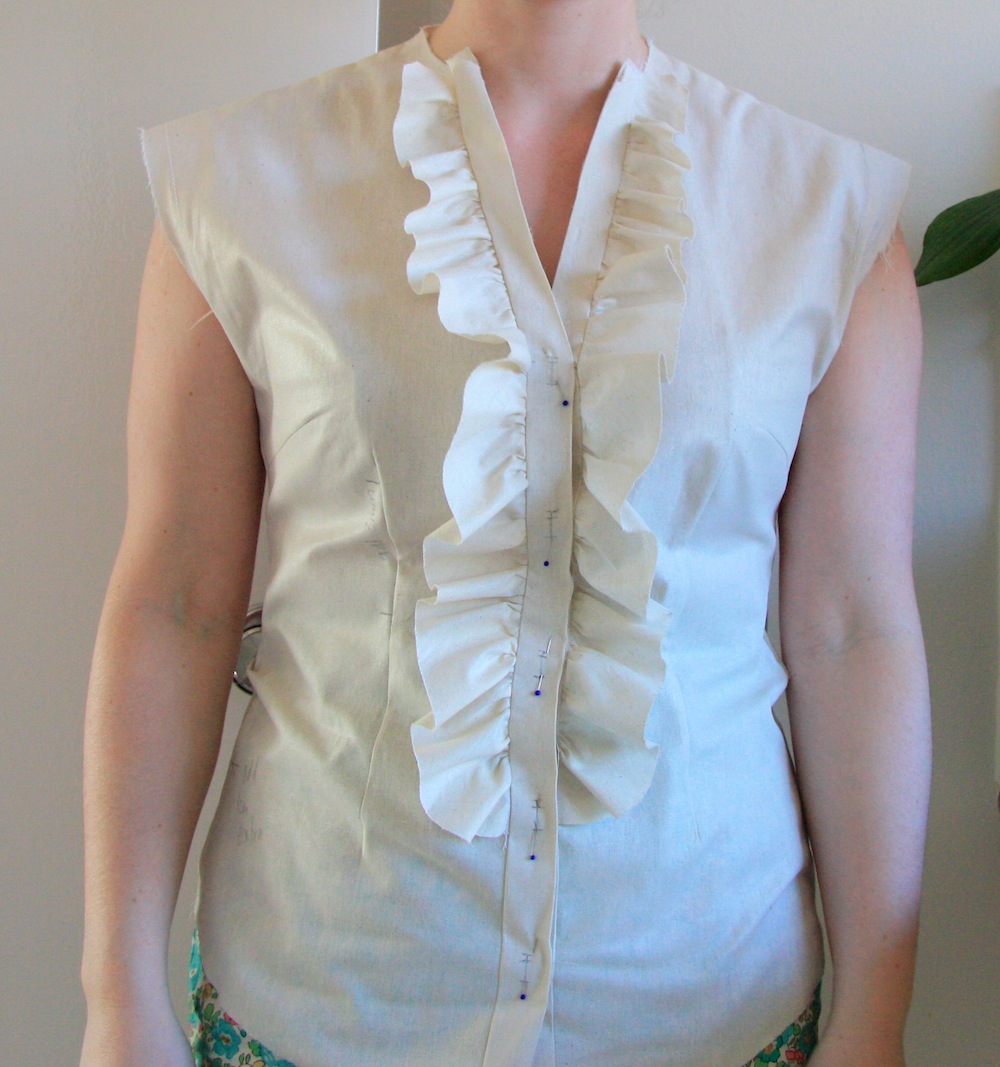
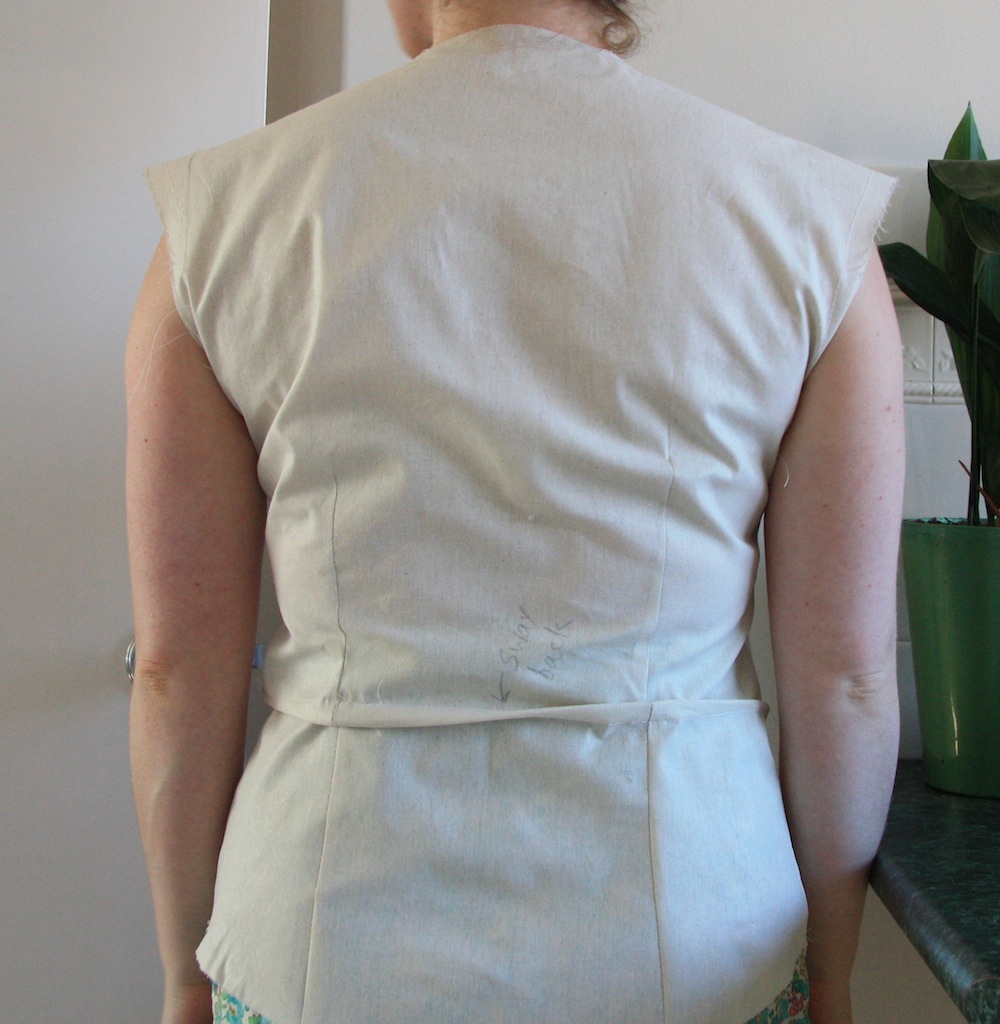
However, at the back – apart from it being more obvious here to me that it was a little tight – there was that annoying pooling of fabric around my waist, which I’d already pinched out and sewn up (about 3cm all up), tapering to nothing the side seams and perpendicular to the grain line:

I thought for comparison, I’d whack on my made-to-measure shirt to compare – here’s the front and back:


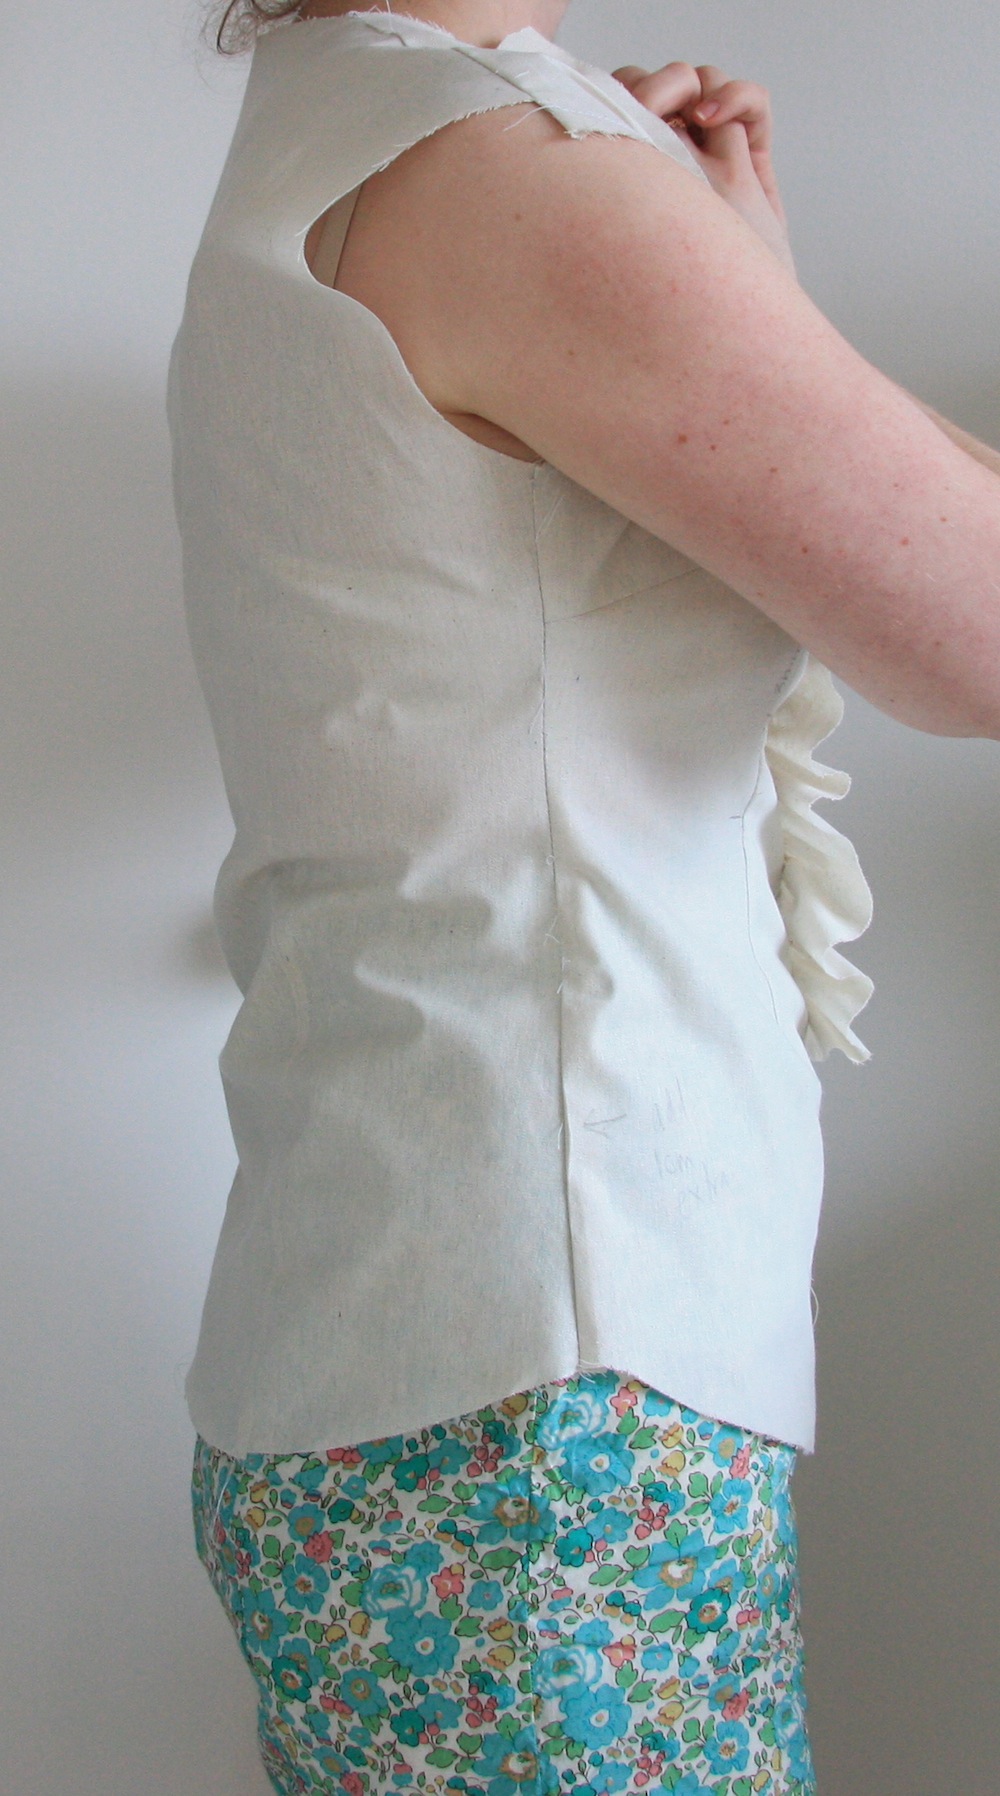
Once I’d transferred the swayback adjustment to my pattern piece, I realised that as my shirt doesn’t have a centreback seam (I also don’t WANT it to have a centreback seam) that I couldn’t just leave it as is – the ‘cut on the fold’ edge was no longer straight:

After a bit of reading and googling, and then reading and googling some more, I decided to try two different methods at adjusting my pattern. I felt like I had some time to kill whilst I waited for a particular Marfy pattern to arrive in the mail – at which point this project would be dropped like the hottest of hot potatoes to work on that.
First up – this method at swayback adjustment (from Fitting and Pattern Alternation (1992) by Liechty, Pottberg, & Rasband, pages 140-143) which resulted in a very square shoulder seam:

Sewn up and attached:

There’s still some pooling (ignore the tightness, I’d yet to attack that), but at this point I’m wondering if it is even logistically possible to get rid of this and still not have a centre-back seam. And I’d probably want to soften the squareness of the shoulder seam as well.
Ok, so let’s try method number 2 for comparison – I’m taking this from Sherry’s (Pattern Scissors Cloth) blog, she did an amazing post on altering for a sway back way back in 2010. I’ll admit, I fumbled around with this method for several days trying to figure out both how it worked and why, even testing it on mini-pattern pieces to get my head around it.

In the end, I just didn’t get the logic of it. I attribute that to the fact that Mr poppykettle and I are smack bang in the middle of the Live Below the Line challenge, and I am SO DAMN HUNGRY right now that I swear my brain isn’t functioning properly.
So I step back and try to think coherently.
I vaguely (very vaguely) remember reading somewhere that when fitting, you should always work top to bottom. And then a mini lightbulb moment… and all of a sudden it makes complete sense. If I add in the extra width at the sides, then the fabric pooling will be reduced – surely. I’ve been reading KathleenS’s PR Review of Simplicity 2339 (she was the runner up in PR’s Fitted Blouse contest in March this year) and staring intently at her flickr photos and I’m nigh-on convinced this will solve it.
Thoughts?

When doing my standard swayback adjustment, I add to the centre back at my lower back and remove from the centre back at the neckline (up to 2cm on the fold). This solves two of my problems. It removes the gaping from the neckline that I always get and it adds a little extra to the waist area. Which always needs a little extra!
On looking at your original adjusted piece, I wonder if you need to split the sway back adjustment over two adjustments. I need to remove a total of 8cm so I do 2 x 2cm folds, removing 4cm at each. Does that make any sense? You then won’t get such a crooked centre back and it will be easier to straighten. I also learnt at a Tessuti class that each swayback adjustment should be up to 1.5-2cm. Any more and you need to do more than one.
Or you can ignore me because I really don’t know what I’m talking about!!
No, not at all!! Thanks for sharing how you do it :) I like the idea of spreading the adjustment – it makes complete sense really. I might give this a try over the weekend :) Thanks Leith!
I’m sorry to disappoint but I don’t know the answer to this one either! My shirt could have done with a small swayback adjustment but like you I didn’t want the centre back seam. My ideal shirt wouldn’t be quite that form-fitting anyway. Fitted yes but nowhere near skin-tight, and a heavily curved back seam would be part of “going too far” in my view. And furthermore I didn’t want to break up the print. If I were making another shirt in a similar fabric I would even consider leaving out the back darts.
I do think you should tackle the other problems first and come back to this one. Are those wrinkles at the front waist from pinning out the sway back adjustment or were they there already (in which case they might be part of the same problem)? What happens if you unpick the side seams below the waist?
By the way, I would make a voile shirt slightly bigger than a sturdier cotton. (I’m not sure whether you were thinking bigger or smaller). Because of the fragility of the fabric, and because of the floatiness which will absorb and hide the extra ease.
Thanks Kathleen, I’m in agreeance with pretty much everything you’ve said there. Thankfully I’ve got some time this weekend to give myself some more room to reduce the tightness which I really do think is at least in part causing the problem. I’m going to try toile #2 in voile to make sure I’ve got the right amount of breathing room too… I’ve made the mistake of thinking I can get away with tweaking in calico too many times!
in my not very experienced opinion, if you think it’s a bit tight around the hips, i would tackle that and see if it helps, as it could be bunching at the waist (see how you have slight draglines at the front waist too) rather than doing a huge swayback. worth a try to see if it improves things?
Absolutely, couldn’t agree more. It really paid off to put that mockup shirt away for a few days and think on the fitting issues… coming back with fresh eyes to look over those photos has given me a better handle on it, I think. I’m putting my faith in having some additional ease to solve the problem! It was definitely too tight at both the hips and my upper torso. Thanks Joanne!
I don’t have any advice, though I would address the tightness issue and just see what happens, but please do report back on what you did, this is very interesting!
I definitely will Kelly :) Besides… I’ve still got the sleeves to tackle… !
Loved the WTF scrawl over the pattern diagram… I’ve been there too often to mention when the alterations get a bit too mathematical! :)
Have you done a rub-off of your RTW shirt to see if you can compare how that works on paper?
Hi Tania :) Not as yet on the rub-off, no. I’ll be trying out a few things this weekend, definitely!
oh boy, i haven’t attempted the fitted shirt yet! to my unskilled eye, it looks like it may be more of a bust/hip issue that is creating the problem. adding a little more bust and hip room may reduce the back pooling so that it needs only minimal attention. all in all, there’s only so much that can be done without a CB seam. good luck!
Now having taken a break from looking at it, the tightness at the bust and hips is the first thing I see! Last weekend, I saw them but it didn’t register that it might be a (major) contributing factor. You’re right though – that CB seam is a big influencing factor. I’m pretty sure that with an increase in ease and any additional shaping by the darts can give me a better fit than even the MTM shirt. Booyah.
I’m no fitting expert (though I also end up with too much fabric at the back waist), so take my ramblings with a grain of salt… but I think your side-on photo shows a little tightness just under the bra-line at the back, and the side seam swings towards your back hip somewhat.
For me – I have a short waist, which means the widest part of my hips is higher than the pattern pieces. Once I worked that out, I actually reduced the width across the mid-back (where my real waist is), and increased the width at my high hip (where the pattern waist is). This didn’t get rid of the need for sway-back adjustments completely, but it did reduce the pooling.
Hope that is somewhat useful! The other comments have some good options to try :-)
Yep, it’s that tightness for sure. I think what I’ve learnt from this is to tackle the simple fitting problems first (like amount of ease) as that’s naturally going to have an effect on the way the fabric behaves elsewhere. Here’s hoping I can get a better outcome this weekend! Thanks Kat :)
Hey Mel, out of curiosity, how much did the shop charge you for your custom made shirt?
Also, thanks for the sway back tutorial, I’ve always thought I had a sway back, but I’ve never bitten the bullet and done an adjustment (once I did with the help of my tutor) and all the tutorials I have found online looked very complex but your example made it easy to identify a swayback and how to tackle it.
thank youuuuu!
Hi Neen – I think it was around the $170 mark? (that’s at half price!). That’s going back a fair while now! I remember thinking it was a good deal coz I mean, a good Rhodes and Beckett or Herringbone shirt is that amount off the rack.
No dramas though, just make sure you don’t do a me and overlook the amount of ease as a way of solving the problem first! haha :P
I don’t really have much to add fitting wise, so hopefully your ideas and those commented above will help. I’m interested to see how it works though.
This post has reminded me that I have a shirt half finished that I need to tweak the princess seams on, and that I should bring it along tomorrow to try and finish off, so thanks!
hehe.. we can work on our shirts together then!
however, you haven’t seen the length of my to-do list tomorrow, so it’s entirely possible that I won’t get to it at all!
HA. Mine wouldn’t be much better, I’d imagine :( Ah well!!
I’ll be watching this with interest! I sadly have little to contribute however, other than lol at your WTF on the pattern piece :)
Humour solves all problems :)
I have the same issues and now add a centre back seam so am looking forward to seeing what you do to fix it! I am wondering about the swayback adjustment what would happen if you do it, then straighten the centreback seam and add that amount to the side seam? It might just make no difference or make it worse?
Its looking good though, I got some fabric the other day I want to use for making a fitted shirt so its great reading about yours :)
It’s a confusing roundabout of adjustments… that’s for sure. I’m going to try adding in some extra ease and see how that affects the pull and tug of the fabric. After that? I’m not so sure! I’ll play it by ear, and be sure you post how it all goes! Thanks Suzy :)
First get the side seams wide enough so your hips don’t grab the fabric and make a pool around your back. Then I would measure your back length. Maybe you are short waisted so then you would reduce the length above the waist both front, back and sides by the same amount. This is what I do because I only measure 37cm neck to waist and most patterns will be 40cm. try pinning the muslin tuck all the way around and see what you think.
Thanks Vicki – I’ll definitely be taking that on board. Great point about the location of my waist versus that of the pattern, too – love it. All this talk about it has made me really hanging out to try making changes to it right now!
Sherry’s explanation (on scissers, pattern cloth) of a sway back is pretty amazing. It would make sense if you actually cut out the pieces of paper in small size and then follow along with her ‘origami’. I think there would still be a bit of pooling that happen with any fabric where there is no give but the result would be much better.
I might try her quick pattern adjustment next time. Actually all I do usually, is cheat and add two darts at the back to take up the extra fabric and shape the waist. …..It becomes a design feature! Be sure not to overfit though. I think I used to do this and now I think it actually makes the clothes look ‘more home made’. One more point….Any fitting for yourself on your back really requires 2 mirrors at angles to work effectively. The best fitting aid I ever bought was my full length cheval mirror to line up at an angle with my ikea wall mirror.
p.s. great blog.
Helen
I love the idea of having the angled mirrors like they do in change rooms – definitely a great idea for analysing fitting issues! Thanks for the tips though, I did try cutting out mini-pattern pieces to test Sherry’s preferred sway-back method, but still got confused. In the end, I ended up adding in some extra ease and the pooling disappear. So I think I mis-diagnosed it in the first place!! oops! ;)
I’ve been staring at this for a while trying to work out what exactly is going on….If this was me I would start with the shoulder seams, there is to much fabric up around there, especially towards the outside….rip those suckers out and re – pin them! they are definitely affecting the way the back is pooling…it will also adjust the excess on the front bust but you will then have to adjust your dart again…one step forward…SO frustrating. You are absolutely right, starting at the top and working down is the only way to go, I was taught that a long time ago, and it really seems to work. The blouse is going to be so pretty, I love a good ruffle :-) btw what Marfy are you waiting for??!!
Hi Leisa :) Thankyou! I’ve been working away at this most of today and I’m really quite happy with where it’s at. I ALWAYS struggle with the armscye seam – it’s definitely my fitting nemesis. Once I added in the ease I should have had in the beginning – the ‘swayback’ disappeared. So I completely misdiagnosed it! It was all to do with the fabric being pulled where it shouldn’t have.
I’m waiting on a delivery about about 12 Marfy patterns… but the one I’m itching to sew up first is 2940 – it’ll make a fabulous winter knit dress, and I love the neckline for it. I hate waiting! :P
I’m not sure I can be of much help, mostly because I’ve not really made many shirts before (only vintage blouses). But I have recently signed up to the craftsy course on sewing shirts and I’ve found it to be a wealth of knowledge.
Good luck, I can’t wait to see this made up, with cute little ruffle and all! And I think it’s a great idea to trace a pattern from your made-to-measure shirt. Then you’ll get the perfect fit every time and it would be so easy to customise.
Looking at the diagonal lines in the photos, it seems that you need more width at the top of the side seam, particularly in back. The diagonal lines are more prominent at the back, but there are some also on the front. As someone else mentioned, you have excess fabric at the upper armscye. So before addressing the lower part of the blouse, I would take off width at the upper back armscye and add it to the upper side seam.
Making those changes should get the upper garment fitting better. Then you’ll be able to see more clearly what needs to be done at the waist and below.
Melanie! I’ve just noticed your new post! For some reasons, my reader does not show updates from your new blog :( By now, you have probably modified your bodice :) In any case, my two cents on the matter…
Swayback is the biggest nightmare for me! Here are two methods I use to modify the pattern: I either broaden the back piece starting from waist or I shorten the length of the back as demonstrated on Shery’s blog. When adding extra centimetres to the pattern, there are also two ways: either add some width to both side seams or to the center back seam. It really depends where is the most prominent part of your bottom is.
I understand that the front is the same as pictures on top of your post and you’ll add sleeves to the bodice. Here are a few thoughts on the modification from top to bottom:
* cut out 1.5-2 cm of the back neckline
* cut out 1cm of armscye under the arm to allow more movement (I would even cut 1 cm around the armscye taking into account the fact that by attaching sleeves later on you will slightly re-shape the bodice)
* release partly the front darts and completely side seams
* re-distribute fabric from the front darts and side seams into the back
* shape the excess of fabric from the bottom back to darts
* I would also take off 1-1.5cm from the front piece around your waist, I can see some extra fabric from some naughty wrinkles on the picture :)
But most importantly, is there somebody to help you fit? Or you make all alterations by yourself?