
Thanks for your input on my last trouser post – it was really fascinating hearing everyone’s thoughts and opinions. I don’t think I’ve had a pattern disaster quite this bad before! In the aftermath I’m left wondering if indeed my perception of fit has been overly influenced by a lifetime of badly fitting RTW clothing.

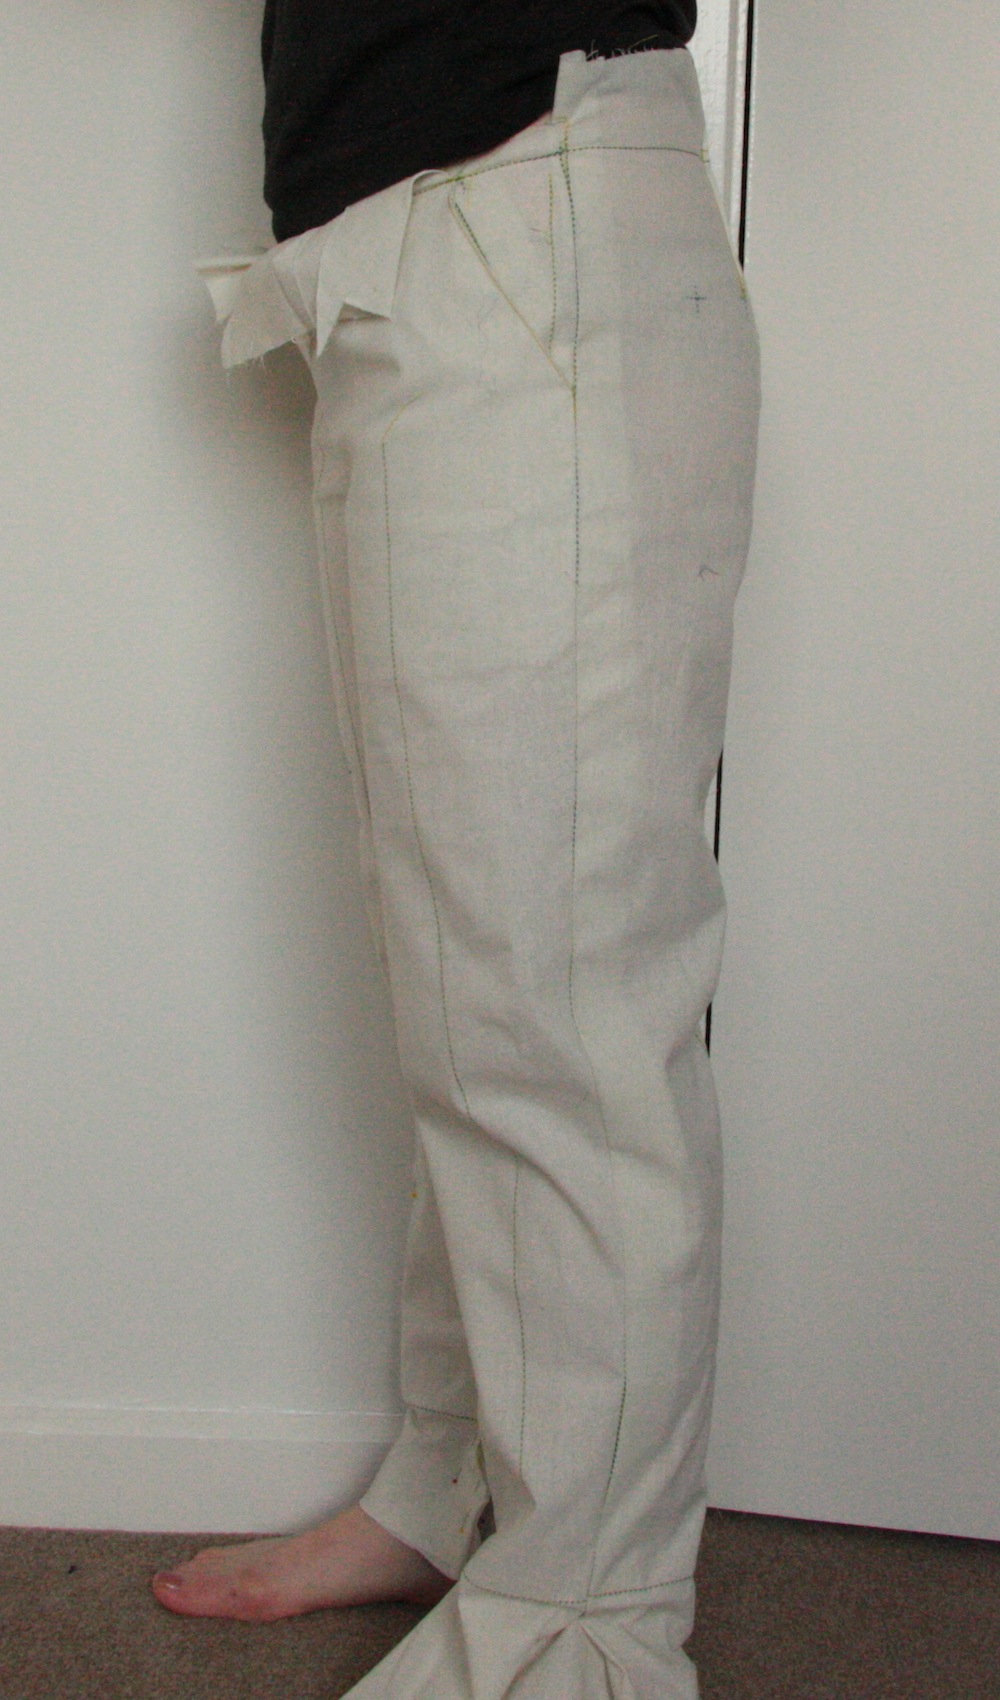
Case in point – many of you mentioned that you could tell looking at this picture that the fit would be bad – mostly due to the way in which the side slant pockets stuck out and the pleat disappears. I’ll admit… that’s actually one of the things I like about this pattern, but I can’t explain why. I suspect it has something to do with spending the entirety of my teenage years wanting slighting bigger hips, and the optical illusion provided by those pants kinda delivers on that.
So, I turned to a variety of different resources to beef up my knowledge on pants fitting.
CRAFTSY
I logged in after what must have been two years to discover that at some point in the past I had bought the class ‘Pants Fitting Techniques’, by Sandra Betzina.

I watched the whole thing (for the first time) and it does have some excellent tips, if you don’t mind Sandra’s rather chaotic approach of explaining things, and that you already know what your areas for improvement are. There are some good descriptions of how to make changes based on your desired improvement, however what I really wanted was a before shot showing the issue, and then the correction. Visual learner here. Notwithstanding, for the small price point you pay, there’s some really useful information in this course that shows you how to adjust without delving into depth the reasons why you need to adjust (at least, beyond saying ‘because of protruding thighs).
KENNETH KING’S SMART FITTING DVD
Another recommendation left in the comments of my last post was this. I haven’t got it, but it’s something I’d maybe consider adding to my wishlist.
KENNETH KING’S TROUSER DRAFT DVD
This, I now have – and what a gem it is. I borrowed it from someone and ended up buying my own copy. He not only takes you through a very logical, easy to comprehend set of reasons why a particular adjustment is required, but shows the symptoms of the issue and the fix. I totally got his reasoning and I honestly think it’s going to change the way I look at fitting. Something about the way he describes ‘net loss and net gain’ just made my brain click all the missing puzzle pieces together – best US$25 I’ve ever spent. It also includes a detailed method and formula to draft your own pants block from scratch using the French Method. I did attempt to do this, but vowed to come back and revisit my numbers/calcs after a break because my pants draft looked really, really wrong. I must have an incorrect calculation in there somewhere, which just compounded the problem.
SO WHAT HAVE I BEEN UP TO SINCE?
I tried on Jacques again. And holy crap I must have been having a fat day of epic proportions previously, because they fit. I’ve got no explanation for that, especially as I tried them on multiple times previously.
I really, really want a pair of slim fitting trousers. Something a bit Brigitte Bardot-ish.

So with my new found knowledge of net loss and net gain all thanks to Kenneth, I spent several hours in front of the mirror, straining my neck and bending down to pin and back up again to check. His e-book does contain a lot of fitting information and solves, but nothing on the lower half of the legs.


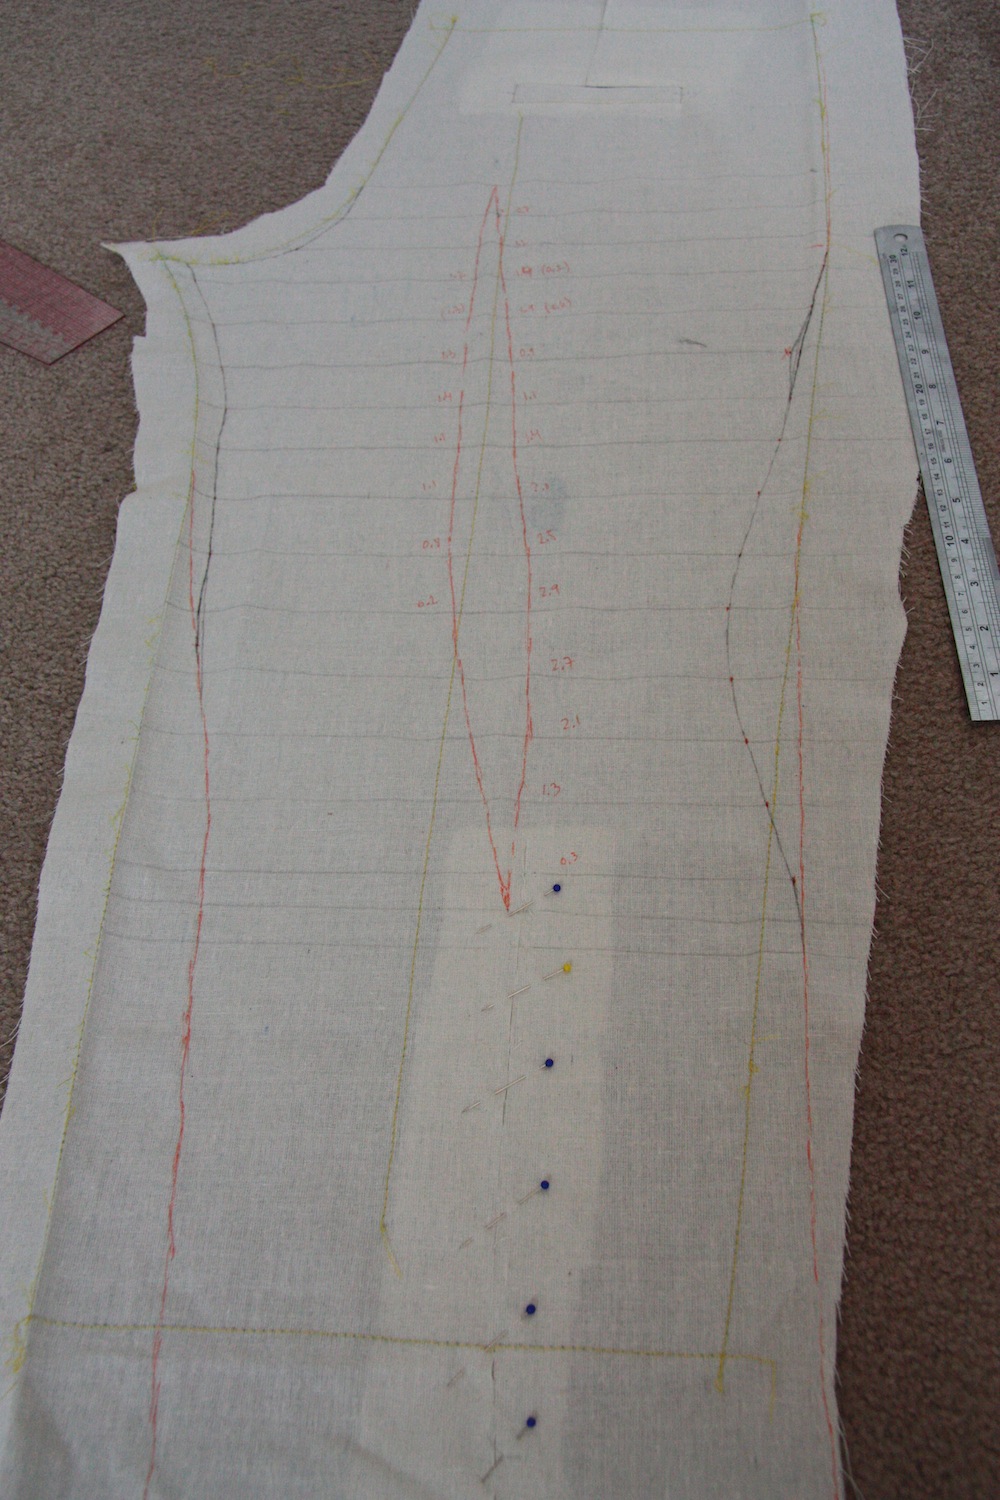
My legs aren’t straight – they curve outwards quite substantially at the knee. What I really wanted to see was how pinning out these pants to match my leg shape would translate into 2D. I was rather disturbed after unpicking everything, it looked… ugly. Not the lovely straight lines we’re accustomed to seeing from a sewing pattern! The yellow lines are the original pattern lines, the orange is where I’ve pinned out excess and the black is the final line where I’ve taken out the excess in a vertical dart.
I then sewed my muslin back together again, this time along the new seam lines I’d marked, to see how it fit. I knew I’d still need to mark new side seam lines as they’re quite crooked in the photos above, but the moment of truth would be in how they looked now I’d been playing around with them a lot…
I’ve also sewn on the waist band here – it’s far too tight, I know. I may still grade up the waistband 2 additional sizes and see how the proportions sit then, but I think it’s unlikely you’ll ever see a finished version of these pants.
But I am really quite happy with the progress I’ve made on a slim leg!


What I’ve taken an incredibly long time and huge amount of futzing to figure out – is that I need a ‘knock-knee alteration’. I guess the benefit of taking the long way to find that out is I know exactly how knock-kneed I am. Cindy from Cation Designs has an amazingly informative post on this alteration and a stack of others (including the hyperextended calf alteration) – definitely recommended reading.
What I have veered away from is making a comfortable trouser suitable for the office environment. I can see myself wearing these (very close fitting) pants made up in a floral cotton pique on a warm spring day, but they really are too tight for the office. Time to get back on brief!
A PANTS FITTING CLASS
Then, Oanh invited me to join her in a pants fitting class she was taking. It wasn’t quite what we thought it was (which was a trouser drafting course), but after a few short hours, I had a rather well fitting, high waisted wide leg trouser outline.


They’re comfortable. Really comfortable! The kind of comfortable that I could spend anywhere between 8 and 12 hours straight sitting in – which means they pass the office-suitable test. They look good in the mirror. The fit even looks perfect on camera!!!
So why do I feel so ridiculously dowdy in them?
That’s something I think I’m just going to have to get over – because those muslin photo aren’t lying.
So I’m going to sew up a wearable muslin from a fabric I don’t mind sacrificing to this cause (which will be a wool crepe), which means I can effectively test drive how the style would work for me. I would like your opinions on a waistband treatment though:
1. A really wide waistband so I can work in the slanted pockets still (this is not a pair of pants I’d feel comfortable tucking my shirt into, so it would be covered. That way I’d still get the ‘look’ of hip height pants, but with the comfort of waist height.)
2. A facing and no front pockets?
3. A picked zip at the side seam, or a centre back invisible zip?
I await your advice!

The pants will look very different from the muslin once they’re made up using this pattern. And if they’re a staple item then it’s normal for them to be ‘boring’, so to speak. They’ll be enlivened with whatever you wear with them and accessories.
I’d put the zip in the centre back seam, it depends what you prefer. :-)
You’re probably right. Muslin isn’t exactly an attractive fabric! I’m inclined to put the zip in the centre back seam too. Thanks Mel :)
What a journey! What about those clover pants you made some time ago for a Brigitte Bardot-type pair? Re: the upside-down frowny-crotch going on with your Jacques, maybe check out the Coletterie pants fitting cheat sheet? It dealt with a few crotch issues – hehe. Regarding the CB zip on the high waisted pair – don’t do it unless they’ll be lined. I have a pair of Cue pants that fit beautifully but have a CB zip that rubs my ass. I prefer to wear a g-stribg with tailored pants, and it rubs on my butt cheeks (sorry fir the TMI but there is nothing worse than great pants that give you a sore butt). Good luck!
Yes my clovers have been getting a little bit of wear! More so recently, and after all this I’m beginning to realise they aren’t actually as bad a fit as I previously suspected them to be. I checked that Coletterie sheet – it says it’s because of the waistband being too tight! haha. Good to know about the zip, I’ll more than likely be lining. But if I don’t, I’ll know otherwise :) Thanks Rach!
My goodness what a very interesting journey you’ve been on. The latest muslin looks good. What if you lowered the height of the waistband and inserted slanting hip pockets? Then they would have a nod to your original preference whilst fitting well? I second the vote against a CB zip on scratchy grounds. I think I’ve worn a singlet every day of my life and yet I’ve still had scratches from CB zips – so aggravating. Will be compounded if you’re not going to tuck your blouse in (unless you too wear singlets!). As for frumpy, that should go once you use the real fabric. Rachel ☺
That’s exactly what I’m thinking of doing, Rachel :) I’m planning to line the pants, which will help. But I’m wondering if I can work in some kind of placket. Or maybe I’ll work in a centre front zip like jeans have!
I think they look better because they are high waisted. You are lucky that you have a trim belly that can look good in a pair of ‘hipsters’ but the styling and the good fit of a high waisted pair will always look better. I agree with Rachel, I think all the frumpiness will disappear when you use lovely fabric. Hats off to you for all your experimentation and for sharing it with us. When I get brave enough to attempt a pair of trews I will be sure to return to your fab post for advice! :-)
High waisted is so much more comfortable, too! I’m sure you’re right – lovely fabric should make the difference :) Thank you so much Janene! I’m absolutely LOVING your flora. You look stunning!
I have not studied the ins and out of all the things that you want in a slim fitted pair of pants but—-why not draw where you would like the top of your pants to end. Create a shaped waistband below this line.Creat slanted pockets below the waistband(mens style) and treat the hem with either a turn up or small slit . If you use the same pattern in a stretch woven , you might have to grade down a size – leave out the pockets , use an invisible side zip and pop a couple of jet pockets somewhere to give them a more expensive look. Great weekend pants, you can either tuck something in and wear them with a belt or wear with a relaxed long line top. This will also get rid of the “frumpy” Just read Rachel’s suggestion above – very similar to mine!
Yep that’s pretty much exactly what I’m planning on, Coco :) I think that will keep the lines simple but just a little bit more visual interest to take it off the bottom rung. Thanks!
Good work. I’ve had very limited success with sewing pants… The crutch rise is always wrong & I seem to have too much hip! Thanks for the links – hopefully they help me with my pants adjustments too.
I’d go a wide waistband for your pants. I’m a sucker for a waistband. I can’t wait to see thd end result.
Yeah that blasted crotch curve is a troublesome beast. Worth fiddling around with to get it right though – once you’ve got it, it’s very easy to adjust everything to match! I’m definitely leaning towards a wide waistband… now I just have to get around to actually making it happen :) Thanks Myra!
If you put the zip in the back then you have the opportunity to fiddle with the side seams after the zip is in. I even put side seams in my waistbands so I can adjust later. If you are making a pair of basic pants and differnt fabrics will be used, you will definitely need to tweak the fit.
Yeah I think that’s a really smart idea. Previously I’ve had a look in some mens RTW pants, and they’re all sew like that! Makes adjustments so much easier down the track. Thanks Meg :)
I’m personally not a fan of pockets but I’ve got ‘child bearing’ hips (must have, I had 9 pound babies) so refrain from drawing attention to them!
I prefer concealed zips so I would use an invisible. I only like handpicked zips in heavier fabrics where the stitches ‘get lost’ – however I’m a bit weird about some things LOL.
I knew you would sew the ar*e out of pants ;-)
Yeah I like them exactly for that reason – they give me a little more hip! hehe. I’m with you all the way on zips. Invisible please, and only picked when it adds to the look. Thanks Lizzy! x
I’ll give you some of my hips in exchange for a smidgen of your bust ;-) ROFL
Deal!!!
You have done the yeoman’s work and you are going to benefit from this with every pair of pants (and likely every garment you make) going forward. They look great. Muslin is a hideous fabric to see potential in. When you make them in a proper fabric with drape, you’re going to be very happy.
Thank you Kristin! I certainly hope so. I’ve just successfully altered a shorts pattern (with pleats at the front – yay!) based on this block so I’m only about a million times happy. Definitely worthwhile spending the last two months trying to get this right! After a finished garment win I think I’ll be ready to come back to pants :)
Your last muslin looks perfect.
What a great starting point for anything you now want to do with pants/trousers/jeggings/leggings…whatever you want to call them; however you want them to look.
Any interesting details you see on a skirt pattern can be successfully transferred to your pants muslin. If you want sticky-outie pockets giving you a more curvy look, you can have them. There’s an OOP Montana pattern with a very high waist that has a quilted waistband. The trousers are seamed at the waist and then the waistband flares at the top to accommodate the rib cage. Pattern shows slash pockets and two big pleats each side. Very interesting, very elegant. Maybe cuffs too… it’s been a long time, I can’t remember.
I envy you your last muslin, any details of pattern drafting would be gratefully received.
Thanks! It only took me two months…. hopefully that time investment will pay off in time! It just took a lot of time, making small changes, trying on and adjusting again. No silver bullet unfortunately… I recall Kenneth King once saying that in order to be a good sewist, you have to be willing to ruin many yards of fabric. There was a lot of muslins sacrificed during this process!
I’m looking forward to playing with the details. Cheers Barbara :)
looks like you’ve nailed the fit! all the dowdy-ness will go away once you add great fabric. definitely do the wide waistband, slant front pockets, and i’d suggest a traditional fly front. i would think that a CB zip would be awkward, and side invisible zips are really hard to get a smooth fit with (or so i’ve observed). good luck, can’t wait to see this in real fabric!
Thanks Lisa! I’m pretty happy. 2 months of faffing about with fitting pants have finally come to an end and a result. I just successfully altered a Patrones shorts pattern (pattern 7 from issue 317) that I’ve been dying to sew up for nearly two years with that block – cut into the real fabric last night! It’s started to get really warm here lately so I’ll finish these shorts before sewing up a pair of work pants :) I’ve now swung about to completely agree with you on the zip issue. Fly front it is. I have one pair of pants with a side zip and everyone’s comments reminded me how uncomfy that configuration is!
I think they look great on you! Your hips look lovely and feminine and the fit is looking awesome! Don’t be disheartened by the calico. Imagine this in a wool crepe!!! You have a great figure, don’t be mean to those hips :)
Thanks Julia! You’re too sweet :) I’ve actually started sewing shorts instead. Because it’s hot right now! And a need to experience the rush of a successfully executed sewing win, before heading back into pants land. WhoohooO!
I’m no muslin expert but agree with the others, looks like you’ve got the fit right and they won’t look at all dowdy in the final fabric.
Thanks Barbara! I’m counting on it :)
Melanie, I have a “spare” copy of Kenneth’s fitting dvd set if you’d like it. I was sent two in error and they didn’t want the extra back, so it’s been sitting there waiting for someone who’d like it ever since. I just need an address to send it to, you could email it to me, probably easiest, and it’s all yours 😊
You’ve brought such a wonderful smile to my face – thank you Wendy!! I’ve emailed you, and am very much looking forward to more Kenneth!!
I think you have to start out with a straight leg muslin and work your fashion fit from the paper pattern. There are really good pattern making books about that will show you how.
Thanks Gail. I’m pretty happy with my last muslin effort for the mean time :)
Hello , I am a bit worried about you taking lowered leg width only out of the inside leg . I was taught you had to do it from inside and outside leg equally so you don’t throws off grain lines . Also it looks to me the you need to add a big of length , though not much typo the front crotch curve length , if you want to keep your thigh measurement the same then scoop out the front crotch a little on the seam line by increasing the scoop of the seam line into your garment space . This counter intuitively creates mores space for your body to sit withinn the pants and so avoids ” camel toe” syndrome . I would use a wide waistband .
Hi Mem – that exercise was really more about learning the shape of my legs and how they related to the pattern. I won’t be using it at all – it did tell me how much of a knock-kneeded adjustment I need, and I think the results of that speak for themselves in my final muslin :) Now that I’ve got that, I’m going to go back and draft in features similar to that of the Jacques pattern (which I still do love the idea of) – slanted pockets, a small pleat, a fly front and a waistband. Thanks for your thoughts!
I really admire your perseverance! Your final muslin looks like it can be a workhorse pattern for your future pants. I agree with the above comments about the fabric you choose making every pair of pants NOT boring at all!
Thanks Karen! After spending two months getting to that last muslin… I’m creatively frustrated at my lack of finished garment output, but so very happy I’ve got this base to use going forward. As the weather has started to warm up here, I’ve just successfully used that block to alter a shorts pattern that has very similar features to the Jacques pants – slant pockets, front pleats, fly front and waistband. The muslin for those was super successful and I cut into the real fabric for them last night! (Hot pink silk twill – lovely stuff). So it’s likely that will translate into a pair of pants very soon :)
I like you last pair but I don’t like the high waist. I think a waist where the waist should be would look very nice. . Just not into things that deform the natural body. I lived through the eighties did it all , the high waist, extra big sweaters, everything off and then saw the pics a decade later and learnt to keep things where they should be . I’m still unearthing old pics and destroying them!!!
Oh absolutely – and I’m the type of bodyshape that just feels lost without waist definition :) I made them that high so I’d have an outline of my shape with which to adjust other pants patterns I like to. I’m sure in several decades time I’ll be doing the same thing to photos of myself today!! haha, thanks Ines :)
How awesome is a self-drafted pants block. Seriously.
I’m no help on the fitting issues front though as most of my fitting ‘technique’ goes something like ‘pinch here, see what happens, pinch there, see what happens’ and so on. Luckily self-drafted patterns should allay the need for fit alterations (which is probably why I have no idea why my pants actually fit).
I’ve never had luck with slanted hip-height pockets and always curse myself when I make them for forgetting every time. As for the zip, I’d definitely go for a side zip- the thought of sitting on the tail of a zip sound particularly uncomfortable :p
Lovely to hear your thoughts, Jenny :) I’m pretty happy with that final block! It’s only taken me two months….
But I have just successfully altered a shorts pattern to fit because of it. Needed a sewing win before heading back into pants land with refreshed enthusiasm ;)
The plain version at the end of your post has no pulling so the fit is spot on.
So the only suggestion might be to include features like pocket and the ‘collar’ waistband you like to ‘that’ version. Angled welt pockets at the front.
Mel is right about how these will look different with the real fabrics you choose to use.
Stretch wovens will be a smaller challenge to what you’ve already gone through.
I say real fabrics (plural) because I sense these pants might become the basis of your weekend and workday pants.
Ooh I love the idea of slanted pockets at the front, Maria! Great idea. I’ve got a few beautiful wool suiting in my stash that I really want to become pants. But I’m going to try sewing up a pair in a fabric with similar drape beforehand as a test drive! You’re absolutely right though – I want these pants to become a real workhorse for me :) xx
I want you to have a pants pattern that works well in your work wardrobe! Go for it.
Oh that self-drafted trouser muslin looks really good. I’m inspired. Have drafting book; will draft trousers!
With the zip, I’ve put an invisible zip in shorts that fit me well, but they had no stretch in the fabric. The invisible zip broke, I’m sure due to too much force on it. I’ve been very careful where I put them after that.
I had one in some rtw stretch-bengaline trousers that were just fine, in spite of heavy use. Either RTW invisible zips are chunkier than what is available to the home sewer, or the stretch part made all the difference. Dunno. I usually use a lapped zipper in sitautions like you’re looking at with your next trouser sew.
Yeah, zips and tension don’t work together at ALL. I’m sure there are zips and then there are zips… but still. Thanks for your thoughts – I’ll definitely taken them into consideration :)
Wow!! So many adventures in Pants Fitting Land! I think you look absolutely lovely in that second muslin, and I agree with everyone else that the fabric and styling will make ALL the difference! I’m partial to a side zip myself. As for the first style of pant – I totally feel you about pants that give the illusion of wider hips, because I’m always drawn to those as well. And after all your work on getting a good fit, I hope you do make them up in some fun floral print to galavant around town in!
Thanks Sallie! So lovely to hear from you :) Especially as you’ve made some killer pairs of pants across your online sewing career to date! And there will absolutely be a pair of bright floral pants pop up on the interwebs at some point in the future! You can bet your life on it :)
Amazing fit on the last pair. You’re right. The camera doesn’t lie, and even if they’re made up in muslin, you’ll be happy to have a pair that fit superbly and are, therefore, supremely comfortable. I’ve made up several pairs of trousers (lined wool or linen) with a CB zip, and have had no problems with the zip irritating me. The additional of pockets and any other “custom” tweaks will also make them more pleasing to your eye.
Thanks! Nope, the camera certainly doesn’t lie… And I think in the end, two months fiddling around with fit ended up being well spent. In your experience, do you think the wool pants behave better when they’re lined?
Absolutely. I find any trousers that I line hang and wear far more “accurately”, if you can say that about a garment, than if they were not lined. I believe the lining takes the stress of wear and acts like the foundation of the trousers. Besides, lining feels better wool! I have underlined linen trousers with voile to the knee, and that makes a huge difference in how they wear, but I always fully line my wool trousers. It’s like a built-in slip that keeps the wool behaving and looking its best while the lining takes brunt of use.
I had the exact same experience with my bodice sloper – I had totally convinced myself that it didn’t fit, and a month later I put it on to show my fashion-designer friend and neither he nor I could find fault with it. I was saved from a bizarrely-fitting muslin on that same sloper by Maddie, who told me some of my measurements couldn’t possibly be correct (and I’d done them two or three times at that point!) It’s tough starting from scratch! You’re making me want to pull out my jeans pattern and make necessary adjustments that were revealed to me during months of wear.
I vote for the wide waistband with pockets approach. I also second Lisa’s vote for a fly-front zip, but maybe it’s because I have a weird thing against side and back zips for pants. I just feel like the front of the pants don’t wear well throughout a day of sitting and standing without a fly front!
What is WITH that? It was so bizarre. I swear they totally didn’t fit before. You’ve just confirmed my suspicion about pants though – that a fair bit of the fit learning also comes through wearing. Thanks for reinforcing my thoughts to sew a ‘wearable muslin’ pair before I think about cutting into the two precious and much beloved wool suitings I have in my stash :)
I don’t know why it didn’t occur to me to do a front fly – that really makes the most sense. I’m definitely going to do that and a wide waistband! Thanks Morgan :)
I hear your pain. I finally drafted my own blocks and with the help of a tailor and a lot of thinking I got there last year. Some things I have been doing… it helps to locate the center/crease line of both front and back. The knee line and the hem line should be centered over that line. It’s really easy to take in too much from side seam or inseam and then throw off the balance of the pattern. When the legs aren’t centered, there are often distortions with the pants leg twisting.
Also I discovered through a lot of trial that there is only so skinny you can go without stretch fabric, especially in the front crotch, because it has to curve around the upper thigh comfortably. In a skinny pant the front crotch extension is pretty short compared to regular trousers. I hope any of that makes sense! I love that second pair! (I’m kinda partial to high-waisted ;)
Thanks for your thoughts Amy – it’s lovely to hear about the experiences of someone who has been there before! I’m going to mark the location of the front crease tonight and see how balanced out my leg pattern is. That absolutely does make sense about stretch and woven. I think initially my attempts were with using woven but wanting to get the effect and look of stretch – which was silly, really. Once I accepted that I needed to work with woven, things got so much easier! (and, much better looking). :)
Your trouser fitting patience puts me to absolute shame! I think the second muslin looks absolutely spot on – even in calico. I also vote for the wide waistband, slant pockets look. I think your slim hips will actually be an advantage with these trousers, they’ll look so, so chic! Keep up the wonderful work! x
Yay! Another pro-wide waistband and slant pocketeer! And yep, that final muslin was worth the several months it took to get to that point :)Thanks Jane!
Mel, I love seeing how your problem solving sewing brain works. The pay offs are always rad!
I’m team wide waistband for a first run here- it gives a nod to the original Jacques pattern. And if you figure out a tops fitted Bardot style pants pattern give a sister a yell- I’m seriously after some for work.
Also, looking forward to the Shorts of Pinkness!
Thanks Amazing-Amanda! The shorts of pinkness are coming along well, albeit slowly. Nothing new there though ;) I’m beginning to think that those Bardot pants would need to be stretch to be that close fitting. Otherwise one may be liable to bust a seam when attempting to sit! Not cool. So those will be put on hold until I can find a lovely floral stretch cotton! :)
Wow – your processes are amazing to see followed out. I love to see how your brain works. Me, I’m a more f-it type attitude :)
Your patience has certainly paid off and that muslin (whilst admittedly ugly) fits beautifully and in fashion fabric will be lovely! I can’t wait to see :)
I think the problem of the last muslin you’re showing is how high waisted they are and that’s probably why you don’t like the look of them so much. A bit lower rise should fix that. I’m completely jealous at how they fit you at the crotch both at the front and the back!
Wow amazing to see your detailed approach to getting your pants/trousers to fit!
Thanks Sharon :)