
Even though this wasn’t seen by anyone at the wedding, this is the garment I’m both the most proud of and got the most satisfaction from sewing out of this whole wedding dress business. Pretty underthings have always been a weakness of mine – even when I was a cash-strapped University student pulling a wardrobe together from eBay purchases and second hand shops, I always found the money for lovely (and well fitting) lingerie. Corsetry has also been a fascination of mine, but one I’ve only vaguely flitted around the edges of.
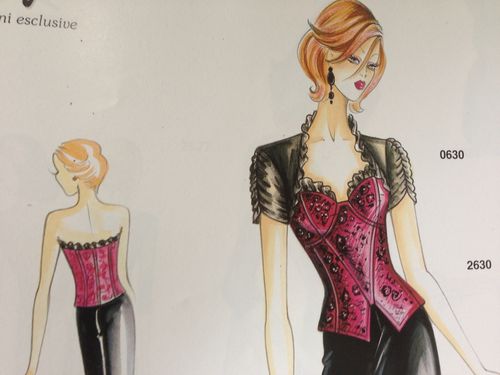
This pattern – Marfy 2630 – blends the best of both of those worlds. Leisa blew me away with the muslin pattern pieces for this at Camp Couture last year. Marfy styled it as outerwear – which I think would be incredibly lush made up in a winter coating material like boiled wool or cashmere, or more dramatic in a brocade. I’m already day dreaming about another version of this in colour blocked heavyweight silk satin – either way it’s an absolute winner of a pattern.
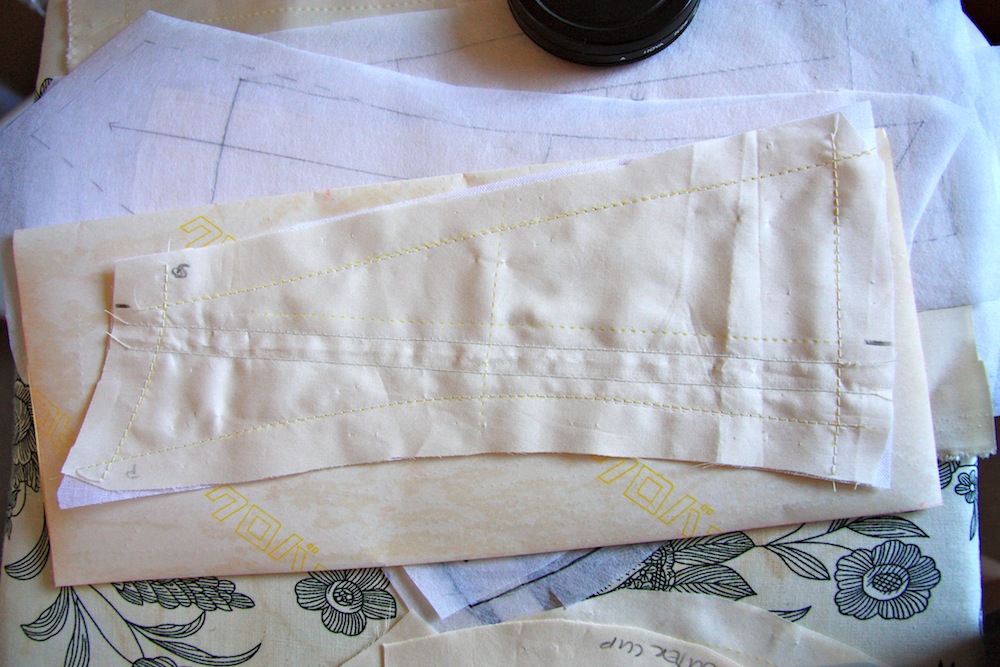
The Muslin(s)… and the back story:
I sewed my first muslin of this pattern after getting back from Baltimore, adding in spiral steel boning and underwires at the cups before trying it on properly for the first time. I think I may have cried at this point (101% likely due to bad timing with hormones more than anything) because there was just so much that needed to be tweaked and it seemed like too much at the time. I gave up and threw it onto my sewing cabinet, where it fell down behind to be temporarily forgotten.
Figuring I’d take a short cut I went out and bought a RTW strapless long-line bra. It fit ok and I could easily have left it at that, but after wearing it for a day here and a day there as a trial, it became uncomfortable, the plastic boning bubbled out in some places and dug into me in others – and I was sure I could do so much better. Like 99.99% of us, I don’t fit RTW well, and having being spoilt by the fruits of my sewing labour these last few years, putting up with something sartorially substandard just niggled away at the back of my mind.
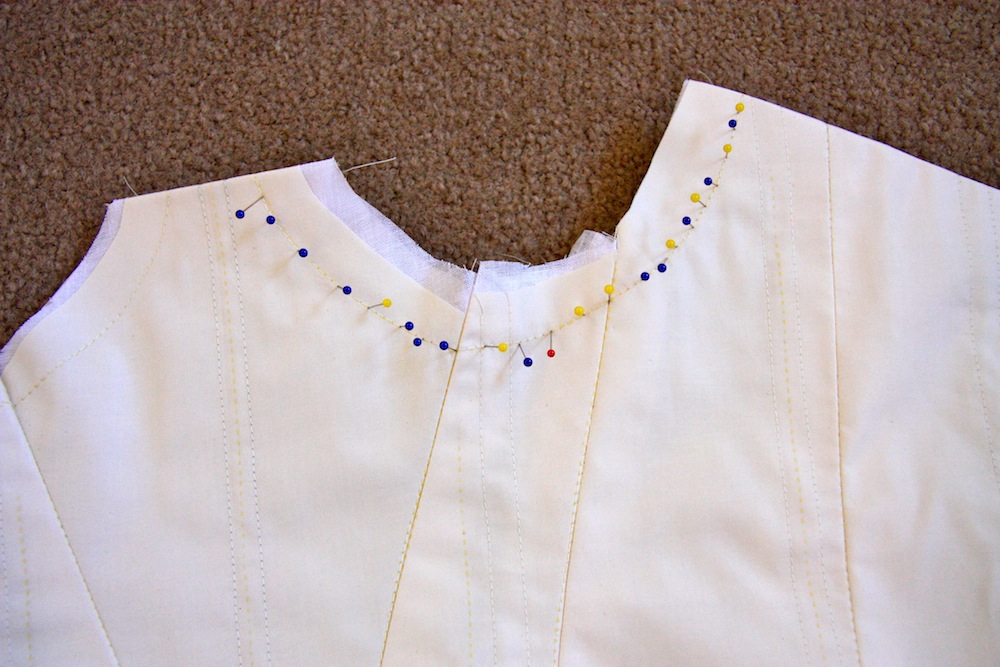
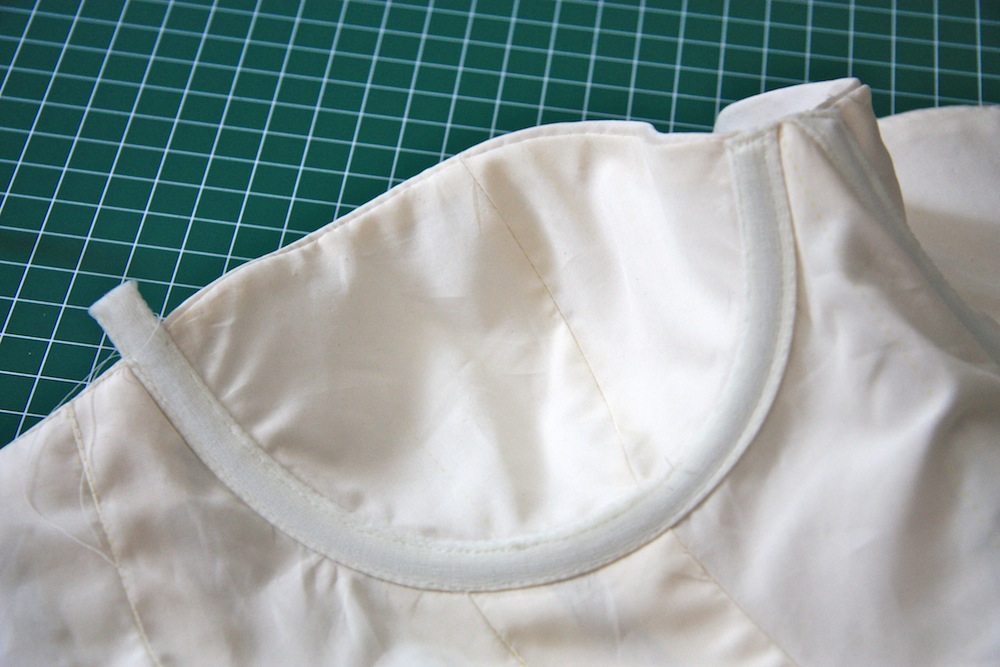
So I reached down behind the horn and pulled it out, ready for the first round of fitting changes. The only structurally significant change was to move the position of the waist down 3.2cm (1 and 1/4 inches) – I’m just long in the body. The other changes were minor but numerous – tweaking the various seams by taking them in here or there and reducing the height of the back down by an inch (so it wouldn’t show under the deep V neck of the bodice’s back) – and I figured once I’d got the bodice part of this sorted, I could focus on fitting the cups.
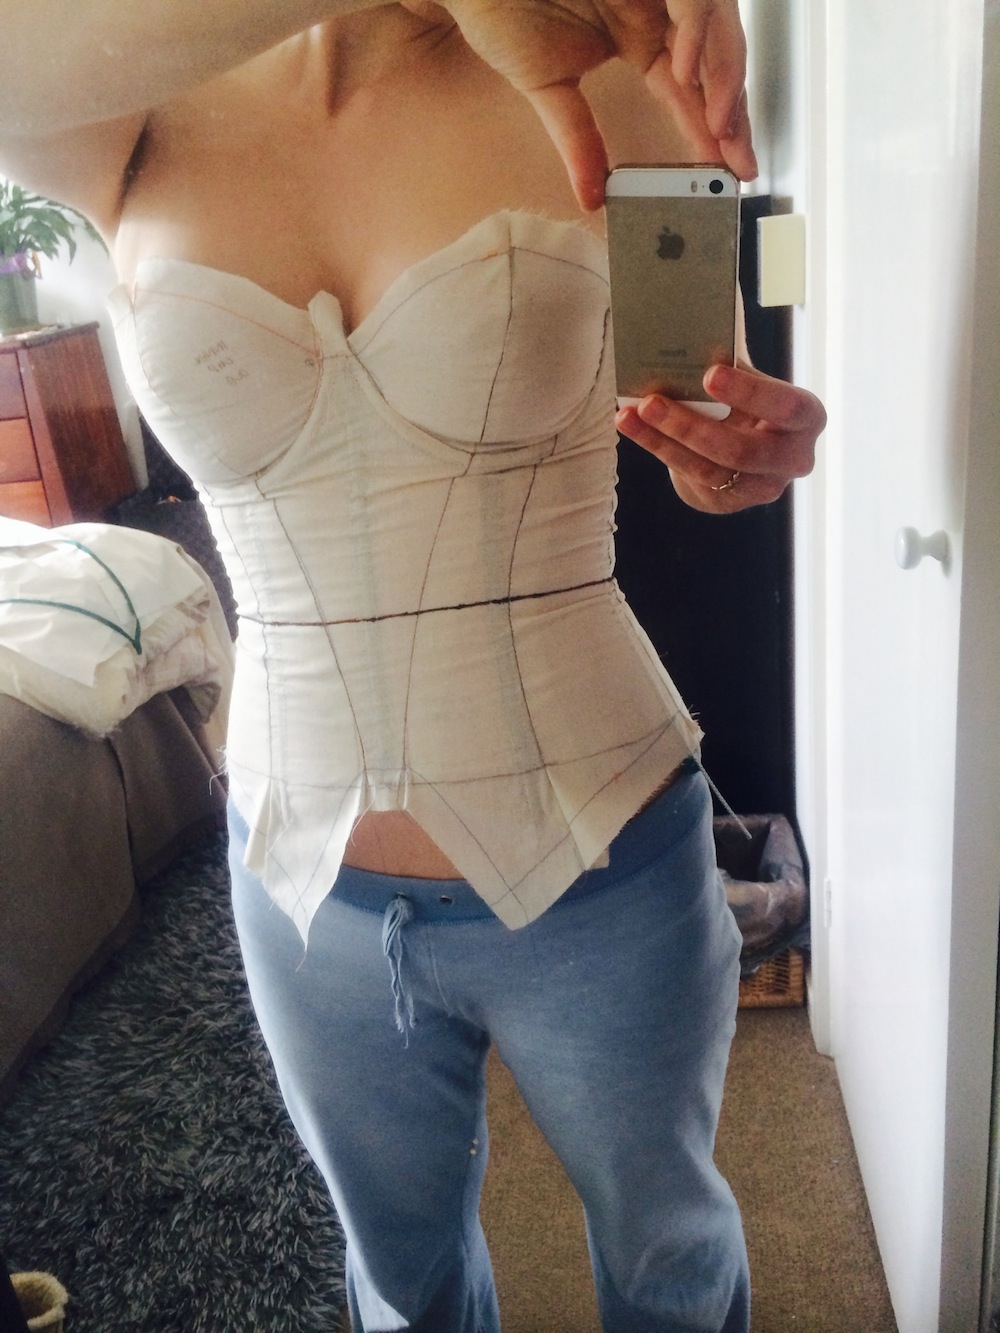
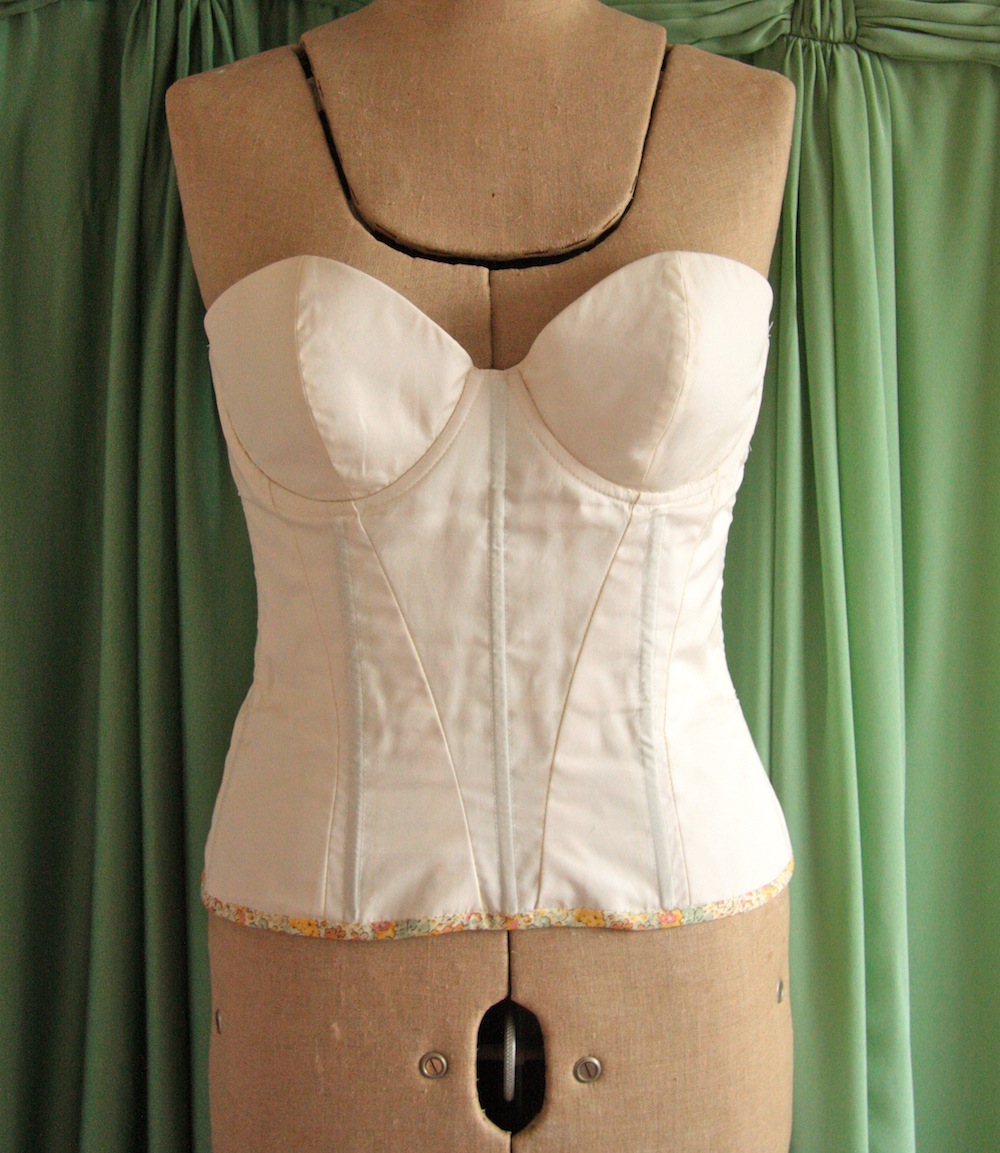
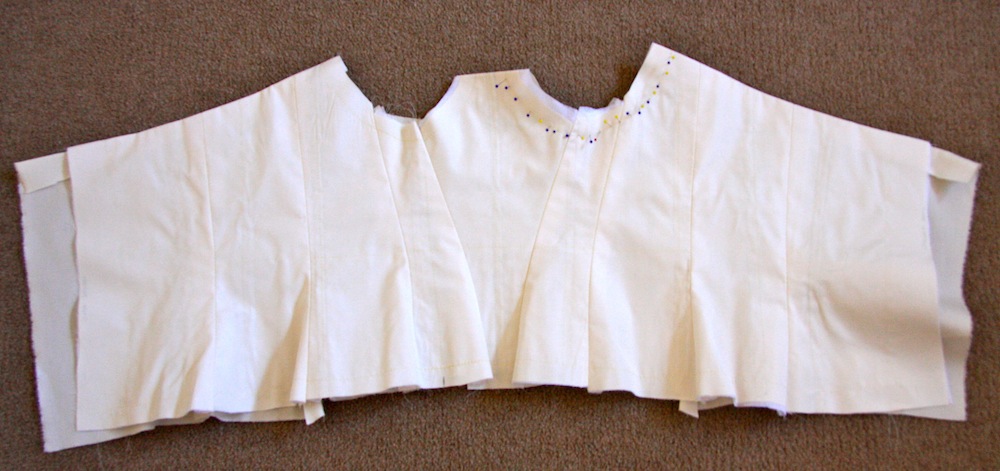
That’s my second muslin above. At this point I’d made most of the major bodice fitting adjustments, including moving the position of the waist down 1 and 1/4 inches and grading the seams. I already knew I’d be removing the front panel angular detail, so I’d stopped adjusting the seams at that point.
The cups are obviously the most challenging point – and I’ve got one original cup and another traced from a favourite moulded strapless bra on in the photos above. Even though the difference between the two was slight, a bit of additional fullness in some parts and less in others (and I’m talking in mm here) seemed to make a rather large difference.
I tried a few more cup adjustments before moving onto my next muslin – a ‘dress rehearsal muslin’ – in the same fabrics I’d be sewing the end result in. I’ve got a whole new appreciation for bra’s now, that’s for sure. They really are engineering masterpieces! Recognising how a simple change in either grain direction or fullness can have a flow-on ripple effect was fascinating. I’d solve one problem and create three more because if it. Then I’d back track and try to fix what I thought was the problem rather than the resultant effect and in the process be experiencing life at a rate of several WTF’s per second. I eventually got it to a point I’m about 99% happy with – it looked fine underneath the wedding dress bodice muslin, so near enough became good enough.
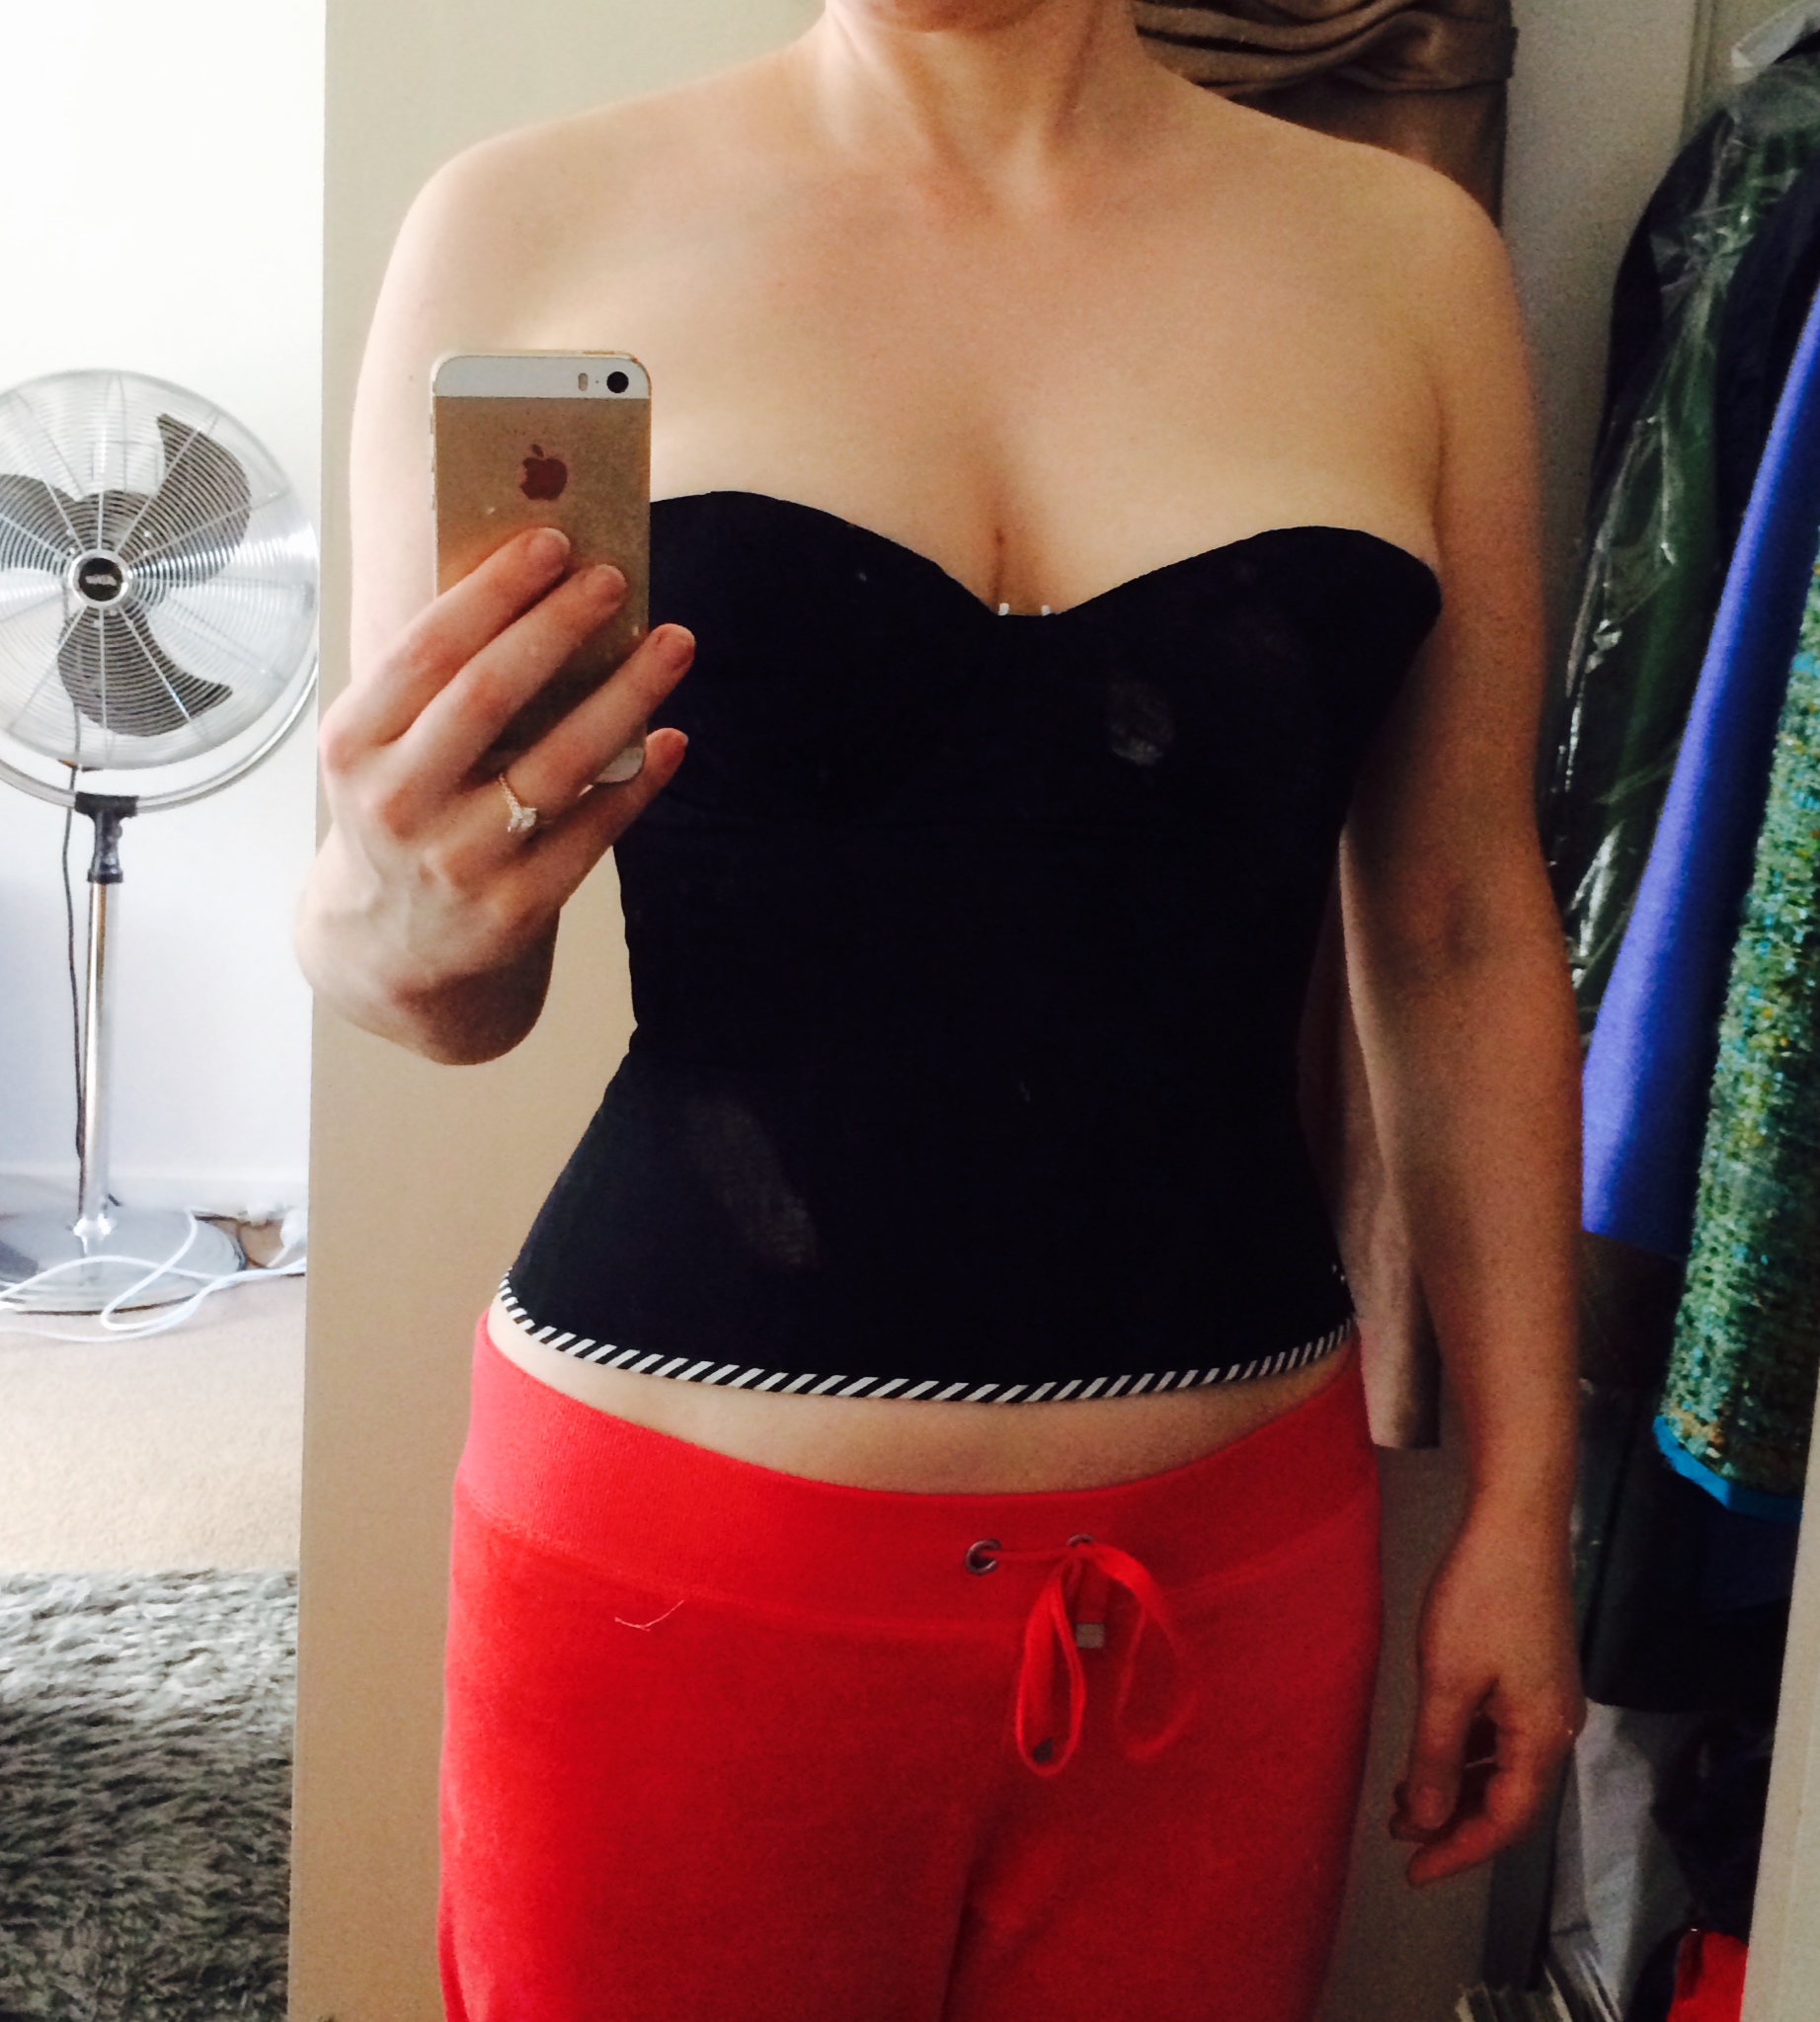
This muslin presented some new issues. Mostly that the final fabrics I was going to use have ZERO give, whilst the calico obviously did when put under so much tension. This resulted in it being too small! I could get it done up, but the cups were now too close to the centre, with me being at risk for falling out the side. You can sort of see that in the photo above if you look hard enough at my left boob. Go on. I dare you.
Also, with this muslin I took a risk and decided to move away from soft cups. The cup here are lined with some 2mm foam instead. I’m not going to talk extensively about fitting and how I tackled changes because really I had no idea what I was doing. Basically the foam lining seemed to exaggerate the fitting issues from what looked ok as an unlined cup, and I was sort-of-sure that might be from the cups now being slightly smaller due to the layer of foam.
I managed to get a picture of my black muslin in the afternoon light – a) so you can see the seam lines and detail and b) because about the only photo manipulation skill I have is cropping. And I only just manage to achieve that half the time!
The Fabrics:
I used Sea Island Cotton, which was commended by Susan Khalje as being the ideal foundation garment fabric, because it’s smooth, very finely woven, incredibly strong and breathable. It’s pretty special fabric, actually – and I had mine sent to me from B&J’s in New York. Also, Leisa gave me some whilst at Camp Couture last year. Sewists really are the most nice people around. I used this as the outer fabric and also as the lining.
Underneath that is some white Shapewell canvas, which is basically a lightweight horsehair canvas – and definitely a contributor towards the dress rehearsal muslin having zero give! Melburnians – you can get this from Clegs.
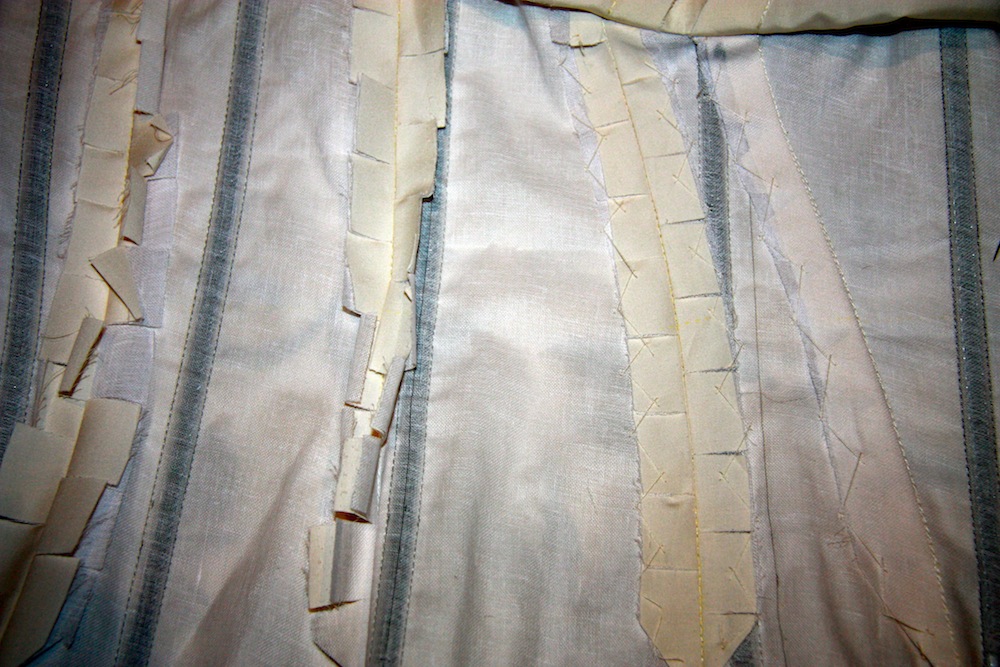
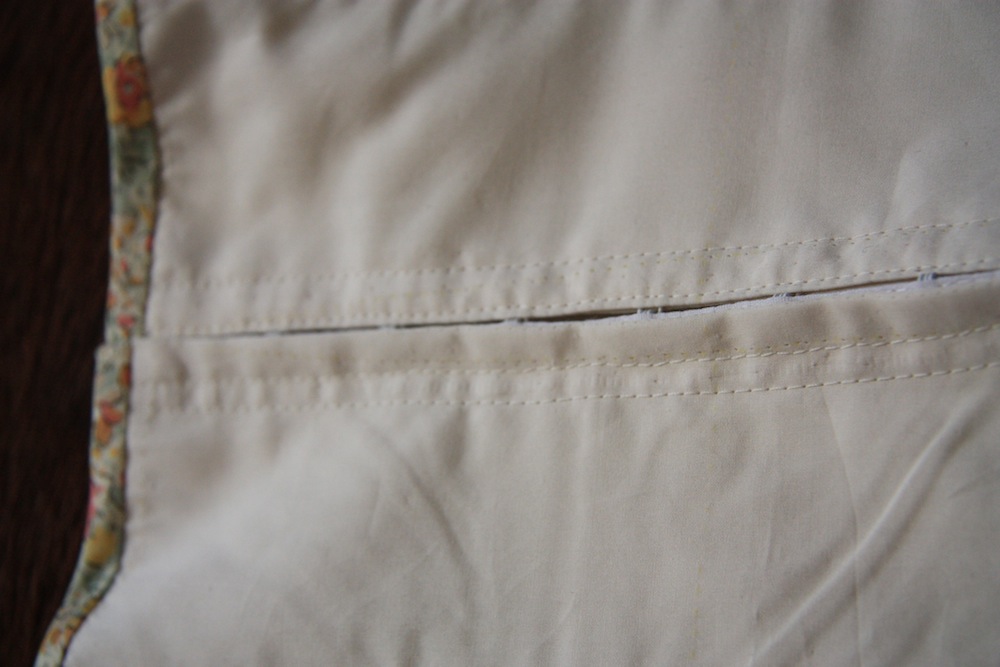
I used those two layers to sew channels for the boning:
The seam allowances also needed to be catch-stitched down to keep the bodice smooth, so having another layer in between always helps for that:
The 2mm foam I used to line the cups with, I got from Booby Traps. Their minimum order length is a meter, which was annoying – and it also arrived with some pretty dirty marks on it. Along with some other reasons, I won’t be buying from them again. It seemed I forgot to take any photos whilst I was sewing these back in December 2013, but a few months later Amy from a Cloth Habit did a 3 post extravaganza on sewing bra cups with foam. It was so lovely to read her posts – especially because she did it in a virtually identical manner to what I did, so instead I’ll leave you with the links to her posts:
Cloth Habit – Making a Foam Cup Bra: Part 1
Cloth Habit – Making a Foam Cup Bra: Part 2
Cloth Habit – Making a Foam Cup Bra: Part 3
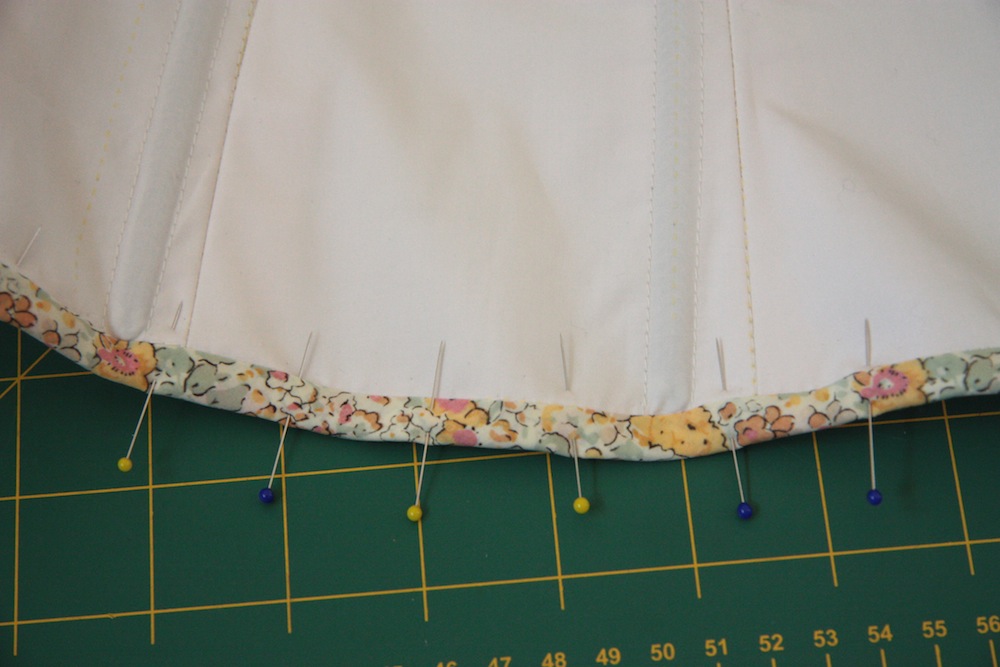
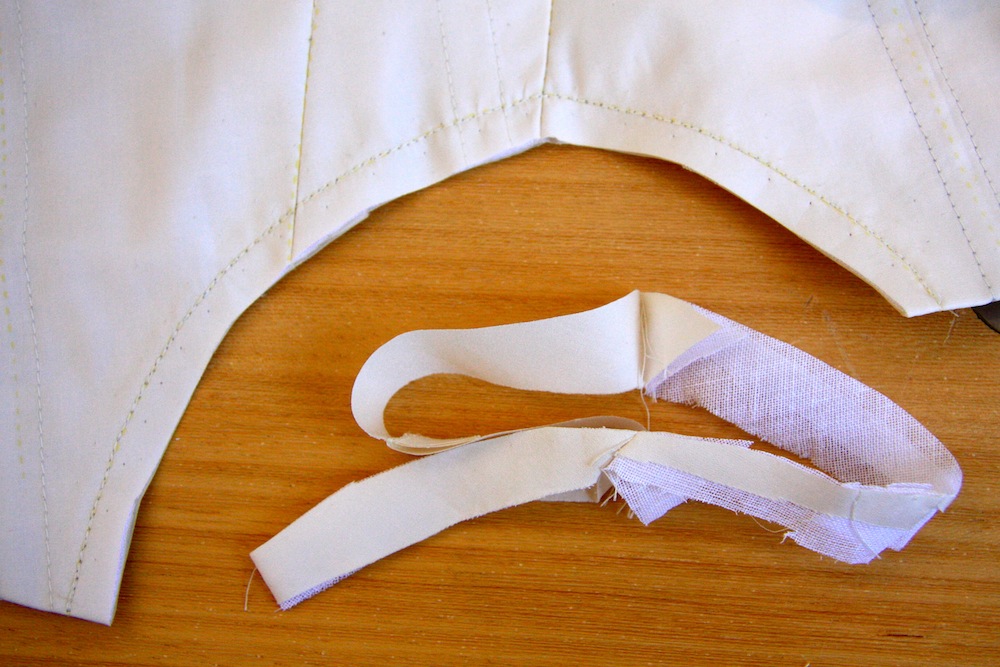
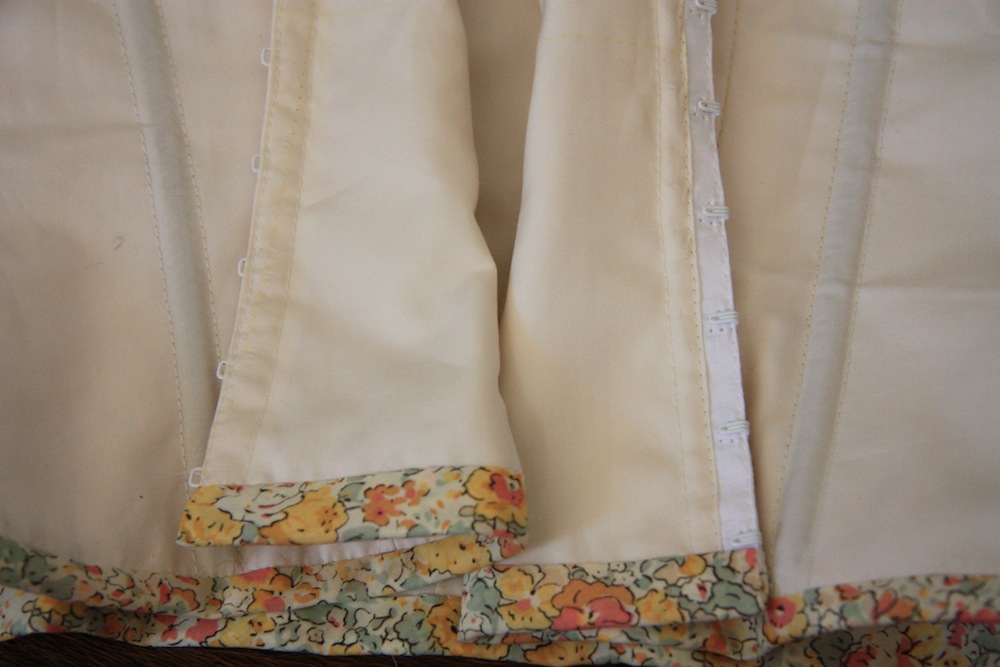
I also used some self-made bias binding to close up the hem – made up in some of my all time favourite Liberty Print (of which I’ve yet to sew anything from! Criminal!):
The Hardware:
I pilfered some underwires from a favourite bra that was out of commission (sob!), but these had to be cut back because they were a wee bit too long for this pattern at the sides, especially as I’d lowered the back to fit under the deep V-neck backline of my Wedding Dress.
Thankfully, Amy had also covered this in another handy post, so I felt confident cutting into them with some wire cutters.
I was at a loss as to what to use for ‘tipping’ them though… and even though I made and finished the bustier back in mid-January this year, I of course left the underwires until 3 days before the wedding – when I really didn’t have time to go searching for such things. So I used nail polish. It took overnight to for several coats to dry properly, but it did ok. Next time I’ll get something more appropriate!
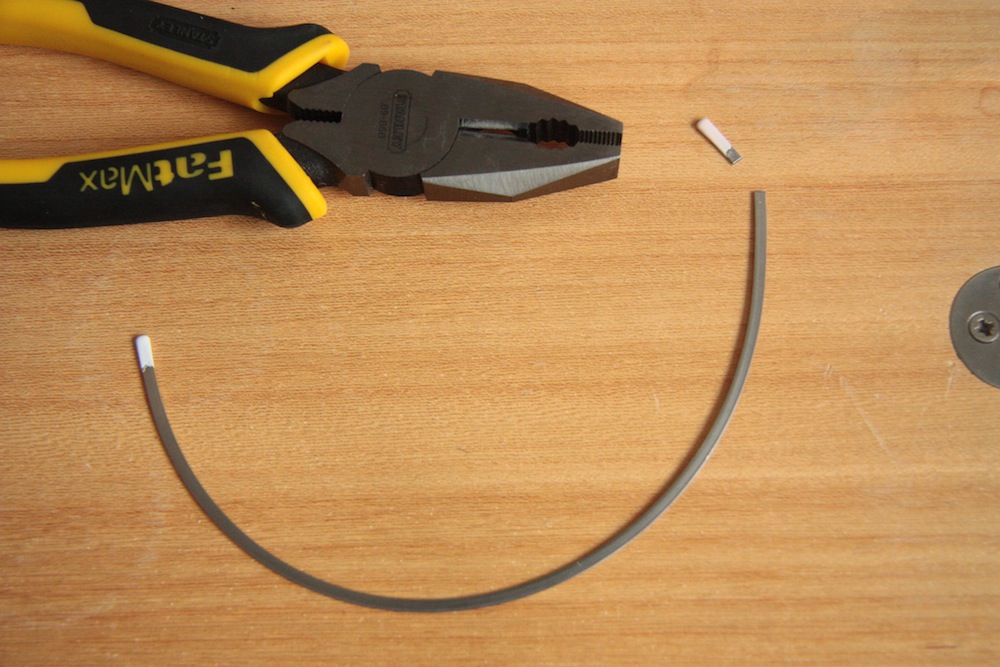
The other hardware was of course – the spiral steel boning. I bought a 10m continuous length from Aussie Corset Supplies (an online shop that I would highly recommend), plus some metal tips as well.
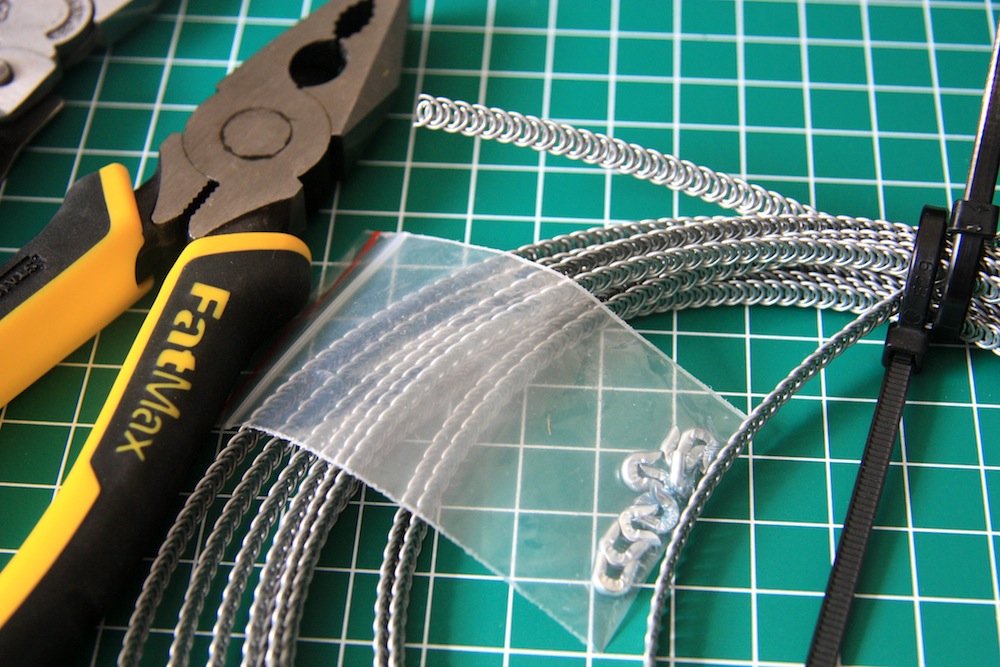
My first attempt at cutting was disastrous and relied solely on excessive brute strength – after 2 or 3 cutting attempts I realised there’s a sweet spot in the boning’s circular repeat where the wire cutters can snip through with very little effort. That made thing so much easier!
Notions:
Instead of sewing channels for the underwires like I did with the boning, I chose to use a pre-made underwire channel as it worked with my construction method. I bought two types during muslin phase, one from Aussie Corset Supplies, the other from Booby Traps. The ACS one was a few cents more expensive, but considerably better in quality.
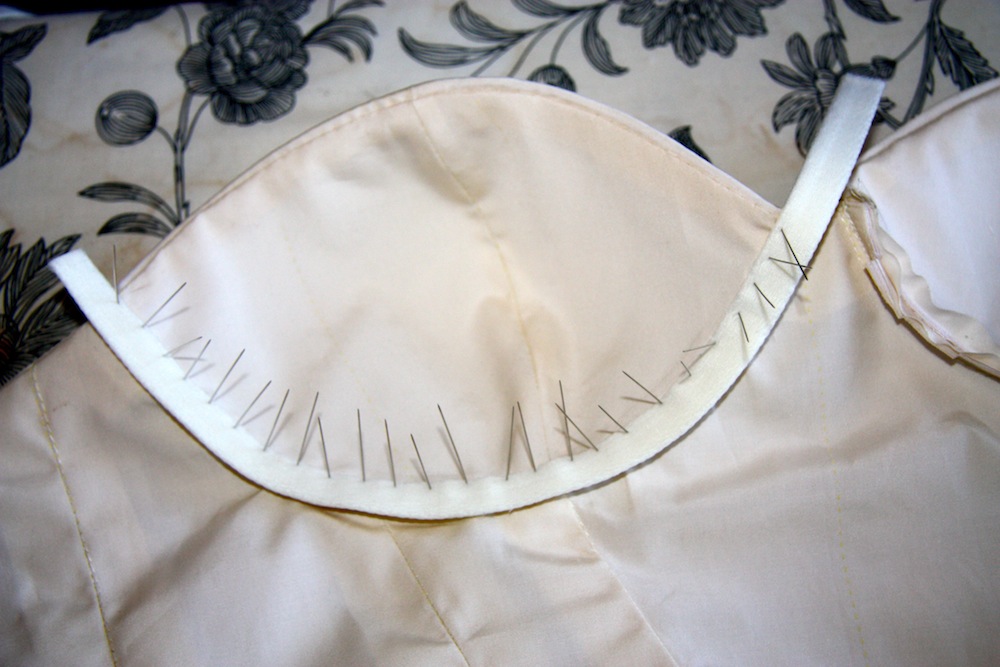
I used the underwire channel to ‘hide’ the seam allowance between the bodice and the cups, which worked a treat:
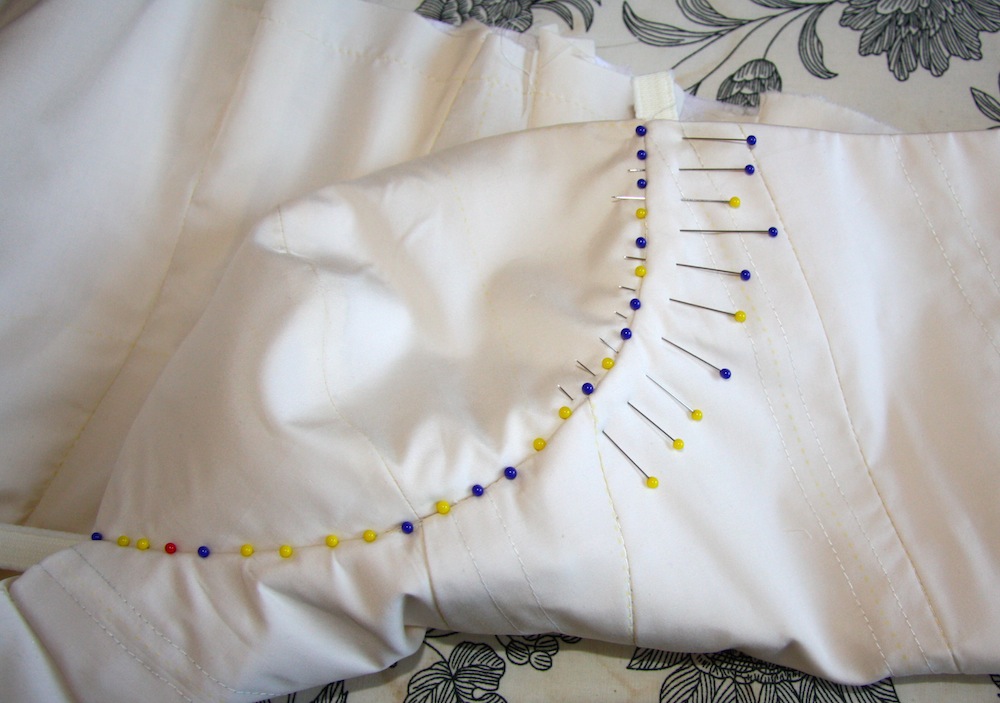
A back closure was a little more tricky. A zip is completely inappropriate – they simply aren’t designed to handle that kind of tension. I know, because I used one on all my muslins to make it marginally easier to get in and out of, and yes – they kept on breaking.
I ended up going with some hook and eye tape which I bought from Susan Khalje’s online shop. It’s lightweight, supple, super strong, well spaced and ends up being quite subtle, even though it’s white and my sea island cotton is ‘ecru’.
Before I realise that was an option, I had also ordered some hook and eye tape from Booby Traps. I didn’t use it because it was stiff, scratchy and bulky – not the kind of thing I wanted pressed up against me. But you can’t know this from looking at it online, so that was a risk I knowingly took. What shat me off is that they thought it was appropriate to send me that minimum-order-length of a meter length in two sections – stapled together. I did email my disappointment through to them, and got a prompt and pleasant response back indicating they do this in order to keep costs down. Whilst I ended up throwing it out, if I order a length of something, I full well expect to receive that as a continuous length, unless otherwise advised of at the time of ordering. Combine that experience with the foam I ordered from them that had dirty stains on it, and I won’t be ordered from them again.
The Construction:
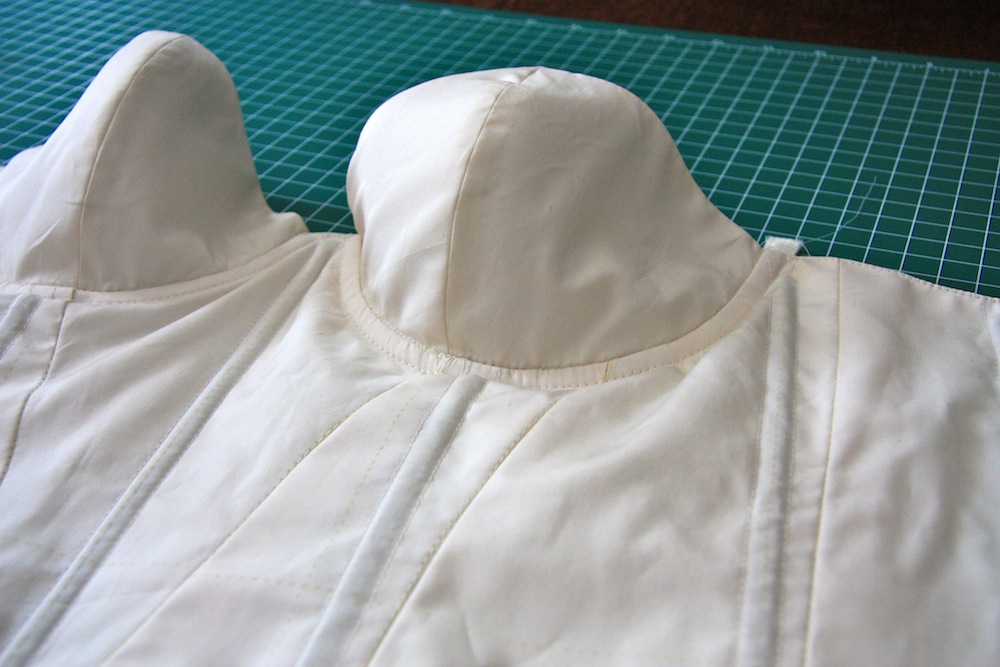
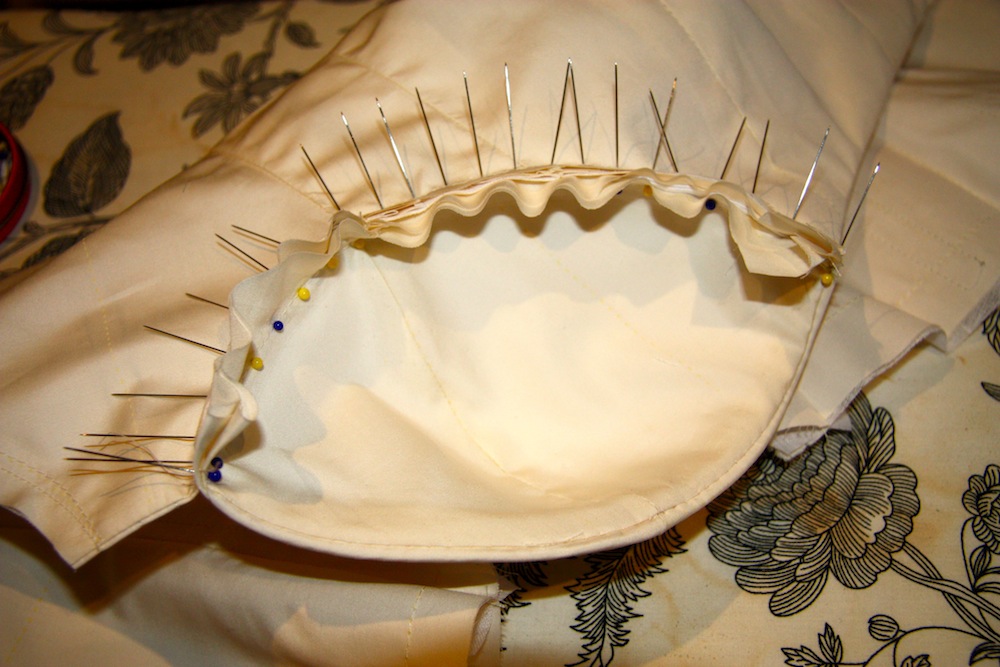
Obviously without instructions, you sort of have to go at it your own way. Making muslins really helps in this regard, you really get a feel for what needs to be done. The trickiest part is the cups, which you can see in the series of photos that cover the underwire channeling.
Otherwise, you’re simply dealing with three layers of fabric. The canvas underlining I sewed directly to the outer layer of the cotton, which means you only have two layers to deal with instead of three. I sewed these together along the tops of the bustier, folding it over and pressing, so I could then sew around the cup seamline to sew in the cups.
After sewing in the hook and eye tape by sandwiching it between the inner and outer layers, I closed up the hem with bias tape.
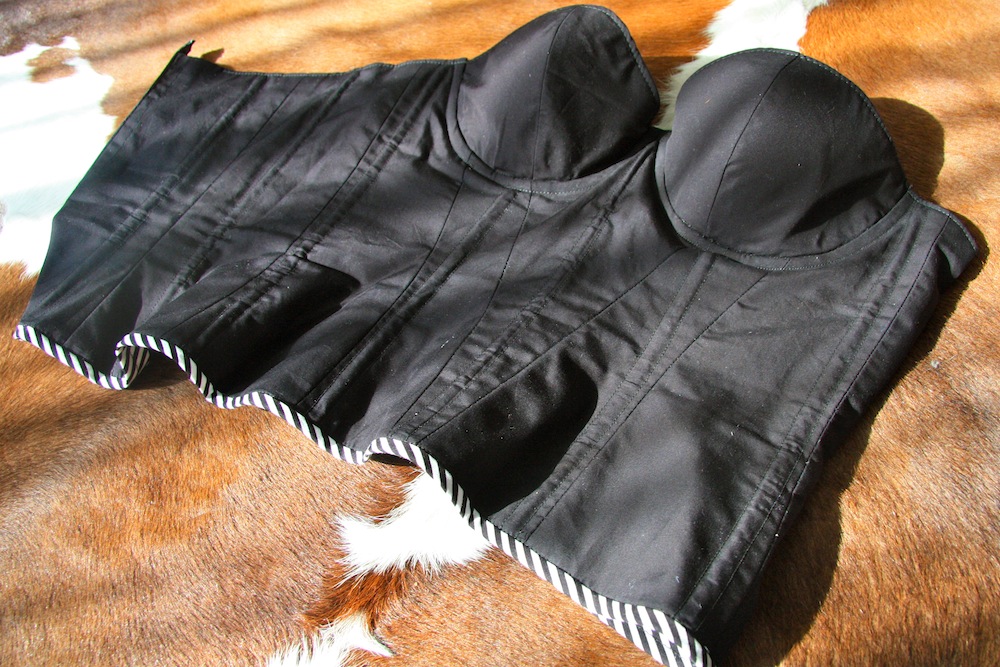
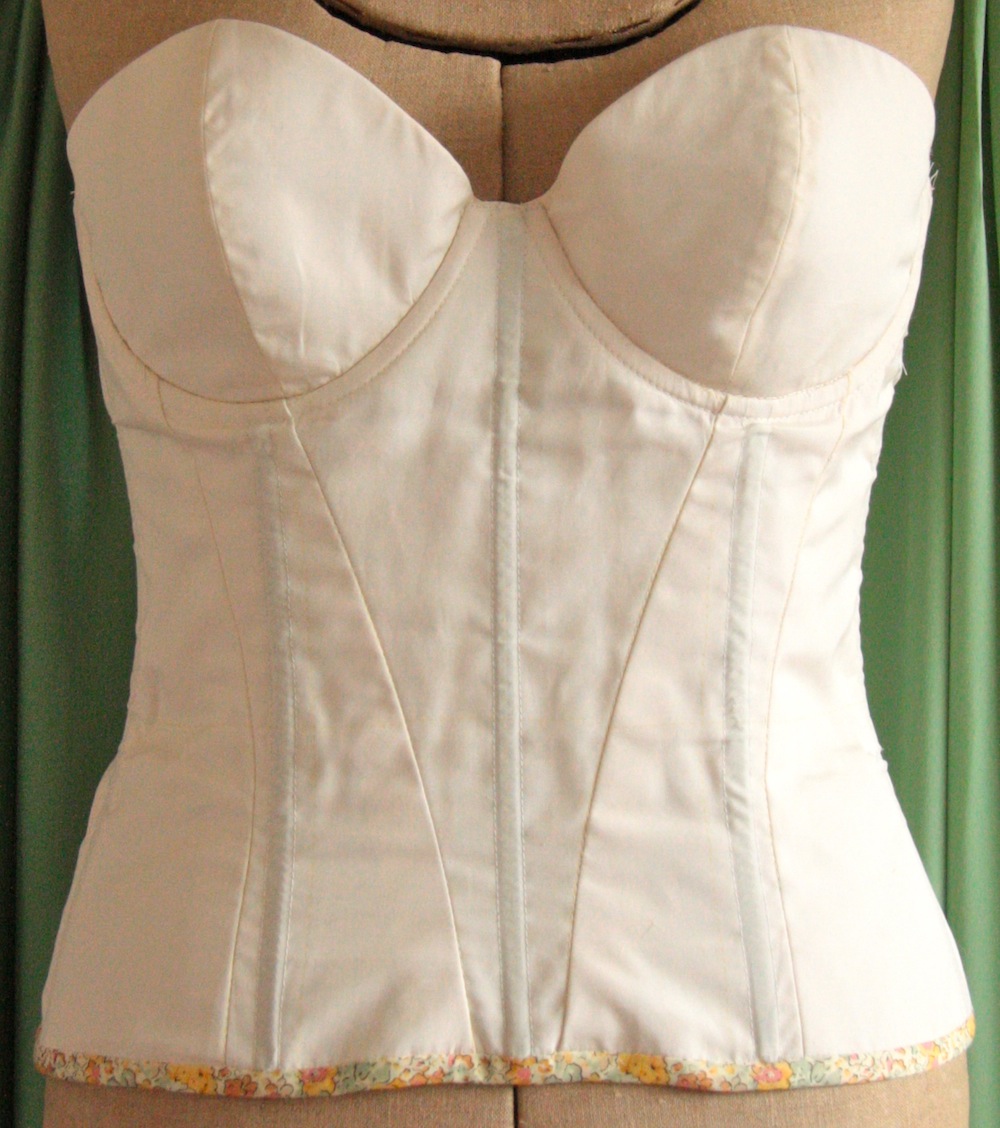
The Finished Bustier
I’m ecstactically over the moon I persevered with this pattern – it’s so much more comfortable compared to the RTW version I bought. I get damn good boobage support thanks to the underwire, I can move freely and not feel restricted, and most importantly – I’ve got a totally custom-fit-to-me foundation onto which I could sew the bodice of my wedding dress.
What absolutely blew me away is how amazing it feels to not have the weight of your chest supported by your shoulders. I honestly thought bra’s were comfortable until I wore this around the house for a day! Afterwards I really noticed the pull on my shoulders – and I always get fitted when I buy bra’s so I know I’m wearing the most suitable option. I’m absolutely going to sew up another one of these and play around with making the boning channels removable (??) so I can wash it and make it everyday wearable. The spiral steel boning is technically rust proof because it’s been galvanised (which means the steel has been coated in zinc so it doesn’t react with oxygen (you know the term ‘oxidise’)) – but the moment you cut it to length there’s a break in that seal meaning rust is definitely a potential outcome from washing. I wasn’t able to acquire ‘tipping’ fluid to seal off the ends with in the time I had, so I might investigate that also. Not sure how I feel about taking a garment like this to the dry cleaners! (and yet, here I am flaunting it all over the internet….). I ended up unpicking my fell stitches along the binding and removing the channels so I could hand wash it after the wedding, which isn’t really something I want to do on a regular basis.
I was originally planning to sew the dress directly onto this undergarment, but by the end of it all, decided to keep them separate so I could get some more wear out of it. I’m still undecided as to whether this was an intelligent decision.
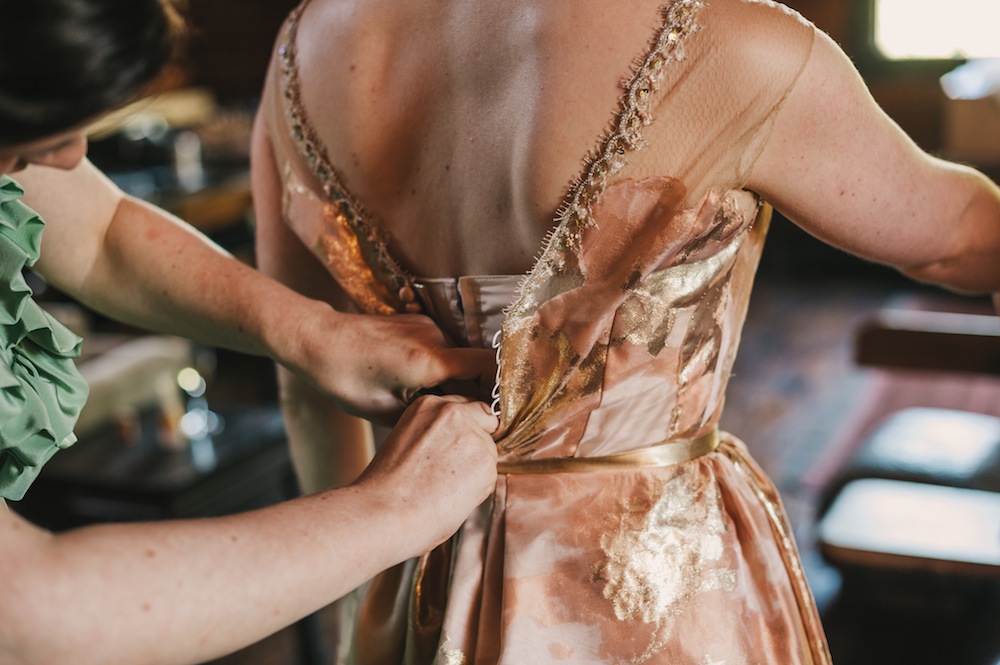
With all the craziness that is getting ready prior to the wedding, I never did actually get any photos of wearing the final iteration… but you can see it peeking through in the photo above. I probably could have given myself a little extra breathing room – it’s a tough call to make when it’s your first time sewing such a thing!
Next up… all about the construction, design and sewing challenges of my Wedding Dress skirt :)

Amazing! I’m so glad you rescued the bustier and finished it to perfection. Thank you so much for your detailed post, as I’d love to make one too and wear it everyday, if it’s that comfortable. I just love looking at that dress and fabric – congratulations on all your hard work.
So am I, Evelyne! It was worth it in the end. It really is that comfortable. The only issue with such a garment is if you’re a weight-fluctuator like I am, even a small gain (or loss) changes the comfort factor. I wonder what it would be like to make from a fabric that has some stretch instead, like corset mesh? Thank you!
Everything about this post is awesome. Thanks for all the details on your process. I am definitely saving this in my ‘like’ file for a rainy day!
Thank you, Debbie! You absolutely should :)
Wow, that’s really impressive! Lots of perseverance and pinning! Thanks for all of the in-depth info and photos.
LOTS of perseverance and pinning. And pin-stab wounds. :) Thank you!
Wow! This is so impressive! This seems like about the most supportive thing you could possibly wear! PS- if you’re really accident-prone and bleed a LOT onto your fabric, hydrogen peroxide will take it out! (Turns out shears will cut right into your finger if you’re not careful, ouch!)
Pretty much. Always good to know! Although I don’t keep any peroxide in the house… you’ve used it before? Does it change the fabric much? Thanks Sonja!
I’ve used it more times than anyone should have! It has never affected the dye of the fabric – it just bubbles away the stain!
Cool! haha, good to know :)
Must be some kind of reaction with proteins in your blood then, rather than the fibres of the fabric. Although if you did it on wool (also a protein and not a fibre) it might damage it?
OMG I can’t imagine how many WTFs went into that bustier – but how incredible and satisfying it must have felt!
Your technical prowess, sewing skill and problem solving always leave me in awe.
But what I’m dying to know is… were you secretly dying all day to rip off your dress and show everyone the undercover masterpiece? LOL
A rather lot of WTFs. But absolutely worth it in the end. It’s always easier to sew something in a woven than stretch… but I’m wondering if this would be better (and more appropriate for weight-fluctuators like myself) in a corset mesh that has some give in it. As incredibly comfortable and supporting that it was, the smallest gain or loss can change that because its so closely fitting.
haha – not quite, but I did feel a twinge of sadness when it became hidden whilst getting dressed that morning! I think I may have told a few people that ‘the only thing I’m wearing that I didn’t make is my shoes and knickers’ :P
I wonder if you could do just a side panel or two in a stretchier fabric to add the give, rather than the whole bustier?
It’s a thought, Mel!
Wow, I’m really amazed and impressed with the amount of work you have put into, not only your amazing bustier and wedding dress but the whole wedding. Did you have time to do anything else. I’m really loving the detailed posts and the tenacity you show. Really impressive all round.
Not a great deal, no! Now I’m back to normal life I’m beginning to realise exactly how tunnel-visioned and insanely productive I was. Not that one can ever keep up that kind of pace, but it’s nice to know it can be done when required! I had a very long and detailed project plan so I wouldn’t go off track :) Thank you so much!
Absolutely beautiful, so well done.
Thank you, Danielle!
Fabulous post and fabulous garments. Thanks do much for writing so clearly and engagingly about your process in this post and your others. Fascinating stuff!
Thank you, Elle – it’s been my absolute pleasure to share it. Actually, it was pretty painful to keep it all under wraps for so long, and quite the relief to finally get it out here! :)
I’m in awe if your dedication, patience & skills. Eagerly awaiting the next instalment.
Thanks, Anna! :)
Mel, this is magnificent – both as a final product, and as an amazingly detailed tutorial. Well done you!
As a large-busted lady with a tiny ribcage, I wholeheartedy concur that a bustier provides the most comfortable support. It also eliminates unwanted bulges. Maybe I, too, could attempt to sew my own (probably not, I do not have the skill or dedication!).
I am absolutely appalled that a dressmaking supply store would deliberately chop up lengths of hook-and-eye tape (or any other item), especially without explicitly stating that before ordering. I cannot think of any way that this is acceptable.
Aw thanks, Kat! I don’t half wonder if my fascination for corsetry came from some kind of subconscious understanding that for people like you and I, this is a far better means of support. Of course it’s not like the weight is removed – just transferred away from your shoulders (you know how the laws of physics work!). Especially because I seem to store all my stress in my shoulders, so I can’t even begin to describe the feeling of freedom there once I tried this on. Is this what guys feel like, all the time?? I’m just a little bit envious if it is.
I don’t quite think they deliberately chopped it up – I think it was a roll end and a roll start. Whilst her reasoning is that you would never use a continuous meter length of hook and eye tape, I still strongly disagree with that because if you wanted three specific lengths of tape (say 33cm), you wouldn’t be able to get that from the piece they sent me, and thus have to order more (and their postage isn’t cheap, either). Either way, it’s a fail. Combine that with the stained foam they sent me and you’ve just got yourself some bad publicity.
Well done!!! Very great post. I love looking at the construction of garments with cups, something about the detail of bust cups looks so elegant, so beautiful. Such a great fit.
Can’t wait to see post on the making of your wedding gown :)
oh I agree! They’re fun to work on, once you get the fit right! Otherwise it’s a LOT of steps (boning… underwire channels) to sew before you can even try it on :) Thanks!
Loved this post. Making the under supporting structure certainly is just as challenging as the outer dress. You did a fabulous job and I’m sure made your dress comfortable to wear. If you try another corset and cut steel boning try a bolt cutter. I got one at the hardware store and it makes cutting so much easier. I’m eagerly anticipating the next installment.
Oh absolutely it is. Worth while, though! I’ve spent many hours pouring over photos of vintage-dresses-with-built-in-foundations that it was definitely time to give it a try. Now I know vaguely how, there will be more!
That final photo shows the reason for all your good work on your corset. And I would have found this the most rewarding aspect of the whole dress prep stage too.
You really are so skilled.
It certainly was rewarding. Thank you, Maria!
i am so impressed that you could keep your quality of work so top notch throughout the whole process! this corset is gorgeous! gosh it must have been nerve wracking to make something so fitted. you did amazing!
To be fair, I did have 6 months to do it all in! Although sewing such a tight fitting garment through the height of summer wasn’t the smartest thing… Thanks :)
Amazing work, your skill at working out the construction and fitting issues and ending up with a divine corset is amazing. Thank you very much for the detailed photos and information.
My pleasure, Sharon. Thank you!
Oh my goodness I love this! Where do you buy this pattern?
Generally you can just email Marfy with the pattern # you want, your shipping addy and credit card details and they’ll post it to you. Leisa copied this one out for me though, as I think it’s one that’s no longer in production/print. I can copy you out what I have, if you like? It’ a size 44, which is a size smaller than what I usually order (a 46) but it worked well for me, probably because it’s so close fitting!
Mel you are wonderful, thank you so much for offering! I’ll try emailing Marfy first and see if they have it! Thanks again :)
Hey there I have been on a hunt for this pattern as it looks so amazing here and it is perfect for a school project of mine. I was wondering if there was anywhere I could access a copy! Thank you so much for your detailed tutorial.
Hi Bella, I don’t think this specific pattern is available anymore – but there are a number of varying bustier style patterns on the marfy website (see https://www.marfy.it/en/tipologia/bustier/). It’s an italian website, but you can order printed and pdf patterns directly from their website. Pattern 3949 is quite a close match to the one I used here! Goodluck.
I’ve always been interested in making corsets so thanks for the internal photos and fitting info. Its utterly gorgeous now its finished and I had never thought about washing with the steel boning, very interesting!
Yeah, it’s a mindfield out there! I wasn’t willing to risk the rust :) Thanks Suzy – corsets are super rewarding to sew!
WOW! You did a beautiful job! Thanks for the detailed posts, I find them very interesting and come in handy. I’m in the process of making my own bustier and am striking many fitting problems along the way! Was hoping you might be able to offer a bit of wisdom…I’m having trouble with the boning that is positioned under the bust to hip. Every time I sit down the boning digs up into my bust (not the most pleasant experience!!). Did you have any similar problems? Any suggestions on what I’m doing wrong – the only thing I can think of doing is shortening the boning??
Thanks.
Hi Justine! Thank you :) I’d love to be able to help, but fitting at that level is really something that has to be done face to face. I wouldn’t have a clue where to start just with that description! What pattern are you using and where are you placing the boning? I didn’t have that issue.
Thanks for replying. I find fitting the most complex and frustrating thing about sewing, especially when trying to do it on yourself! Pattern is just a rub off from an old favorite so no instructions to help! To be honest I thought my question would be in the too hard basket over the net but I thought I’d just throw it out there on the off chance you had come across something similar. I’ve been searching the net/blogs for posts with similar issues but it looks like the problem is unique to me!! Love your blog!
White notions can easily be made ecru with a quick soak in a strong cup of tea. My grandmother recolored her tablecloths that way and I have done lace undies the same way.
You know I thought of trying that… after I’d finished sewing it all up! Thanks for the tip though Carol :)
Wow. Just wow.
;)
I cannot believe you made that masterpiece and it went together so professionally and all without instructions!! So impressive!!
Thanks Lizzie! Making the muslins reeeally helped get everything organised in my mind so it would professional at the end!
You are seriously nuts dear. But this looks amazing!!!
haha, Thanks Christy :P
Wow! I am impressed. Years ago I made a corset from leftover Christian Dior fabric I purchased in a small shop in Miami. Back then I had a 24″ waist and 34″ bust. I won’t see that again, three children later. But, I have been working on loosing weight and now I can place a photo of your bustier on my wall to remind me of what I am aiming for: Loosing weight, sewing AND wearing a fab bustier. Thank you for sharing. God Bless.
Sounds like a grand trine to me, especially if it makes you happy :) The sharing is all my pleasure! I’m glad it’s helped inspire you, and Thanks!
Hi Melanie,all I can think to write is WOW. I remember your post so clearly when you were deliberating whether to make your own wedding dress or not. You will never have to question yourself again. You are so talented and your eye for detail and perfection in sewing is so incredible. I know you are an engineer and you have been trained to make sure everything is precise and exact in the smallest detail but you are also very creative and I truly admire your work. To this day I am incredibly proud of my wedding dress using an Oscar de la Renta Vogue pattern that I made and I know you will feel the same for years to come. Your bustier and dress are masterpieces. Well done you clever girl.
It definitely feels like I made the right choice, Marjorie – in fact, I can barely even imagine having not done it now! It did seem like a very daunting challenge at the beginning :) Thank you! And I am absolutely loving all your France photos on instagram :)
I’m with all the “Wow, just Wow” respondents – you’re such an inspiration to us all – amazing work.
Aw, thanks Nic! x
Thank you for all this detail! I’ve found it to be a frightening process making something that needs to sculpt to your body and support the right areas but still allow you to breathe. I may still yet need some of the links for resources you’ve posted so they’re super handy to be able to read back on. It sounds like, despite the initial heartache, this really was the right choice for you. It looks superbly made. Congrats! And I look forward to the rest of your posts on the dress!
Yep, I know the feeling – it was so incredibly daunting facing up to that initial muslin! I felt like I was just going to drown even attempting it. Breaking it down into manageable tasks and focusing on the little things I could do made all the difference. If at any time you’ve got a specific question… and I’m not saying I’m an expert, but I’ll happily help you out if I can! Thanks Jodie!
GAH!! So impressive, Melanie! What an inspiration you are! Thank you for all these incredibly detailed posts – I’m loving them!
Thanks Sallie! :)
BEAUTIFUL!! And many happy wishes to you and your Mr.
Thank you so very much! :)
Good gracious, Poppy! That bustier is something else. You really seem to have encountered hell and high-water on the quest for good materials (grr), but it all worked out perfectly in the end.
I never thought about all of the pressure put on our shoulders by bra straps. I might give a bustier a try, sometime.
I couldn’t recommend one enough, Charlotte! Thank you :)
Simply astonishing! You are so persistent — which really paid off on this most important part of the dress! I have to make a strapless dress soon and probably need a bustier. But how do I get it on without a personal dresser??
Thank you, Cissie! That’s why I went the zip option during the muslining phase! It requires some pretty tricky moves (and a fair bit of cursing) to get such a thing on by yourself. You’ll need to enlist someone to help!!
Its gorgeous! and I agree, I think making a corset that fit was the absolute pinacle of my garment sewing to date..
Needless to say, you inspired me to pull out my black cashmere version today, its almost finished but it needs some help with keeping the upper cups tight to the body and I am stumped..suggestions?!?! xx
Thanks Leisa :) Oh I’m so glad to hear the black cashmere is going to come out to play! I’m just a little dying to see the skirt that goes with it… and I’ve been wondering how you were going on that. As much as I’m absolutely LOVING the sewalong, I miss your usual posts!
Hmm… cups. I’m pretty sure I saw just a few weeks ago the innards of a dior gown that had stay tape around the inside top of the cups. You know, under tension to help both keep the shape and prevent it from buckling in, similar to what you have on a roll line of a jacket? I also recall hearing about someone sewing with that grippy, rubber tape that you get on RTW strapless bras… but I can’t for the life of me find the reference. That’s why I went with the foam sandwiched in the cup… it solved that problem quite nicely.
It’s beautiful. I really like the Liberty trim with the cream colour. (Which Liberty is it?) This is a great achievement. How long do you think it took in total, excluding time-outs for bad behaviour?
I’m shocked about the service from Boobytraps. I notice that they actually call the hook-and-eye tape “continuous”! I agree with you that I expect a metre length to come in a continuous piece unless I’m consulted with beforehand. Under the circumstances “keeping costs down” sounds remarkably like “maximising profits”. (especially when they admit that they don’t expect anyone to actually need a continuous one metre length and yet they insist that people buy it).
Thanks Kathleen, it’s the Claire-Aude in a yellow colour way – I got it from shaukat.co.uk. Once you get the fitting issues out the way, this comes together pretty quickly. And despite it looking complicated, it’s a relatively simple sew as well. I would say all up – between 20 and 30 hours? That probably excludes cutting out.
Couldn’t agree more with you about Boobytraps – their logic on the continuous issue is definitely twisted!
Am wondering if a bead of hot glue would do for the ends of the wire?
Sounds like a plausible idea there, Ruth! It would probably work better than my nail polish option ;)
I have been hanging out for your posts like a total junkie, travelling around and logging in whenever I have an internet connection, and DUDE do you ever fucking deliver! I don’t think I’ve ever been so excited or impressed about someone’s underthings. If I was undressing someone on my wedding night and they were wearing this I wouldn’t even get to the good stuff – I’d be too busy checking out the seams and fit. You. Are. Amazing.
You’re waaay to kind, dudette! I’m still in the shock people-actually-want-to-read-my-ramblings phase. Or is it the pictures that do it? Hmm. That said, it’s a freaking awesome pattern that delivers exactly how you’d like it too, and I’m totally stoked for your enthusiasm about it. You rock!! Hope you’re having an absolute BALL travelling about the place :)
I loved reading this detailed post. Your bustier turned out amazing. I have been collecting bustier patterns with the idea of making one lurking at the back of my mind for a while, but the thought of all that work to get a good fit is holding me back. I don’t think any of my pattern have separate cups for the bust though and I really like this idea. Thanks also for directing us to Aussi Corset Supplies…I am not familiar with them. Booby Traps changed owners in the last year or so, and it is sad to hear that they are not offering good service or product. Suppliers for lingerie bits are getting thin on the ground.
It’s absolutely worth the drama of getting that fit right, trust me. 3 muslins and all the time that went into them have given me a pattern I can not only rely on, but it delivers the goods in exactly the way you would hope it too! Definitely worth the effort. I wasn’t aware of that about Booby Traps – good to know. I hope I’ve portrayed both sides of the story enough on that one, but I really was pretty disappointed. Definitely recommend ACS although they don’t have everything. Thanks Katherine!
OMG I am in awe of your sewing skills and your perseverance. Your corset … It is absolutely beautiful. Whilst those at your wedding didn’t get to see it you can see how it it enhanced the dress’ overall structure. I think if you ever decided a change in career was needed, this would be it.
I certainly thought so – and it was just so comfortable, too. I danced like crazy for most of the night and didn’t once feel restricted! I like my day job (and my income!) a little too much to think about making a change any time soon… but it brings so much happiness I’m not complaining :) Thanks so much, Sandra!
One more time you blow us away with your phenomenal skills of a top seamstress! I admire this bustier as much as I did your wedding robes and the Dress. In the past, I made a bustier but it was not as sophisticated as yours but a simple one. I remember the amount of work but especially patience and precision. Phew! Now I’d like to see you making a casual version of this beauty!
Oh its going to happen, Inna – you can bet on that! It’s too good and I spent too long perfecting it to let this just slide into the great beyond :) Thank you so much!
Fabulous. It would look so lovely made up now in a pretty fabric. Very wearable.
Thanks very much, Vicki! :)
Wow – that’s amazing! Congrats on making something so tricky. :)
Thanks so much for the sensationally detailed info on the pattern – I hope to have an excuse to sew something like this one day, so it’s fascinating to see what goes into it.
Also awesome that you live in Australia too – I’ve been trying to find Australian suppliers for bra making supplies, so your links are super helpful.
Thanks very much, Laura! Glad to be helpful :)
You really accomplished something special! That Marfy pattern is amazing and you really made it very beautifully.
Thank you so very much, Robin! :)
Wow! Wow! I love how you took us through constructing this bustier; makes it look easy!!??!! Mel, I live in Sydney Australia – where could I get this Marfy 2630 pattern from? Would love to have a go. You are an inspiration to try and try and try and never give up. Thank you.
Thanks Bernadette! It is actually very easy to sew together, the pain and tricky factor comes from making it fit you!!!! To the best of my knowledge this pattern is now effectively ‘Out of Print’, but you can always try emailing Marfy to ask – check their website (www.marfy.it). Goodluck!
wow – that’s amazing mel! i am also shocked about the tape coming in 2 pieces. i actually orders some fabric online – 3 metres – and they called me to say they didn’t have a continuous 3m length left and could they send me 1 piece that was 2.5m and one that was 1m for the same price. that’s what i would expect. can’t wait to see the dress construction!
That’s what should have happened I guess! The joys of buying online from an unknown company – sometimes you win, sometimes you don’t. Thanks very much :)
I’ve been enjoying these posts! What a gorgeous garment, even if it is never meant to be seen. I’m so glad you pulled your first muslin out from behind the cabinet and gave it another go!
Thanks so much, Amy! So am I :)
You seriously blow my mind with everything you make.
Aw, thanks you lovely thing!
I am so SOOO thoroughly impressed right now – you did an amazing job on this, and I have to believe you must be pretty proud of yourself that you did such an amazing job too!! :) Like you, I’ve always been fascinated (to the brink of obsession) with corsetry, but have only presently dabbled in it – nothing of this caliber, although I would be INCREDIBLY excited to undertake a project like this… that pattern is really divine (shame it’s discontinued), and you really did an amazing job both with the fit and the finishing (not that I’m surprised – everything you make is top caliber).
I’m very interested in the materials you used too, I’ll have to do some further research into them – I had always thought coutil was the best for corsetry, but perhaps the sea island cotton is a type of coutil? I’m also surprised the hook & eye structure was strong enough – that’s good to know too! Thank you for your thorough and very very informative post! :)
Thank you! :) Oh I can’t tell you how equally excited and daunted I was to take in this project! You’re absolutely right about Coutil – it IS the pre-eminent fabric for corsets. But this is just a bustier – effectively a long line bra without straps, designed to provide bust support and not ‘shape’ your figure like a corset does. So the sea island cotton is perfect for this application – lightweight, strong and breathable. It’s not a type of Coutil, feels more like a dense silk/cotton blend. I’ve got so many links saved for corset making and Coutil – so I know exactly where you’re coming from!
Wow Great Job! so much work but turned out fabulous!
Thank you, Joen :)
Wow – looks fabulous!!! I love all the detail and fitting that you show in your process of getting the proper fit. Just amazing!
Thank you, Kathy :)
I was drawn to this post by the picture of the bustier whilst searching on google. Completely in love with your story and this post (you made such a beautiful wedding dress, I’m in awe). I’m currently making my daughter’s wedding dress and am unhappy with the bust, I have realized that I desperately need the Marfy pattern. Unfortunately, I’m all out of time so I downloaded the Burda Bustier dress pattern but it falls short. My current bustier is boned and made of coutil but being a D cup, it just doesn’t sit as nicely as I would like, so I will have to create some kind of wired bustier but am having difficulty with the pattern. This is a long shot, but do you know anyone who has the Marfy pattern in Melbourne? I’m at my wits end, and of course, have just a week to get the dress done.
Hi Esther – what size is your daughter? I have the bustier in a Marfy size 44, and if I can dig it out of storage (we’re currently renovating), you can borrow it.
Hi PoppyKettle, you are so kind to take the time to reply. I had flagged any replies for email (which I didn’t receive), so didn’t see your reply until today. My daughter is a 44 D and I have made 4 more bustier samples (none of them suitable) since my last comment and am running out of coutil…and time. Seeing the pattern would be an enormous help to me, I’d love to borrow it if I may.
Wow turned out to be a wonderful garment; thank you