
I’ve loved the Australiana prints and earthy textures of Melbourne’s very own Ink & Spindle ever since ‘discovering’ them – they make eco-friendly hand printed textiles on ethically sourced fabrics. I’ve even been lucky enough to hang out in their production space a couple of times when I’ve joined the Handmaker’s Factory ladies (Jorth! and Nikkishell) for knitting lessons. It’s a wonderfully inspiring and feel-good place!
The Portside Travel Set was perfect to get my heavy-weight fabric on. It also rather stylishly fills the gap between carry-on suitcase and backpack for weekend escapes and overnight trips.

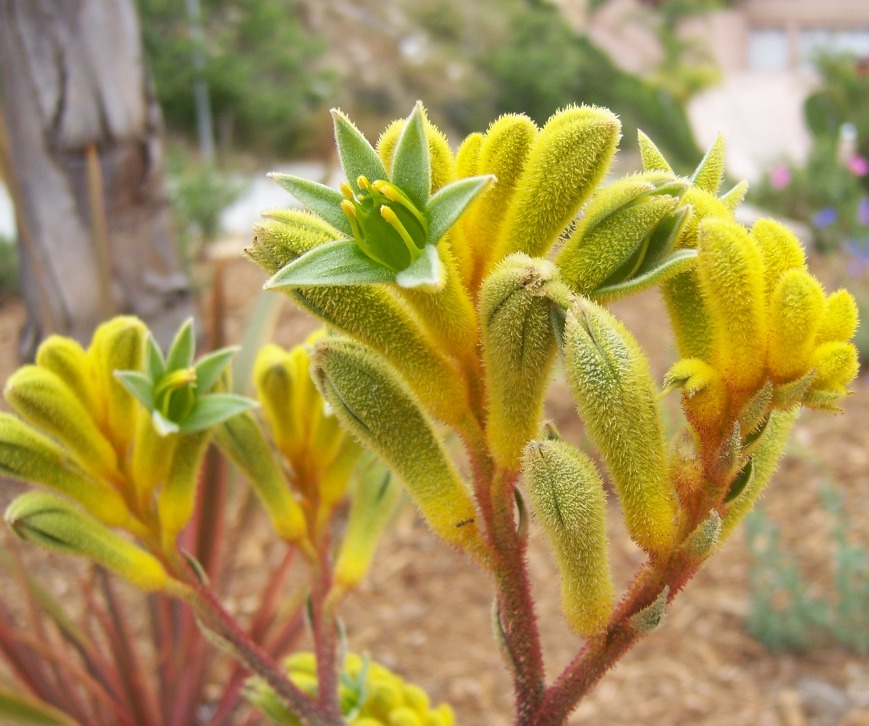
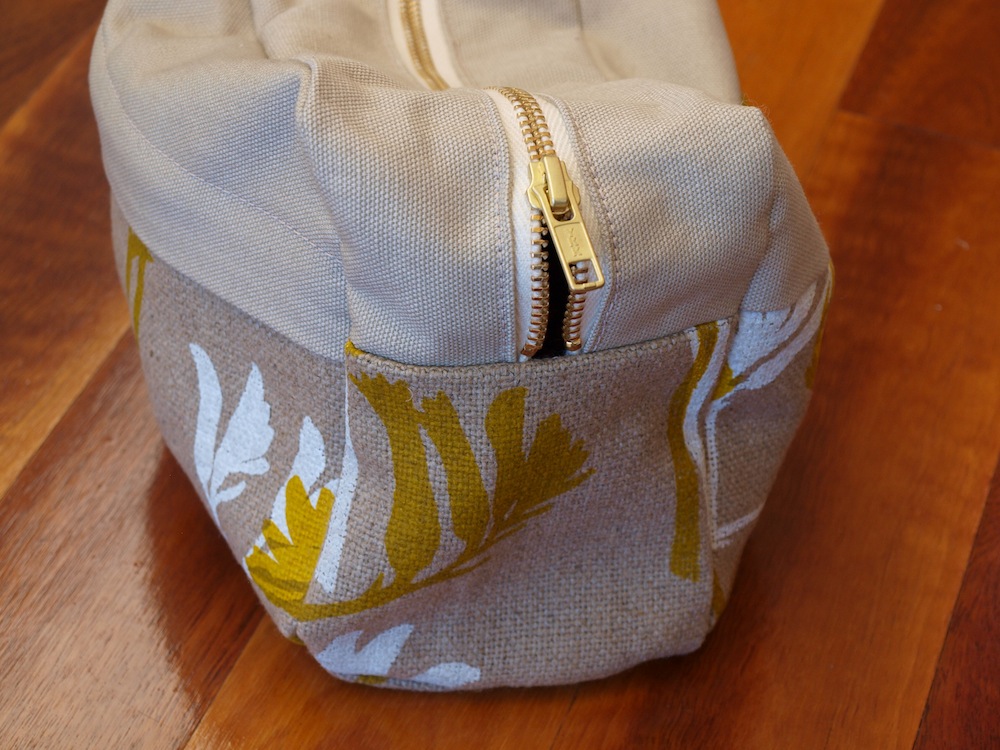
I chose a Kangaroo Paw print (a pretty native plant that blooms in reds, yellows and pinks) on a 600gsm raw hemp canvas from their online shop, and paired it with some of the left over oatmeal-coloured canvas from my Baby It’s Cold Outside coat.
The yellow and oatmeal match means I now have a coat and weekender bag that unintentionally match each other. Ha! I was actually a little concerned about all the neutral tones being a bit much, but I think it worked ok.
The hemp canvas is surprisingly soft (and pliable!) given it looks rather a bit like hessian. I interfaced all the Duffel Bag pieces with iron-on interfacing, and also underlined in calico. Seeing as it matched so well and I’m reticent to buy new fabric (stashbusting is go chez poppykettle atm), I also lined this with calico.


I do believe I may have halved the remaining life of my sewing machine motor with all the upholstery thread and super thick fabrics… I was dealing with a lot of thread snowballs, but still managed to get the side you see looking good:
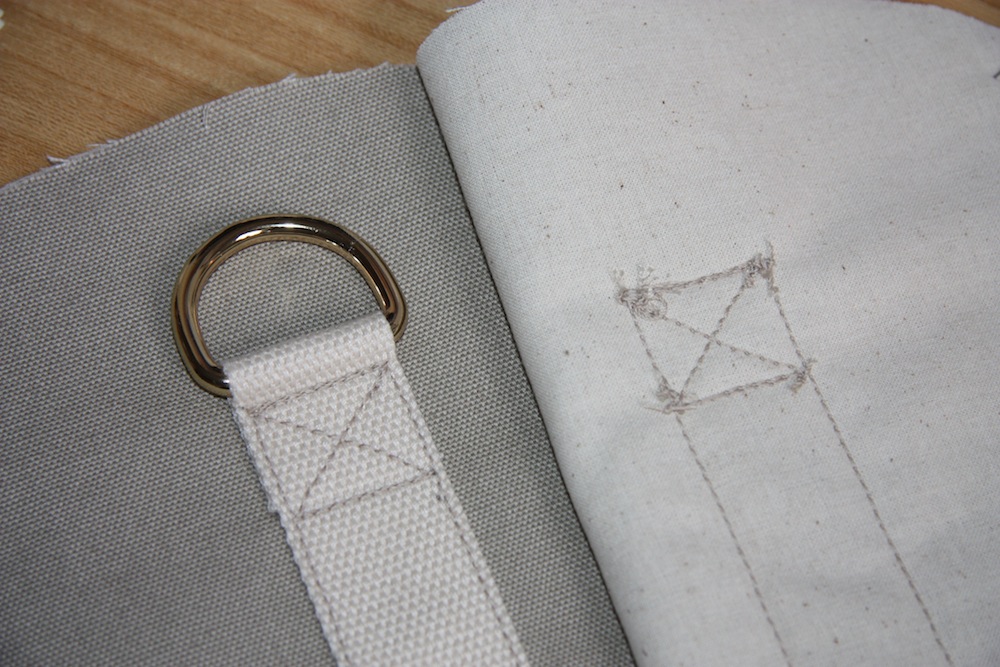


It was a real challenge to get my stitching lines up close to the hardware, with a few feet being changed out to achieve the closeness. I was trying to minimise the chances of the D-rings swivelling around during use because they’re so curved.
As was expected, sourcing quality hardware that fitted my vision was very challenging. I wanted gold zipper teeth on cream to play along with the theme of this project, which I found on Etsy. I’ll admit I paid a ridiculous sum to get these zips. The 1.25 and 1.5 inch webbing used for the handles of the bigger bag I sourced here, and the gold hardware from here.
I did notice one inconsistency with this otherwise excellent pattern – if you’re sewing with a patterned or directional fabric like I did – pattern piece four has its grainline on the crossgrain, not the grain. Had I positioned this pattern piece as per the grainline mark on the pattern piece, I would have had this segment showing my Kangaroo Paw on the side, instead of being upright. Thankfully I noticed it and turned it around.
The other thing I might change were I to make this again would be to include a tab either end of the zip, which would be achieved by either elongating the bag or using a 12″ zip instead of a 13″ zip. I did this on a small (unblogged) toiletries bag I made last year and I like both the look and the extra strength/stability it lends to this area.
Instead, I used a bit of the cotton webbing to beef up the seam between the zip end and the side of the bag:

Otherwise, I behaved in a highly unorthodox fashion and followed the instructions for this pattern to the letter. Except for deciding to ‘line’ the side pocket (with calico) on the outside because having two layers of hemp folded over to create the pocket opening would have been too thick.
This bag has already made its maiden voyage, and I love it to bits!
I also made the Dopp Kit:
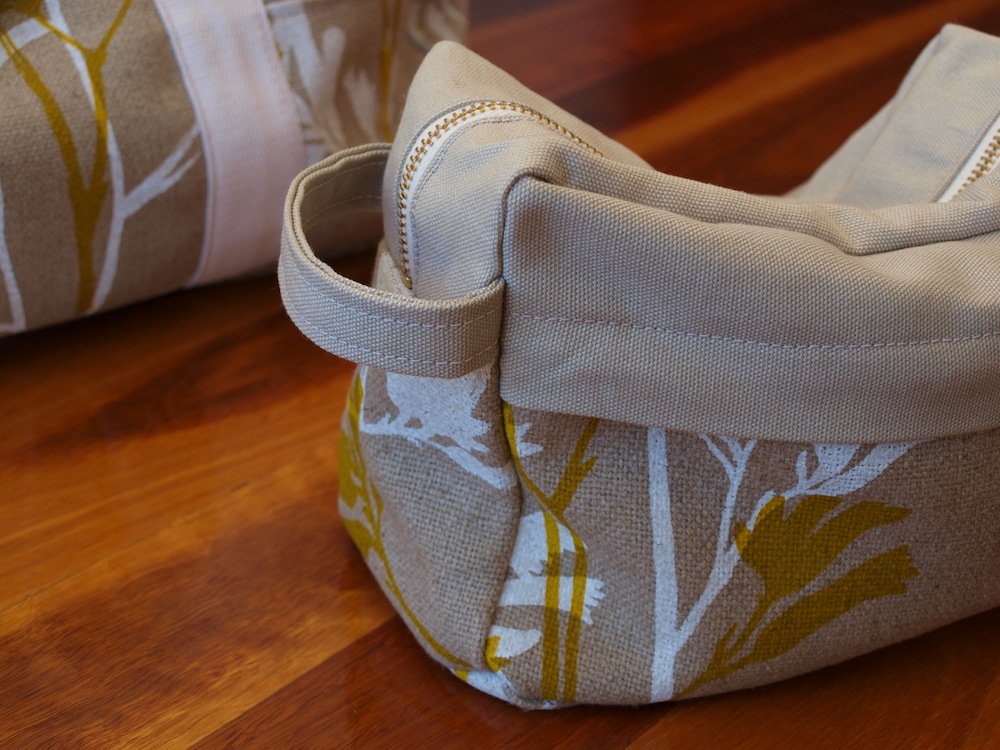
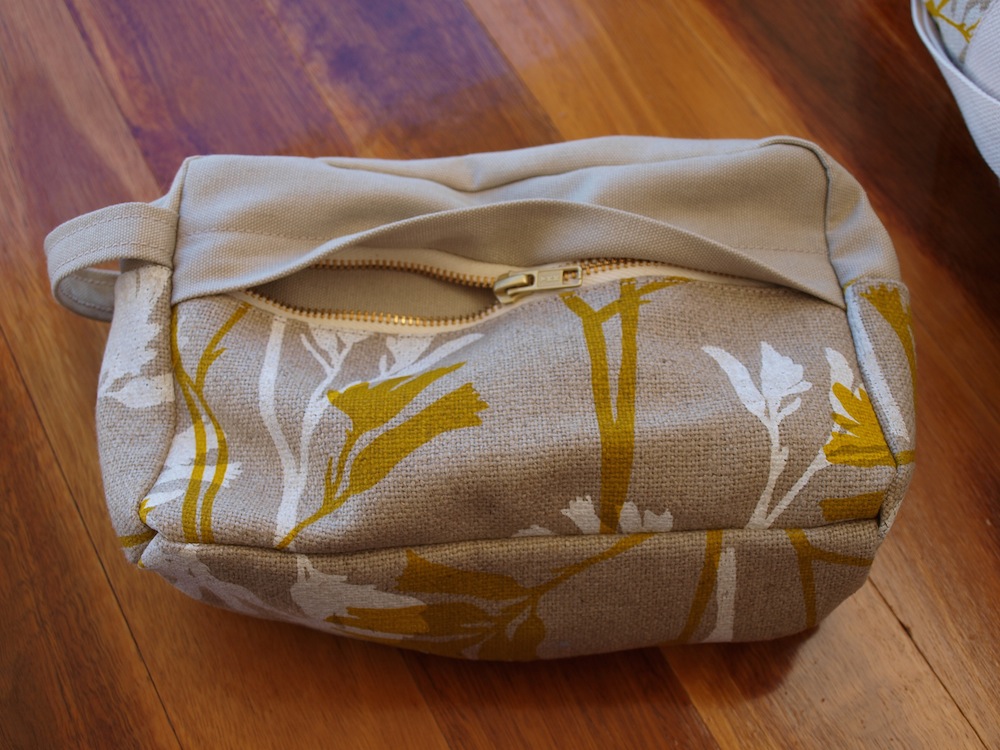
I had to move the handle up a little so I could get the layers of fabric through my machine. The side pocket hidden zip thing is super cute and the kind of detail I love when it comes to sewing, but I’m unlikely to use this part of it. But the size of this little bag is perfect for all my toiletries, which makes me happy. I will be lining it, however – which is not included in the pattern but pretty basic to figure out.
My only issue with the Dopp kit is the pattern piece that goes either side of the top zip. The top zip is specified to be 13″ – and the 13″ zip I bought measured exactly 13″ from the start of the teeth to the end of the teeth. By logic then, the piece either side of the zip with 0.5″ seam allowance should be 14″.

Not so – the pattern piece was exactly 13″ long. I had to add an additional inch to ensure I had adequate seam allowances. My pattern piece is on the top. As this didn’t affect the rest of the pattern pieces and how the Dopp kit came together, I presume it must just be a mistake.
Otherwise, I love my new bags. Easily stored because they can just be rolled up, but both are fabulous in size and convenience for being able to be carried on as hand luggage onto a plane. Definitely a sewing win!


These look so great! What a fun set!
Thanks Sonja! I’m loving them to bits! :)
Gorgeous looking set and a great review.
Cheers Manju :)
Both patterns for your bags have really show cased this beautiful fabric and your sewing skills made them up perfectly.
Cheers Marjorie! :)
Wow, these turned out awesome!!
Better than I could have hoped for, definitely! Thanks Sue :)
Lovely. That gold zipper was worth it, it looks great!
I agree wholeheartedly – the little details always make it special :) Thanks!
This is a lovely set. I especially like the gold hardware and zippers with the neutral tones.
Cheers Jessica! :)
I want to make this NOW! Ink and spindle IS amazing and you’ve totally done it justice here, seriously, your sewing is above and beyond. I love that you paired the I & S with neutral fabrics too, it looks all earthy and yummy and like I’d want to take it away to a log cabin!
Aw thanks! Ink & Spindle fabrics are puuuurfect for bags. They’re so divine and I want to have them ALL. Glad you like it as much as I do – they’ll both be getting good workout!
That bag looks amazing, and the fabric looks so lovely. I feel so inspired to make one up myself!
I can definitely recommend sewing this pattern up! Thanks so much :)
I hadn’t heard of Ink and Spindle before, they have some seriously gorgeous fabric!
Love the bag, that size is so handy and a bit more fancier than a back pack for overnight stays.
Oh they make such divine prints… I want them ALL! I get excited at the idea of overnight trips now, just so I can take this away with me ;) haha, thank Suzy! x
Very impressive make, and I loved seeing the picture of that flower from your part of the world.
Thanks Julie! It’s a favourite flower of mine. Rather rugged and spindly from far away, but with an unexpected delicacy up close :)
These are fantastic! lovely print, Ink and Spindle do beautiful work.
Don’t they just! Thanks so much, Barbara :)
Yum! I’m liking those neutrals. And I think your splurge on hardware and nice zips was worth it; they always elevate a piece!
Oh definitely, the little details make it all. The neutrals came together so much better than I thought they might. Mixing so many different colours together is not normally something I’m confident of. Might try it again some time! Thanks Morgan :)
Fantastic. Gorgeous job and terrific fabric. Let me know when you go into business and I’ll buy one of each!! Love, love love! Cissie
aw, thans Cissie!!! haha :)
This set is just lovely, my favourite flower and all!
Thanks, Sharon! Kangaroo Paw is a gorgeous plant – I saw one the other day that was almost what could be described as ‘hot pink’ – I was in love!
Very neatly sewn; what a great job you’ve done! Love the gold details.
Thanks so much, Stina! :)
Epic win, Mel! This looks tops and the fabric is delish! I made a few dope kits for Christmas presents last year and couldn’t handle the insides so lined them up- it was pretty easy though there a short zip issue too- thought it was just me though. You’ll be ready to travel to Frocktails now ;)
Lining all the way. So glad to hear it wasn’t just me that has had issues with that top zipper piece – I think there is a definitely error going on there. But no matter… Can’t wait for frocktails! This will absolutely be joining me!
So cool! I absolutely love the print fabric you chose.
Thanks Jean! :)
these look great! i had wanted to make this set before our recent vacation but time got away from me… not sure my machine would have been up to it anyways. love the fabric and hardware combo you went with!
You should definitely give it a go – I went with upholstery weight fabric on the bottom and I think you could easily still get away with just a canvas, if you interfaced it to give a bit of stiffness. The upholstery weight fabric was a killer… but worth it. Glad you like it! :)
I love your fabruc choices and the finish is beautiful.I’ve made a lot of bags- and you’re right they can be hard work for your sewing machine motor. I almost always use my industrial machine now as it can handle all those layers a lot easier!
Oh I would LOVE to try-out/own an industrial machine one day. It’s a bit of a distant thought at the moment, but a girl can dream, right? So glad you like them :)
That looks so nice! The gold zipper is perfect and the silk screening is gorgeous!
Isn’t it just? I want to learn how to do screen printing now… Thanks Jennifer! :)
Great set! I too have found that the right hardware is a costly, but worthwhile investment. It makes a bag look so professional and increases durability! Bravo!
The fabric and pattern go together perfectly, and the gold hardware is a really chic touch! You’ve inspired me to try sewing one of these to use as an overnight bag.
You absolutely should – you won’t be disappointed! It’s a really satisfying thing to sew… no fitting and you get to get stuck into your fabric straight away without worrying whether it will turn out right or not! Thanks Alex :)
Isn’t it fun to changes gears a bit and make something like these two wonderful bags? I always find that you can’t make just one… Once you know the pattern and the construction details, it just seems logical to want to make more! (And – they would make excellent gifts!)
Oh yes, I’m hearing you on that – very enjoyable to sew up! I actually have enough fabric left over in both to make a whole ‘nother duffel. So I’m thinking someone with a birthday coming up will get lucky… haha. Thanks! :)
Oh wow, they are gorgeous! The both look so luxurious. Very well done!
Thanks Lovely! :)
I’ve been intrigued by this pattern ever since its release but have just not got round to it. You have really done a great job- very stylish set you’ve got yourself there :) And what a lovely excuse to splurge on some I&S…. I reckon I’d spend just as long trying to decide on which fabric design as sewing the thing up!
Oh it’s seriously about the most perfect application for Ink and Spindle fabrics. I’m now trying to come up with ways I can incorporate their stuff into everyday where… I just love their prints and colours so much! I can absolutely recommend this pattern, it’s a really satisfying sew-up. Thanks Jenny!
These turned out so beautiful! I bet you got so many compliments!
I also struggled with getting the stitching close to the hardware. Unfortunately, I didn’t get close enough and the rings spin around. From carrying a heavy bag and having the rings in the wrong place one ring is actually pulling apart and now I can’t use the strap anymore :(
Yeah, that was really tough. And it looks not-so-nice on the inside! Devastated to hear about your strap though… Argh! I’ll admit I was really particular about making sure it wasn’t carrying too much weight when I took it away with me the other weekend… and I carried it on my shoulder with the two straps around the duffel to make sure the weight didn’t damage the strap (I was even precious about putting it on the conveyor belt through the security screener… those things never look properly clean…). Still… totally loving this bag :) Thanks Lovely!
Gorgeous print on your bag. It’s all come together nicely.
I get thread balls when I sew too for some reason. And I clean the bobbin area a lot.
Yeah I’d love to know if that is a machine issue… maintenance issue… or just a fabric/thread issue. Ah well! We work with what we’ve got :) Thanks, Maria!
Sometimes I think it’s because the thread at the start is too short so I will hold it for the first few threads.
I’m not convinced this is the solution.
Cheers.
No, I’ve noticed that too. If I hold the two thread tails towards the back, it seems less likely to snowball!
Looove these bags! Very cute and practical. I keep forgetting about this pattern!
Thank you for sharing! I’m a visual person and it makes sense after seeing this – about the portion of the pattern that is not sized right – I read others comments about the error as well. Still, I’m going to make one of these duffles, I love the pattern.
Your bags are gorgeous! Zipperstop is awesome but also wanted to share other suppliers for anyone on the prowl for hardware – Wawak.com has a great selection of YKK zippers, I buy most of my hardware (solid stainless and brass) at buckleguy.com and I purchase my webbing either on etsy or Strapworks.com. I’m not affiliated with any of these links. :)
Having a visual is always the easiest way to have that lightbulb moment, isn’t it! Cheers for the links Kim :)